Festive Friday Week 9 – Elegant Holiday & Winter Wedding Cards

Welcome back to another Festive Friday, where I share a brand-new holiday card idea every week! This time, I’m featuring not one, but two elegant card designs—both perfect for Christmas, winter celebrations, and even winter weddings! ❄️✨

Timeless Plaid Meets Last Chance Deals!

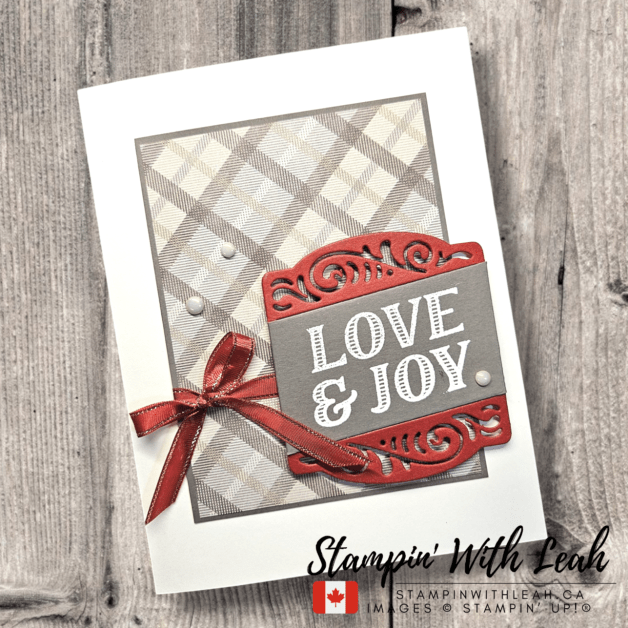
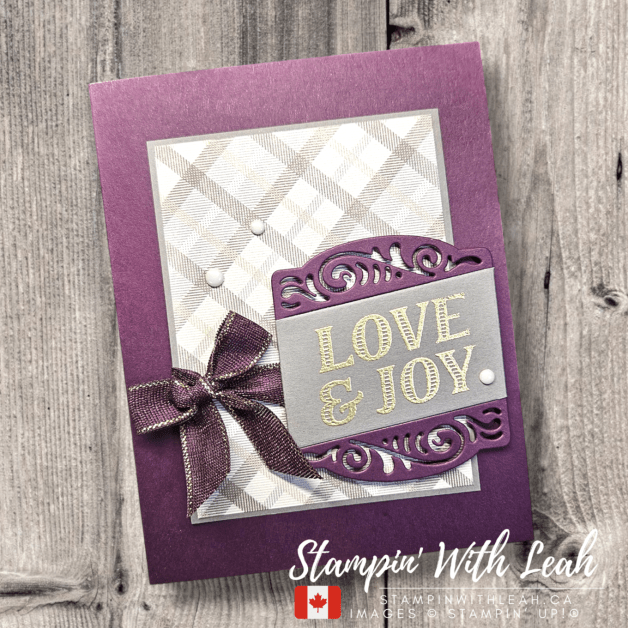
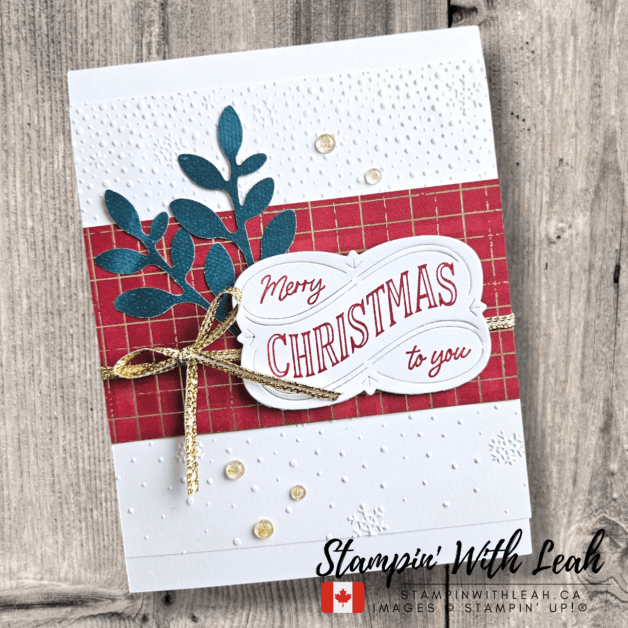
Both cards feature the Timeless Plaid Designer Series Paper on a Pebbled Path cardstock layer. This neutral plaid pattern is a must-have for classic and cozy designs! I also used the Christmas Labels stamp set & coordinating dies, which are currently on the Last Chance list—and here’s a fun tip: purchasing them separately is actually a better deal than the bundle right now! So if you’ve had your eye on these, now is the time to grab them.

Two Color Variations – Which One is Your Favorite?

I had so much fun creating two different versions of this design. While both cards share the same layout and embellishments, the color palettes give them completely different vibes!

❤️ Classic Cherry Cobbler – This version has a traditional holiday feel with Cherry Cobbler cardstock & ribbon paired with a Thick Basic White card base. The sentiment is heat embossed in white, making it pop beautifully against the Pebbled Path label.

💜 Regal Blackberry Bliss – For a more luxurious and unique look, I created this card with Blackberry Bliss cardstock & ribbon (which is also on the Last Chance list!). The sentiment is heat embossed in gold, adding a rich and elegant finish.

Both cards are adorned with Antique Pearls, which add just the right amount of shine and sophistication.


Shop the Supplies Before They’re Gone!

Since some of these items are on the Last Chance list, they won’t be around for long. Grab them before they sell out! Click below to shop directly.

Here’s what I used to create this card:


Versamark Pad
$13.00
Paper Trimmer
$39.00
Simply Shammy
$12.25

Beyond Christmas – Perfect for Winter Weddings!

I love that this sentiment isn’t strictly Christmas-themed! While these make gorgeous holiday cards, they would also be stunning for a winter wedding, anniversary, or even a special thank-you card. The classic fonts and elegant label design make them super versatile.

I’d love to hear what you think! Which version is your favorite – Cherry Cobbler ❤️ or Blackberry Bliss 💜? Let me know in the comments!

Don’t forget to pin this idea for later and follow along for more Festive Friday inspiration each week! 🎄✨

Click here to shop my online store.
Click here to access & view the current catalogs.
Click here to subscribe to Thanks for hopping by! Make sure to pin this post for future reference and share it with your crafty friends.those fun Paper Pumpkin kits of creativity!
Click here for more information about joining my Online Monthly Technique Club. Earn even more goodies by joining a club!
Click here to learn more about joining my Ink Pad Pals Team. Get the MOST rewards including a discount on future products!
Follow me on social media! I share regularly on PinterestYouTube, and Facebook!
Please subscribe to my newsletter, too! Click here and enter your email. When you include your birthday you will even be added to my birthday card mailing list 🙂


Festive Friday Week 8 – A Classic Christmas with More Wishes & Take a Bow DSP

Welcome back to Festive Friday! This week’s card brings classic Christmas charm with bold typography and festive holly details. I used the More Wishes Stamp Set, Take a Bow 6×6 DSP, and the Snowflake Sky 3D Embossing Folder to create a clean and modern holiday design. ❄️❤️

Let’s take a closer look at this week’s festive creation! 🎄


The Card Design

This design is all about layers, texture, and festive details! The sentiment is fussy cut and placed at an angle, adding a dynamic touch to the layout. The holly leaves were carefully trimmed from the Take a Bow DSP, bringing in a natural element that ties everything together. Layered patterned paper creates a fun backdrop, and the crisp border of the Nested Essentials Die with rounded corners frames the sentiment beautifully. The Cherry Cobbler & Pearl Adhesive-backed Berries add the perfect sparkle, making the holly come to life with a festive shimmer.

Card Highlights:

  • Fussy-cut sentiment angled for a playful layout
  • Holly elements hand-cut from DSP for a coordinated embellishment
  • Layered DSP panels add depth and contrast
  • Embossed background for subtle texture
  • Nested Essentials Die with rounded corners for a polished frame
  • Sparkling adhesive-backed berries for a festive finishing touch

Supplies Used

Here’s what I used to create this card:


Paper Snips
$16.50

Step-by-Step Instructions

  1. Create the Card Base: Cut Basic White cardstock to 5-1/2” x 8-1/2”, score at 4-1/4”, and fold.
  2. Emboss the Background: Use the Snowflake Sky 3D Embossing Folder on a 4″ X 5-1/4″ Basic White panel for a subtle textured backdrop. Adher the panel to the card base with Liquid Glue.
  3. Layer the DSP: Cut two panels of Take a Bow 6×6 DSP at 2-3/4″ X 4″, adhere them to the card front slightly offset for dimension.
  4. Stamp the Sentiment: Ink the MERRY image from the More Wishes stamp set in Real Red and stamp onto the top left corner of the 2nd largest rounded rectangle from the Nested Essential Dies. Then stamp the christmas image on a scrap paper in Real Red Ink, fussy cut and adhere to the die-cut panel using Mini Glue Dots. Adhere this panel to the center left of the card front using Dimensionals.
  5. Fussy Cut the Holly: Trim holly leaves from the Take a Bow DSP and adhere near the sentiment.
  6. Embellish: Add Cherry Cobbler & Pearl Adhesive-backed Berries to the holly leaves for the perfect finishing touch.

Why I Love This Design

This card is bright, fun, and festive! The Take a Bow DSP brings in cheerful holiday patterns, while the embossed background adds elegant texture. The fussy-cut holly and berries provide a special handmade touch that makes this design feel extra merry! 🎄✨

Don’t Miss Out – Today is the Last Day of Sale-a-bration!

🚨 Act now! Today is the FINAL DAY of Sale-a-bration! Don’t miss your chance to earn FREE exclusive products with your purchase or take advantage of the amazing Starter Kit special to join my team! More details are below.

📌 Shop now or sign up before it’s too late!

Are you crafting your Christmas cards yet? Don’t wait until the holiday rush—start now and enjoy the process!

📌 Pin this post for inspiration & share it with your crafty friends!

See you next week for another Festive Friday creation! 🎄✨

A perk to ordering with me in the month of February is that with any order over $75cdn, you will receive a FREE SAB item and I am emailing out an amazing 37 project Tutorial Bundle. Just use the host code below. As a member of my team you get free access to this Tutorial Bundle.

Let’s Craft Together!

I’d love for you to join one of my in-person card classes:

These classes are perfect for all skill levels and are a great way to learn new techniques, try out Stampin’ Up! products, and connect with other cardmakers. Spots fill up quickly, so be sure to register early!

Also, don’t forget to sign up for my Stampin’ With Leah Newsletter to get all the details on upcoming events, promotions, and creative tips. You won’t want to miss out!

Live in Canada, don’t have a demonstrator? Contact me to get a catalogue or find out why right now is a great time to join my team.

You can see all the benefits of joining my team (the Ink Pad Pals) by clicking the image below. Right now there are even more perks to joining during Sale-a-bration!

Click here to shop my online store.
Click here to access & view the current catalogs.
Click here to subscribe to Thanks for hopping by! Make sure to pin this post for future reference and share it with your crafty friends.those fun Paper Pumpkin kits of creativity!
Click here for more information about joining my Online Monthly Technique Club. Earn even more goodies by joining a club!
Click here to learn more about joining my Ink Pad Pals Team. Get the MOST rewards including a discount on future products!
Follow me on social media! I share regularly on PinterestYouTube, and Facebook!
Please subscribe to my newsletter, too! Click here and enter your email. When you include your birthday you will even be added to my birthday card mailing list 🙂


Festive Friday Week 7 – Nests of Winter with Everyday Arches Dies

Welcome back to Festive Friday! This week’s card features the Everyday Arches Dies, Greetings of the Season Stamp Set, and the Nests of Winter DSP for a soft, wintery holiday look. ❄️ The background, embossed with the Snowflake Sky 3D Embossing Folder and brushed with White Craft Ink, adds the perfect snowy effect. Plus, I’ve added a touch of shimmer using the FREE Sale-A-Bration Night of Navy & Gold Glittered Ribbon! ✨

Let’s take a closer look at this week’s festive design! 🎄


The Card Design

This design showcases elegant winter birds, layered with the Everyday Arches Dies to frame the delicate branches from the Nests of Winter DSP. The cool tones and subtle texture create a calm and cozy holiday feel—perfect for sending warm winter wishes!

Card Highlights:

  • Dies & Stamps: Everyday Arches Dies & Greetings of the Season Stamp Set
  • Designer Series Paper: Nests of Winter DSP
  • Embossing: Snowflake Sky 3D Embossing Folder (with White Craft Ink for added depth)
  • Color Palette: Gray Granite, Night of Navy, Basic White
  • Embellishments: Neutrals Adhesive-backed Sequins & FREE Night of Navy & Gold Glittered Ribbon

Supplies Used

Here’s what I used to create this card:


Paper Snips
[103579]
$16.50

Step-by-Step Instructions

  1. Create the Card Base: Cut Gray Granite cardstock to 5-1/2” x 8-1/2”, score at 4-1/4”, and fold.
  2. Emboss the Background: Run a 4″ X 5-1/4″ Gray Granite panel through the Snowflake Sky 3D Embossing Folder, then lightly brush with White Craft Ink for contrast.
  3. Die-Cut the Arch Frame: Use the Everyday Arches Dies (3rd and 4th largest) to cut Night of Navy and DSP layers, adhere together and attach to the embosssed layer.
  4. Tie it all together: Tie a Night of Navy & Gold Glittered Ribbon around the embossed layer and make a bow on the right side. Adhere this layer to the card base.
  5. Stamp the Sentiment: Stamp “Merry” and “Christmas” in Night of Navy ink on the left side of the largest Basic White Stylish Shapes banner. Use Mini Dimensionals to attach to the card front, then trim the right edge off of the label.
  6. Embellish: Attach 3 white Neutrals Adhesive-backed Sequins for a snowy finish!

Why I Love This Design

This card has sophisticated elegance with minimal effort! The Everyday Arches Dies create a beautiful frame, and the embossed snowflake background gives a subtle, frosty effect. Plus, the Nests of Winter DSP provides a soft and serene winter scene, making this card perfect for the holidays!


Love this look? Don’t miss out on the FREE Night of Navy & Gold Glittered Ribbon—available during Sale-A-Bration with a qualifying purchase! 🎁

📌 Pin this post for inspiration & share it with your crafty friends!

See you next week for another Festive Friday creation! 🎄✨

A perk to ordering with me in the month of February is that with any order over $75cdn, you will receive a FREE SAB item and I am emailing out an amazing 37 project Tutorial Bundle. Just use the host code below. As a member of my team you get free access to this Tutorial Bundle.

Let’s Craft Together!

I’d love for you to join one of my in-person card classes:

These classes are perfect for all skill levels and are a great way to learn new techniques, try out Stampin’ Up! products, and connect with other cardmakers. Spots fill up quickly, so be sure to register early!

Also, don’t forget to sign up for my Stampin’ With Leah Newsletter to get all the details on upcoming events, promotions, and creative tips. You won’t want to miss out!

Live in Canada, don’t have a demonstrator? Contact me to get a catalogue or find out why right now is a great time to join my team.

You can see all the benefits of joining my team (the Ink Pad Pals) by clicking the image below. Right now there are even more perks to joining during Sale-a-bration!

Click here to shop my online store.
Click here to access & view the current catalogs.
Click here to subscribe to Thanks for hopping by! Make sure to pin this post for future reference and share it with your crafty friends.those fun Paper Pumpkin kits of creativity!
Click here for more information about joining my Online Monthly Technique Club. Earn even more goodies by joining a club!
Click here to learn more about joining my Ink Pad Pals Team. Get the MOST rewards including a discount on future products!
Follow me on social media! I share regularly on PinterestYouTube, and Facebook!
Please subscribe to my newsletter, too! Click here and enter your email. When you include your birthday you will even be added to my birthday card mailing list 🙂


Festive Friday Week 6 – Elegant Z-Fold with Winter Meadow DSP

Welcome back to Festive Friday! This week, I’m featuring a beautiful Z-Fold Christmas card using the Winter Meadow Designer Series Paper (DSP) and the Greeting of the Season Bundle—which is currently on the Last Chance List! ❄️ If you love this elegant holiday set, now is the time to grab it before it’s gone!

Let’s take a closer look at this week’s design! 🎄✨


The Card Design

Z-Fold cards are a fun and easy way to add dimension to your projects while keeping the design simple and elegant. The stunning watercolor prints in the Winter Meadow DSP set the perfect wintery backdrop, while the oval die-cut and Bough punch greenery adds a festive touch.

Card Highlights:

  • Stamp Set & Dies: Greetings of the Season Bundle (Last Chance List!)
  • Fancy Fold: Z-Fold layout for added interest
  • Color Palette: A cool and elegant mix of Night of Navy, Misty Moonlight, and Garden Green
  • Elegant Accents: Navy and gold ribbon with sequins embellishments for a festive sparkle
  • Wintery Vibes: Soft watercolor backgrounds from Winter Meadow DSP

Supplies Used

Here’s what I used to create this card:


Bough Punch
[157711]
$33.00
Paper Snips
[103579]
$16.50

Step-by-Step Instructions

  1. Create the Card Base: Mark a full sheet of Night of Navy cardstock at 3″ down on the right and 3″ up on the left. Then cut lengthwise on that diagonal. Then score at 3” and 6-3/4” to create the Z-Fold. This will create 2 card bases.
  2. Add Designer Paper: Cut tops on a diagonal and adhere pieces of Winter Meadow DSP to each panel of the card base. (2-3/4″ X 3-1/2″ ( front panel), 3-1/2″ X 4-1/4″ (middle panel), 4″ X 5-1/4″ ( back panel).
  3. Stamp & Die Cut: Stamp the sentiment in Night of Navy ink on a Basic White die-cut oval from the Greeting of the Season Bundle. Adhere to the card front using Dimensionals.
  4. Add Greenery: Use Garden Green Ink and a blending brush to apply colour to two Bough Punch cut-outs. Tuck them behind the sentiment and adhere with Liquid Glue.
  5. Finishing Touches: Attach a Navy & Gold ribbon bow to the oval and scatter a few gold sequins for extra sparkle.

Why I Love This Design

Z-Fold cards are simple yet impressive, making them great for special holiday greetings. The Winter Meadow DSP creates a soft, snowy background, while the Greeting of the Season Bundle provides an elegant finishing touch. This is a design you can easily recreate with different colors and papers!


Love this card? Don’t forget—the Greeting of the Season Bundle is on the Last Chance List, so grab it while you can!

📌 Pin this post for inspiration and share with your crafty friends!

Happy stamping, and see you next week for another Festive Friday creation! 🎄

A perk to ordering with me in the month of February is that with any order over $75cdn, you will receive a FREE SAB item and I am emailing out an amazing 37 project Tutorial Bundle. Just use the host code below. As a member of my team you get free access to this Tutorial Bundle.

Let’s Craft Together!

I’d love for you to join one of my in-person card classes:

These classes are perfect for all skill levels and are a great way to learn new techniques, try out Stampin’ Up! products, and connect with other cardmakers. Spots fill up quickly, so be sure to register early!

Also, don’t forget to sign up for my Stampin’ With Leah Newsletter to get all the details on upcoming events, promotions, and creative tips. You won’t want to miss out!

Live in Canada, don’t have a demonstrator? Contact me to get a catalogue or find out why right now is a great time to join my team.

You can see all the benefits of joining my team (the Ink Pad Pals) by clicking the image below. Right now there are even more perks to joining during Sale-a-bration!

Click here to shop my online store.
Click here to access & view the current catalogs.
Click here to subscribe to Thanks for hopping by! Make sure to pin this post for future reference and share it with your crafty friends.those fun Paper Pumpkin kits of creativity!
Click here for more information about joining my Online Monthly Technique Club. Earn even more goodies by joining a club!
Click here to learn more about joining my Ink Pad Pals Team. Get the MOST rewards including a discount on future products!
Follow me on social media! I share regularly on PinterestYouTube, and Facebook!
Please subscribe to my newsletter, too! Click here and enter your email. When you include your birthday you will even be added to my birthday card mailing list 🙂


Festive Friday Week 5 – Quick & Simple with the Christmas Labels Stamp Set

Welcome back to Festive Friday! This week’s card is a special one—it’s my first card post-surgery, and I’m so happy to be back crafting! Since I needed something easy and stress-free, I created a quick and simple Christmas card featuring the Christmas Labels Stamp Set & Dies. This bundle is currently on the Last Chance List, so if you love it, now is the time to grab it before it’s gone! ⏳

Let’s take a closer look at this week’s design! 🎄✨


The Card Design

For this week’s layout, I kept things clean and simple, focusing on the gorgeous label die and festive stamped elements. This design is perfect for mass-producing if you’re getting a head start on holiday cards for Christmas 2025!

Card Highlights:

  • Stamp Set & Dies: Christmas Labels Stamp Set & Dies (Last Chance List!)
  • Quick & Simple Layout: A great go-to design when you need an easy yet beautiful card.
  • Festive Color Palette: A rich combination of Cherry Cobbler, Basic White, and Pretty Peacock for a classic holiday feel.
  • Elegant Texture: The embossed background adds a soft snowfall effect, making the design extra special.
  • Metallic Accents: A gold trim bow and subtle embellishments bring warmth and shimmer to the card.

Supplies Used

Here’s what I used to create this card:


Bough Punch
[157711]
$33.00
Paper Snips
[103579]
$16.50

Step-by-Step Instructions

  1. Prepare the Card Base: Cut a piece of Thick Basic White cardstock to 4-1/4” x 11”, scored at 5-1/2”.
  2. Emboss the 2nd layer: Use the Snowflake Sky 3D embossing folder to add a soft snowfall texture to a 4-1/4” x 4-3/4” piece of Basic White cardstock.
  3. Add Designer Series Paper: Cut a 4-1/4″ X 2-1/4″strip of Regal Distressed Pattern DSP (Cherry Cobbler and gold grid) and adhere it across the center of the embossed layer.
  4. Add Ribbon: Wrap a piece of gold trim and make a bow on the left side for a touch of elegance and then secure the whole layer to the card base.
  5. Die-Cut the Label: Using the Christmas Labels Dies, cut a decorative label from Basic White cardstock.
  6. Stamp the Sentiment: In Cherry Cobbler ink, stamp a holiday sentiment from the Christmas Labels Stamp Set onto the label. Attach this label to the right side of the card front using Dimenisonals.
  7. Create the Foliage Accent: Use the Bough Punch to create the Pretty Peacock foliage from the Season of Elegance DSP and tuck them behind the sentiment label, hold in place with Mini Glue Dots.
  8. Add Finishing Touches: Scatter a few Iridescent Foil Gems for subtle sparkle.

Why I Love This Design

Sometimes, simple is best! 💕 This layout is fast, elegant, and easy to replicate, making it a great choice for mass-producing holiday cards. Whether you’re crafting after a break (like me!) or just need a quick holiday project, this design is perfect.

If you love this Christmas Labels Stamp Set & Dies, don’t wait—it’s on the Last Chance List and won’t be around for long! 🎁 Shop now to grab yours before it retires!

Don’t forget to pin this post for inspiration and share with your crafty friends!

Happy stamping, and see you next week for another Festive Friday creation!

A perk to ordering with me in the month of February is that with any order over $75cdn, you will receive a FREE SAB item and I am emailing out an amazing 37 project Tutorial Bundle. Just use the host code below. As a member of my team you get free access to this Tutorial Bundle.

Let’s Craft Together!

I’d love for you to join one of my in-person card classes:

These classes are perfect for all skill levels and are a great way to learn new techniques, try out Stampin’ Up! products, and connect with other cardmakers. Spots fill up quickly, so be sure to register early!

Also, don’t forget to sign up for my Stampin’ With Leah Newsletter to get all the details on upcoming events, promotions, and creative tips. You won’t want to miss out!

Live in Canada, don’t have a demonstrator? Contact me to get a catalogue or find out why right now is a great time to join my team.

You can see all the benefits of joining my team (the Ink Pad Pals) by clicking the image below. Right now there are even more perks to joining during Sale-a-bration!

Click here to shop my online store.
Click here to access & view the current catalogs.
Click here to subscribe to Thanks for hopping by! Make sure to pin this post for future reference and share it with your crafty friends.those fun Paper Pumpkin kits of creativity!
Click here for more information about joining my Online Monthly Technique Club. Earn even more goodies by joining a club!
Click here to learn more about joining my Ink Pad Pals Team. Get the MOST rewards including a discount on future products!
Follow me on social media! I share regularly on PinterestYouTube, and Facebook!
Please subscribe to my newsletter, too! Click here and enter your email. When you include your birthday you will even be added to my birthday card mailing list 🙂


Festive Friday Week 4 – Spotlight on the One of a Kind Stamp Set!

Happy Friday, friends! Welcome to Week 4 of my Festive Friday series. This project is part of my 2025 crafting goals to create one Christmas card every week, and I’m so excited to share this week’s creation with you. Keeping up with this challenge has been so inspiring, and I hope it’s bringing you some holiday cheer as well!

This week’s card features the One of a Kind Stamp Set and a gorgeous color palette of Blueberry Bushel, Balmy Blue, and Azure Afternoon. With the addition of Pastel Ombre Glimmer Specialty Paper and Iridescent Faceted Gems, this card sparkles in all the right ways. Let’s take a closer look at the details!


The Card Design

For this week’s design, I wanted to focus on simplicity with a touch of elegance. The One of a Kind Stamp Set provides beautiful imagery that shines on its own, while the glimmer paper and gems add the perfect festive sparkle.

Here are some highlights of the card:

  • Color Palette: The combination of Blueberry Bushel, Balmy Blue, and Azure Afternoon creates a wintery vibe that’s fresh and modern.
  • Specialty Paper: A strip of Pastel Ombre Glimmer Specialty Paper adds shimmer and visual interest without overpowering the stamped details.
  • Embellishments: Iridescent Faceted Gems provide the perfect finishing touch, adding dimension and sparkle.

This card is perfect for mass production or as a special one-off design for someone who loves a touch of holiday glamour.

Supplies Used

Here’s what I used to create this card:


Why I Love the One of a Kind Stamp Set

This stamp set is perfect for clean and simple designs that still feel special. The images are so versatile, allowing you to create everything from minimalist cards to more elaborate designs. Paired with a touch of sparkle from the Glimmer Specialty Paper and gems, it’s a winning combination for holiday crafting.

Are you ready to add the One of a Kind Stamp Set to your collection? It’s the perfect choice for creating elegant holiday cards with ease. Visit my online store to shop your favorite supplies today and join me in crafting all year long!

Don’t forget to subscribe to my blog and follow me on social media for weekly Festive Friday inspiration. Let me know in the comments: What’s your favorite way to add sparkle to your cards?

Happy stamping, and I’ll see you next Friday for another Festive Friday creation!

A perk to ordering with me in the month of January or February is that with any order over $75cdn, you will receive a FREE SAB item and I am emailing out an amazing 30+ project Tutorial Bundle. Just use the host code below. As a member of my team you get free access to this Tutorial Bundle.

Let’s Craft Together!

I’d love for you to join one of my in-person card classes:

These classes are perfect for all skill levels and are a great way to learn new techniques, try out Stampin’ Up! products, and connect with other cardmakers. Spots fill up quickly, so be sure to register early!

Also, don’t forget to sign up for my Stampin’ With Leah Newsletter to get all the details on upcoming events, promotions, and creative tips. You won’t want to miss out!

Live in Canada, don’t have a demonstrator? Contact me to get a catalogue or find out why right now is a great time to join my team.

You can see all the benefits of joining my team (the Ink Pad Pals) by clicking the image below. Right now there are even more perks to joining during Sale-a-bration!

Click here to shop my online store.
Click here to access & view the current catalogs.
Click here to subscribe to Thanks for hopping by! Make sure to pin this post for future reference and share it with your crafty friends.those fun Paper Pumpkin kits of creativity!
Click here for more information about joining my Online Monthly Technique Club. Earn even more goodies by joining a club!
Click here to learn more about joining my Ink Pad Pals Team. Get the MOST rewards including a discount on future products!
Follow me on social media! I share regularly on PinterestYouTube, and Facebook!
Please subscribe to my newsletter, too! Click here and enter your email. When you include your birthday you will even be added to my birthday card mailing list 🙂


Festive Friday Week 3 – Spotlight on the Take a Bow DSP

Happy Friday, stamping friends! Welcome back to Festive Friday, where I share holiday card inspiration to keep your Christmas crafting on track all year long. This week, I’ve paired the versatile Take a Bow Designer Series Paper (DSP) with the Peaceful Season Stamp Set and Dies. These products create a stunning mix of festive textures and classic holiday charm.

The bold patterns of the DSP shine as a focal point, while subtle embossed backgrounds add texture and depth to the designs. I kept the color palette traditional with shades of green, red, and white, adding pops of sparkle and dimension with glimmer paper accents, linen thread, and sequins.

Whether you’re drawn to elegant sentiments like “Peace & Joy” or bold greetings like “Merry Christmas,” these cards are simple yet impactful, perfect for spreading holiday cheer.

Why You’ll Love These Products:

  • Take a Bow DSP: The festive patterns and rich colors make it a versatile choice for holiday projects.
  • Peaceful Season Stamp Set and Dies: With timeless holiday greetings and elegant coordinating dies, this set is a must-have for Christmas crafting.

Sale-A-Bration & Last Chance Reminder:

  • The Peaceful Season Stamp Set and Dies are on the Last Chance List—grab them before they’re gone!
  • Don’t forget, every $75 CAD purchase during Sale-A-Bration earns you a free reward, making it the perfect time to stock up on your crafting essentials.

Supplies Used

Here’s what I used to create this card:


A perk to ordering with me in the month of January is that with any order over $75cdn, you will receive a FREE SAB item and I am emailing out an amazing 38 project Tutorial Bundle. Just use the host code below. As a member of my team you get free access to this Tutorial Bundle.

Let’s Craft Together!

I’d love for you to join one of my in-person card classes:

These classes are perfect for all skill levels and are a great way to learn new techniques, try out Stampin’ Up! products, and connect with other cardmakers. Spots fill up quickly, so be sure to register early!

Also, don’t forget to sign up for my Stampin’ With Leah Newsletter to get all the details on upcoming events, promotions, and creative tips. You won’t want to miss out!

Live in Canada, don’t have a demonstrator? Contact me to get a catalogue or find out why right now is a great time to join my team.

You can see all the benefits of joining my team (the Ink Pad Pals) by clicking the image below. Right now there are even more perks to joining during Sale-a-bration!

These cards were such a joy to create, and I hope they inspire you to make your own holiday projects. I’d love to hear which products you’re excited to craft with—let me know in the comments below!

Click here to shop my online store.
Click here to access & view the current catalogs.
Click here to subscribe to Thanks for hopping by! Make sure to pin this post for future reference and share it with your crafty friends.those fun Paper Pumpkin kits of creativity!
Click here for more information about joining my Online Monthly Technique Club. Earn even more goodies by joining a club!
Click here to learn more about joining my Ink Pad Pals Team. Get the MOST rewards including a discount on future products!
Follow me on social media! I share regularly on PinterestYouTube, and Facebook!
Please subscribe to my newsletter, too! Click here and enter your email. When you include your birthday you will even be added to my birthday card mailing list 🙂


Festive Friday Week 2 – Featuring the Iconic Imagery Bundle!

Happy Friday, friends! I’m so excited to share my second Festive Friday creation with you. This series is part of my crafting goals for 2025: to create one Christmas card every week and keep the holiday spirit alive year-round. It’s been such a joy to embrace this challenge and spark inspiration for Christmas crafting early in the year.

This week’s card spotlights the Iconic Imagery Stamp Set and Dies Bundle, and the Iconic Celebrations Designer Series Paper (DSP). These products are a dream for creating timeless designs with a touch of elegance. Let’s dive into the details of this project!

The Card Design

For this card, I wanted to showcase the versatility of the Iconic Imagery Bundle. The layered DSP creates depth and adds a beautiful contrast between the soft pinks and vibrant greens. The stamped images are simple yet striking, perfectly complementing the patterns in the DSP.

Here are some of the key features of this card:

  • Background Stamping: I used the foliage stamps from the Iconic Imagery set to add subtle details to the green card base, creating a cohesive look.
  • Layered DSP: The Designer Series Paper adds so much interest with its mix of classic Christmas motifs. The pink tree pattern is one of my favorites, offering a fresh take on holiday colors.
  • Focal Point: The “Celebrate the Season” sentiment is fussy-cut and layered on a stitched circle, accented with stamped greenery and Adhesive-backed Pearl Trio “berries” for a polished finish.

This design is perfect for mass-producing Christmas cards or as a one-of-a-kind creation for someone special!

Supplies Used

Here’s what I used to create this card:


Paper Snips
[103579]
$16.50

Step-by-Step Instructions

  1. Prepare Your Base: Start with a Thick Basic White card base. Cut it to 8-1/2” x 5-1/2” and score at 4-1/4”. Stamp the foliage images randomly across the background in Mossy Meadows ink.
  2. Layer the DSP: Cut pieces of the Iconic Imagery DSP to 3” x 4” and 2” x 4”. Layer them on the card base, slightly offset for added dimension.
  3. Create the Sentiment: Stamp “Celebrate the Season” in Rich Razzleberry ink on Basic White cardstock. Die-cut the sentiment and a stitched circle using the Iconic Imagery Dies. Stamp greenery and berries on the circle for a decorative touch.
  4. Assemble the Card: Adhere the stitched circle and sentiment to the card using Stampin’ Dimensionals. Add a few adhesive-backed pearls to the berries for added detail.
  5. Finishing Touches: Double-check your card for balance and alignment, and it’s ready to go!

Why I Love the Iconic Imagery Bundle

This bundle is perfect for crafters who love timeless designs and versatile products. Whether you’re creating cards, tags, or scrapbook layouts, the stamps and dies in this set are endlessly inspiring. Plus, the DSP’s mix of traditional and modern patterns makes it a must-have for holiday crafting.


Shop and Earn Free Products!

Ready to start your Christmas crafting goals? The Iconic Imagery Stamp Set, Bundle, and DSP are available now, but don’t wait too long – these products are flying off the shelves! Visit my online store to shop your favorites and join me in making 2025 a year full of festive creativity. Now is a great time to shop as well since for every $75 you spend, you earn a FREE Sale-a-bration item.

Don’t forget to subscribe to my blog and follow me on social media for weekly Festive Friday inspiration! Let me know in the comments: What colors or designs are inspiring your Christmas crafting this year?

Happy stamping, and I’ll see you next Friday for another Festive Friday creation!

A perk to ordering with me in the month of January is that with any order over $75cdn, you will receive a FREE SAB item and I am emailing out an amazing 38 project Tutorial Bundle. Just use the host code below. As a member of my team you get free access to this Tutorial Bundle.

To make sure you learn about all my upcoming events and don’t miss any sales join my newsletter or check out everything at linktr.ee/stampinwithleah.

Live in Canada, don’t have a demonstrator? Contact me to get a catalogue or find out why right now is a great time to join my team.

You can see all the benefits of joining my team (the Ink Pad Pals) by clicking the image below. Right now there are even more perks to joining during Sale-a-bration!

Thanks for hopping by! Make sure to pin this post for future reference and share it with your crafty friends.

Click here to shop my online store.
Click here to access & view the current catalogs.
Click here to subscribe to Thanks for hopping by! Make sure to pin this post for future reference and share it with your crafty friends.those fun Paper Pumpkin kits of creativity!
Click here for more information about joining my Online Monthly Technique Club. Earn even more goodies by joining a club!
Click here to learn more about joining my Ink Pad Pals Team. Get the MOST rewards including a discount on future products!
Follow me on social media! I share regularly on PinterestYouTube, and Facebook!
Please subscribe to my newsletter, too! Click here and enter your email. When you include your birthday you will even be added to my birthday card mailing list 🙂


Coast to Coast Creators Blog Hop: December 2024 Sketch Challenge Card

Hello, stamping friends! I’m thrilled to join you for another exciting Coast to Coast Creators Blog Hop. This hop consistently takes place on the 14th of every month, making it a regular date for creativity and inspiration. This month, the theme is all about a sketch challenge that inspires us to think outside the box and create something uniquely our own.

If you’re new here, welcome to Stampin With Leah! I’m Leah, an avid Stampin’ Up! demonstrator passionate about bringing creativity and inspiration to your crafting journey. Let’s jump into the details of this month’s project and explore how you can interpret a sketch to design stunning cards.

Working with the Sketch

Sketch challenges are a fantastic way to kickstart your creativity. They provide a layout framework while allowing endless customization to suit your style. For this hop, I used the provided sketch to guide my design process, blending clean lines, subtle colors, and a touch of sparkle to bring the layout to life.

Here’s how I brought the design to life:

Materials:

  • Cardstock: Basic White and Thick Basic White
  • Ink Pads: Balmy Blue, Blueberry Bushel, Boho Blue
  • Stamps and Dies: Snowflake image, sentiment, and dies from the Iconic Imagery Bundle
  • Stylish Shapes Dies: Smallest square for stitched diamonds
  • Adhesive: Stampin’ Dimensionals and Multipurpose Liquid Glue
  • Embellishments: Rhinestone Basic Jewels

Instructions:

Base Layer: Start with an A2 card base (5-1/2” x 8-1/2”, scored at 4-1/4”) in Thick Basic White and a 4″ x 5-1/4″ layer to create on.

Focal Elements: Die-cut three stitched diamond shapes from Basic White cardstock using the smallest square die from the Stylish Shapes Dies. Stamp snowflake designs one in Balmy Blue, one in Blueberry Bushel, and one in Boho Blue. Die cut the images and attach to the squares using Dimensionals for added depth. Arrange the diamonds in a cluster at the center of the 4″ X 5-1/4″ Basic White layer, adhering with Liquid Glue.

Sentiment: Stamp the “Celebrate the Season” sentiment in Blueberry Bushel directly onto the card front, slightly offset below the snowflake cluster to follow the sketch’s layout. Once all the stamping is done, use Dimensionals to adhere the layer tot he card base.

Finishing Touches: Add Rhinestone Basic Jewels around the snowflakes and sentiment for a touch of sparkle and elegance.

Tips for Success

  • Keep It Clean: A clean design lets the sketch shine while emphasizing the stamped details.
  • Play with Placement: Arrange your elements to create balance and harmony within the sketch framework.
  • Add Subtle Sparkle: Rhinestones are perfect for adding a festive touch without overpowering the design.

Explore More Creations

Don’t stop here! Be sure to check out the other talented creators participating in the Coast to Coast Blog Hop. Each crafter has put their own spin on this month’s sketch, and you’re bound to find endless inspiration.

Join the Fun!

I hope this project inspires you to take on a sketch challenge and create something beautiful. Leave a comment below to share how you’re using sketches to inspire your crafting—I’d love to see your creations!

And don’t forget to subscribe to my newsletter for the latest updates on classes, promotions, and exclusive tutorials.

Here is a full list of supplies needed to create this card.


Paper Snips
[103579]
$16.50

A perk to ordering with me in the month of December is that with any order over $65cdn, I am emailing out an amazing 29 project Tutorial Bundle. Just use the host code below. As a member of my team you get free access to this Tutorial Bundle.

To make sure you learn about all my upcoming events and don’t miss any sales join my newsletter or check out everything at linktr.ee/stampinwithleah.

Live in Canada, don’t have a demonstrator? Contact me to get a catalogue or find out why right now is a great time to join my team.

You can see all the benefits of joining my team (the Ink Pad Pals) by clicking the image below.

Thanks for hopping by! Make sure to pin this post for future reference and share it with your crafty friends.

Click here to shop my online store.
Click here to access & view the current catalogs.
Click here to subscribe to Thanks for hopping by! Make sure to pin this post for future reference and share it with your crafty friends.those fun Paper Pumpkin kits of creativity!
Click here for more information about joining my Online Monthly Technique Club. Earn even more goodies by joining a club!
Click here to learn more about joining my Ink Pad Pals Team. Get the MOST rewards including a discount on future products!
Follow me on social media! I share regularly on PinterestYouTube, and Facebook!
Please subscribe to my newsletter, too! Click here and enter your email. When you include your birthday you will even be added to my birthday card mailing list 🙂


Hand Stamped Sentiments Challenge # 453- Inspiration Challenge

This week’s Hand Stamped Sentiments challenge is a festive Inspiration Challenge. I used the very fun Humble Home stamp set and punch bundle, from Stampin’ Up! The rest of the design team have also created beautiful cards using the inspiration collage below. Hop over to the Hand Stamped Sentiments page to view them all and then join the challenge.

Here is my card created using this inspiration collage. You could have fun switching up the DSP and colour schemes too.

You can find a full list of materials used below, as well as a printable recipe card for making this Humble Home card. You can order any of these supplies from me here: https://www.stampinup.ca?hostcode=X7VTGRN4


In addition, when you use my host code this month I will also send you the link to a fantastic 29 project Tutorial Bundle as a thank you!

Looking for some more fun stamping experiences in person or online?

If you are local to Port Coquitlam, join me in person for Coffee and Cards on Jan 4th or contact me to book your own card class. Check out my calendar of events at my website.

I also have a Kit Night (register below) and a New Mini Catalogue Launch (details coming up soon).

Yet another FABULOUS way to stamp with me is to join my team. It is a great deal on your supplies, plus you get 20%+ off your future orders. The best part though is that you get free access to my monthly card class to go tutorials, my crafty collaborations MEGA tutorial each month and we have monthly team meetings where we stamp together. So much fun!

To make sure you learn about all my upcoming events and don’t miss any sales join my newsletter or check out everything at linktr.ee/stampinwithleah. You can also sign up for my newsletter (link below) so you don’t miss out on any of my events.

Live in Canada, don’t have a demonstrator? Contact me to get a catalogue or find out why right now is a great time to join my team.

Please leave a comment below and make sure to follow this blog for more great inspiration!

Click here to shop my online store.
Click here to access & view the current catalogs.
Click here to subscribe to those fun Paper Pumpkin kits of creativity!
Click here for more information about joining my Online Monthly Technique Club. Earn even more goodies by joining a club!
Click here to learn more about joining my Ink Pad Pals Team. Get the MOST rewards including a discount on future products!
Follow me on social media! I share regularly on PinterestYouTube, and Facebook!
Please subscribe to my newsletter, too! Click here and enter your email. When you include your birthday you will even be added to my birthday card mailing list 🙂