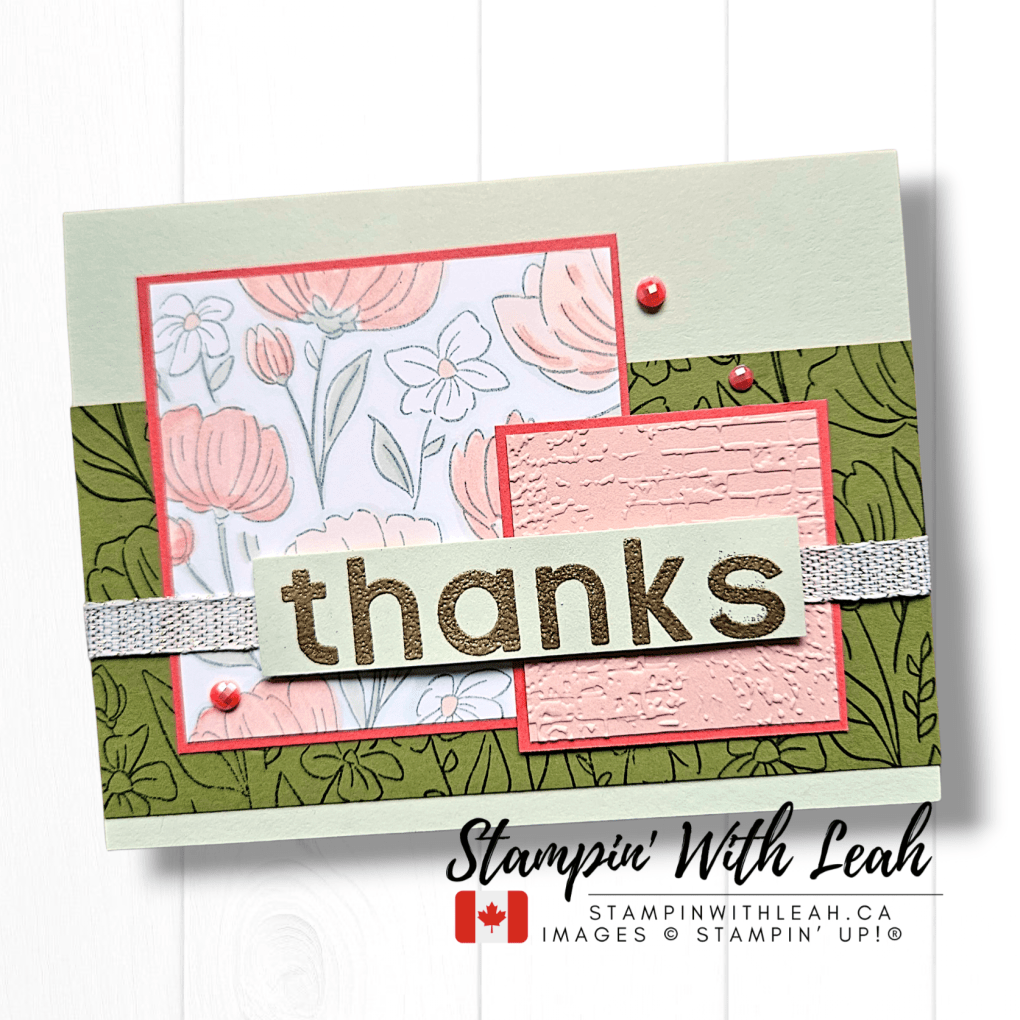
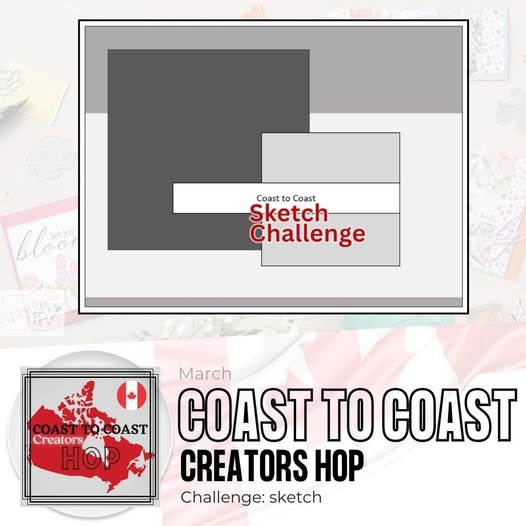
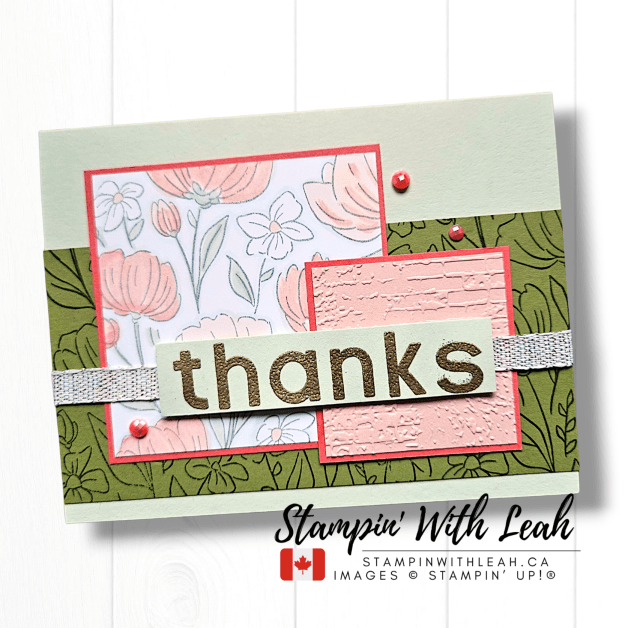
Welcome back to another Coast to Coast Creators Blog Hop! Each month, our creative team from across Canada shares projects based on a fun challenge—this time we’re creating using a great sketch challenge. I used the brand new Flowers Fair stamp and the Simple Alphabet stamp set to create this fresh spring card!
This card is mostly stamped with the newOnline Exclusive Flowers Fair stamp – some colour on colour, others stamped in Smoky Slate and coloured with Stampin’ Blends. The sentiment is the new Online Exclusive Simple Alphabet embossed in gold. For full details see the printable Recipe Card below.
Be sure to check out the rest of the Coast to Coast Creators team—there’s so much inspiration waiting for you! Click the link below to continue the hop and see what everyone else created for this month’s sketch challenge.
Want to make this card?
You can! I have a full list of supplies below and a printable recipe card.
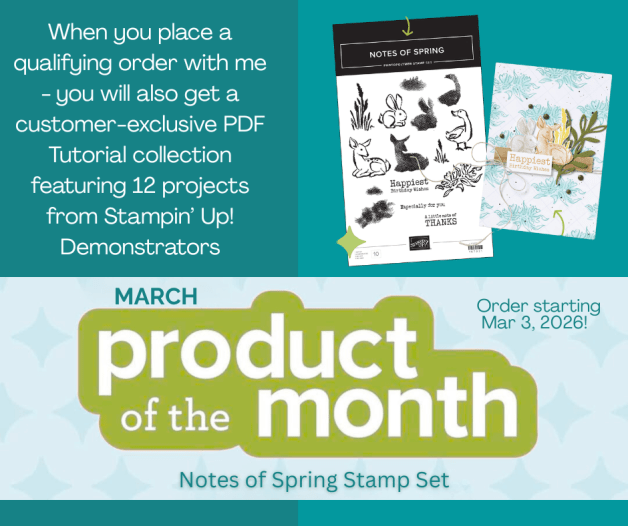
When you place an order with me, you’ll earn Stampin’ Rewards on your purchase, a $65 order with get you the Crafty Collaborators PDF Tutorial and a $100 order qualifies you to purcahse the Product of the Month ( for just $5) and I will send you a 12 card Creative vault Tutorial featuring project made with the Product of the Month too!
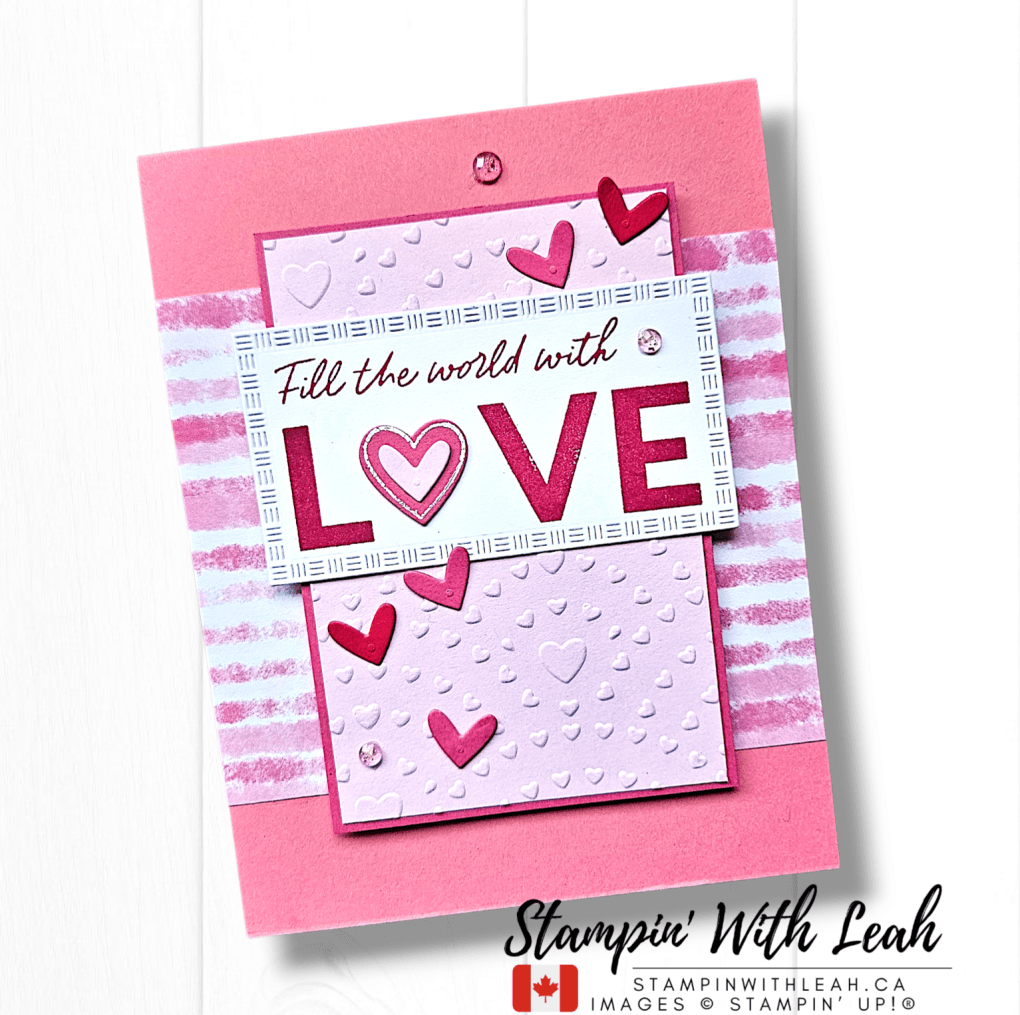
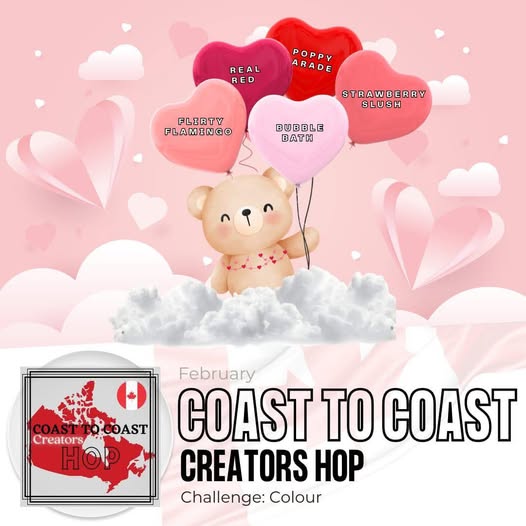
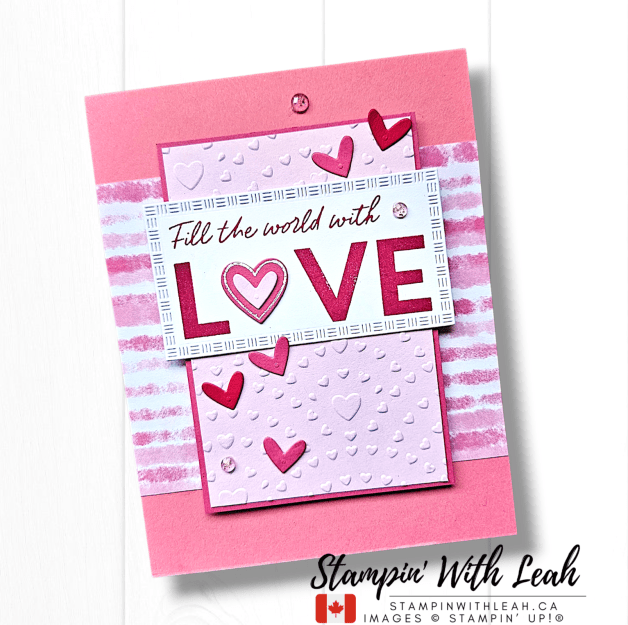
Welcome back to another Coast to Coast Creators Blog Hop! Each month, our creative team from across Canada shares projects based on a fun challenge—this time we’re creating using a Valentine’s inspired colour combo. I used the Hope Love and Joy bundle to create this fun card that can be sent any time of year – but especially this February!
For the background, I used the 2025-2027 In Color 6×6 DSP on a Flirty Flamingo cardbase. I embossed a piece of Bubble Bath cardstock with the Hearts of Love 3D embossing folder. and layered it onto a Strawberry Slush mat. The sentiment was stamped in Real Red Ink on a Textured Notes die ( these are on the Last Chance list!). All the hearts were die cut with the Hope Love Joy dies in Poppy Parade, Strawberry Slush, and Bubble Bath.
Finally I embellished the card with Strawberry Slush and Pretty in Pink Gems (also on thelast chance list).
Be sure to check out the rest of the Coast to Coast Creators team—there’s so much inspiration waiting for you! Click the link below to continue the hop and see what everyone else created for this month’s sketch challenge.
Want to make this card?
You can! I have a full list of supplies below and a printable recipe card.
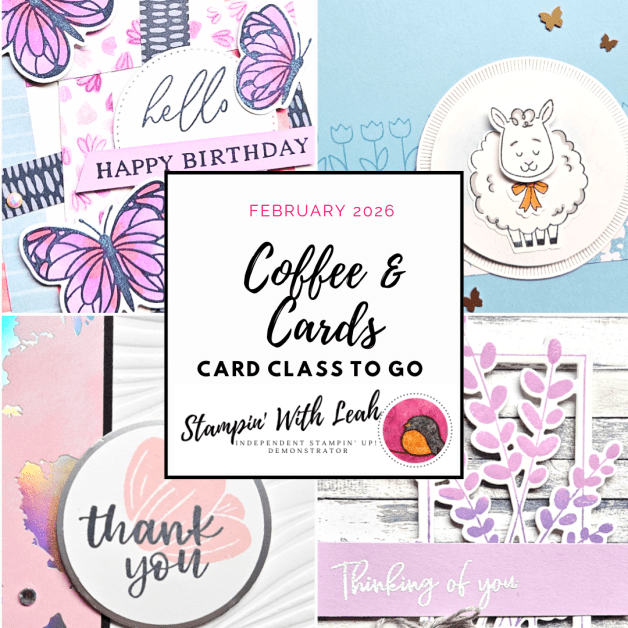
You can also watch my You Tube live each Monday – last week my card class to go featured many new stamp sets from this Jan – April Mini Catalogue. You can find the tutorial in my Payhip Shop.
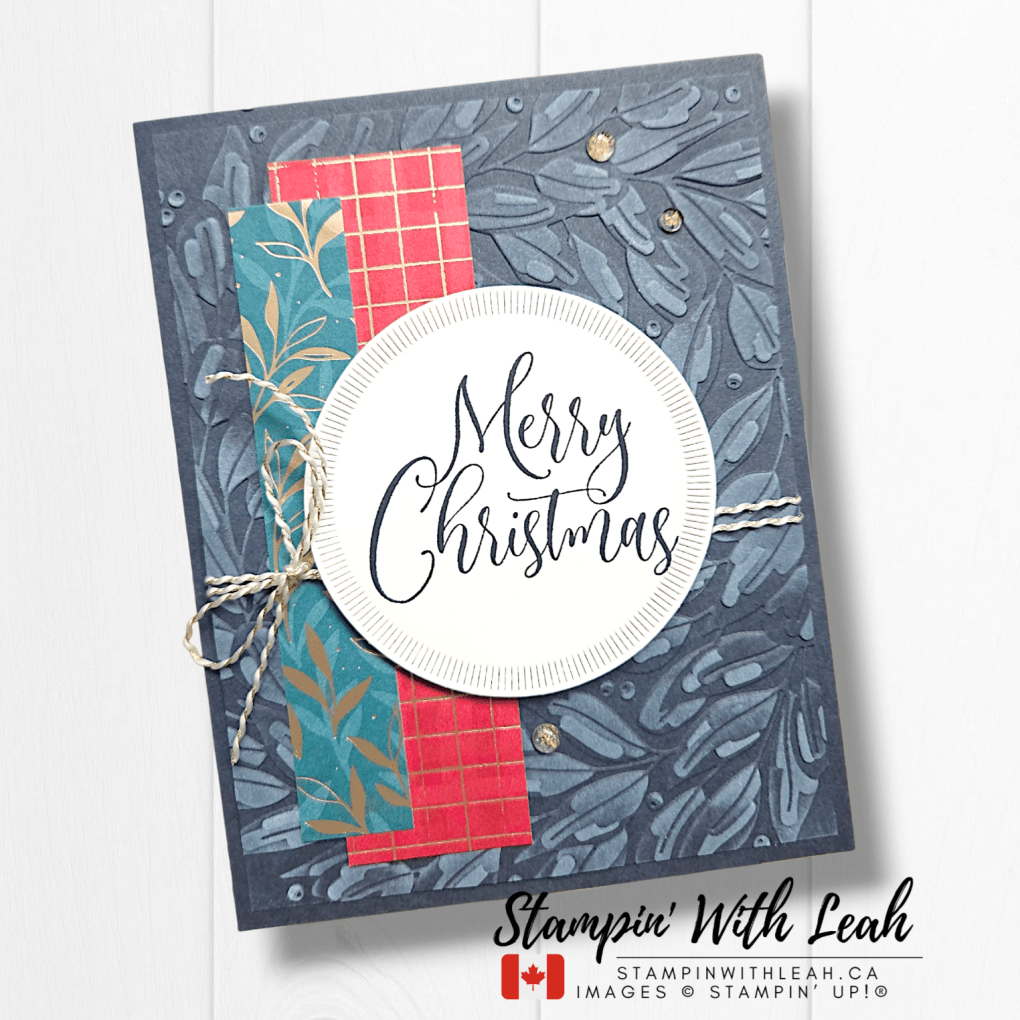
Welcome back to another Coast to Coast Creators Blog Hop! Each month, our creative team from across Canada shares projects based on a fun challenge—this time we’re working with a sketch. Sketches are one of my favourite ways to jump-start creativity, and today’s card came together beautifully with texture, layers, and a bold Christmas sentiment.
For the background, I used the Traditional Wreath 3D Embossing Folder. After embossing, I lightly swiped white ink across the raised areas to highlight all that gorgeous detail—it gives such a frosty, winter-wreath look!
The patterned strips follow the sketch layout and come from the Regal Distressed Patterns 12″ x 12″ Specialty DSP. I love the combination of deep Pretty Peacock, hint of gold, and that pop of Cherry Cobbler—it feels festive and modern all at once.
The sentiment is from the Ornamental Christmas stamp set, stamped in Secret Sea ink for a cool, elegant contrast. I die-cut it using the Spotlight on Nature dies, which frame the greeting beautifully.
A bit of White and Gold Baker’s twine and some Iridescent Gems finish the card with just the right touch of holiday shine.
Be sure to check out the rest of the Coast to Coast Creators team—there’s so much inspiration waiting for you! Click the link below to continue the hop and see what everyone else created for this month’s sketch challenge.
Want to make this card?
You can! I have a full list of supplies below and a printable recipe card.
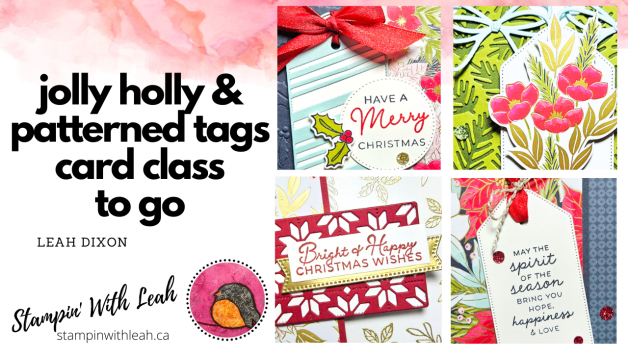
Make sure to watch my You Tube live each Monday – last month my card class to go featured the Jolly Holly Bundle as well as the gorgeous traditions of Christmas DSP- I still have a few available – contact me to get yours or find the tutorial only in my Payhip Shop.
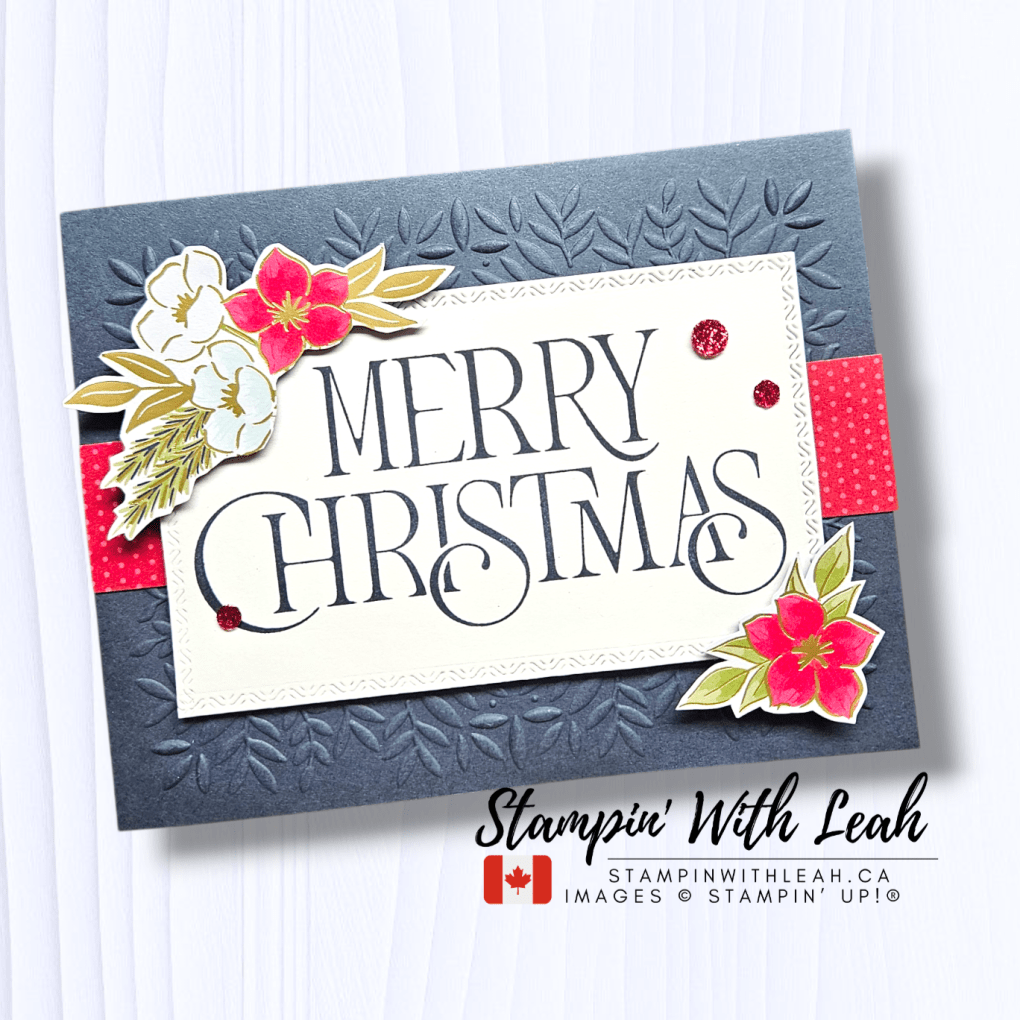
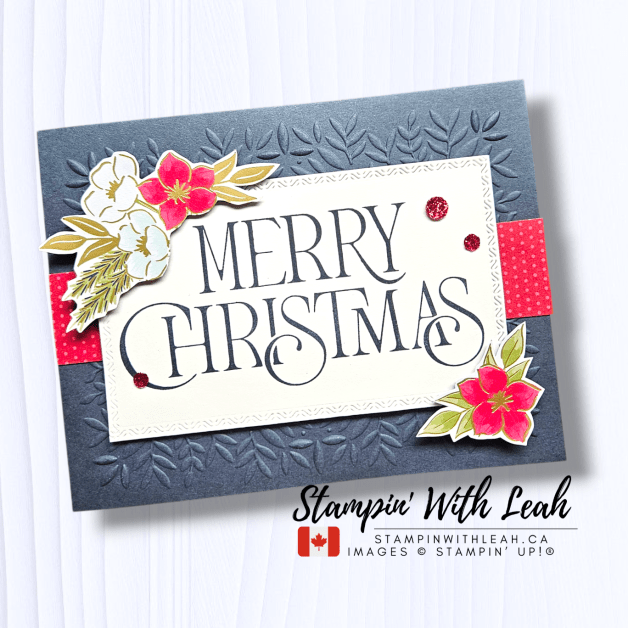
Welcome to this month’s Coast to Coast Stampers Blog Hop! Our theme is ’Tis the Season, and I couldn’t resist going classic and elegant for my project.
I started with the stunning Merry Christmas stamp as my focal point — it’s bold, graceful, and perfect for a traditional holiday card. I layered it over a piece of Secret Sea cardstock embossed with the Peaceful Greenery 3D embossing folder, which adds such beautiful texture and depth.
To bring in some festive color, I fussy-cut a few florals from the Traditions of Christmas Designer Series Paper and tucked them around the sentiment. A strip of red patterned DSP peeking through ties it all together. Of course, no Christmas card is complete without a bit of shimmer — so I added a sprinkle of Traditional Sparkling Sequins for that finishing touch.
This card truly captures everything I love about the season — a mix of texture, warmth, and timeless style.
✨ Hop Along With Us! ✨ Our Coast to Coast Stampers team is sharing even more festive inspiration today! Be sure to visit all the blogs below to see how everyone interpreted this month’s theme. You won’t want to miss a single project!
Want to make this card?
You can! I have a full list of supplies below and a printable recipe card.
Make sure to watch my You Tube live each Monday – earlier this month my card class to go featured the Jolly Holly Bundle as well as the gorgeous traditions of Christmas DSP- I still have a few available – contact me to get yours or find the tutorial only in my Payhip Shop.
It’s time for another round of creative inspiration from talented Stampin’ Up!® demonstrators across Canada! Each month we share our unique take on a theme or challenge, and this time we’re working from a sketch challenge—a perfect way to spark creativity and help you try a fresh layout.
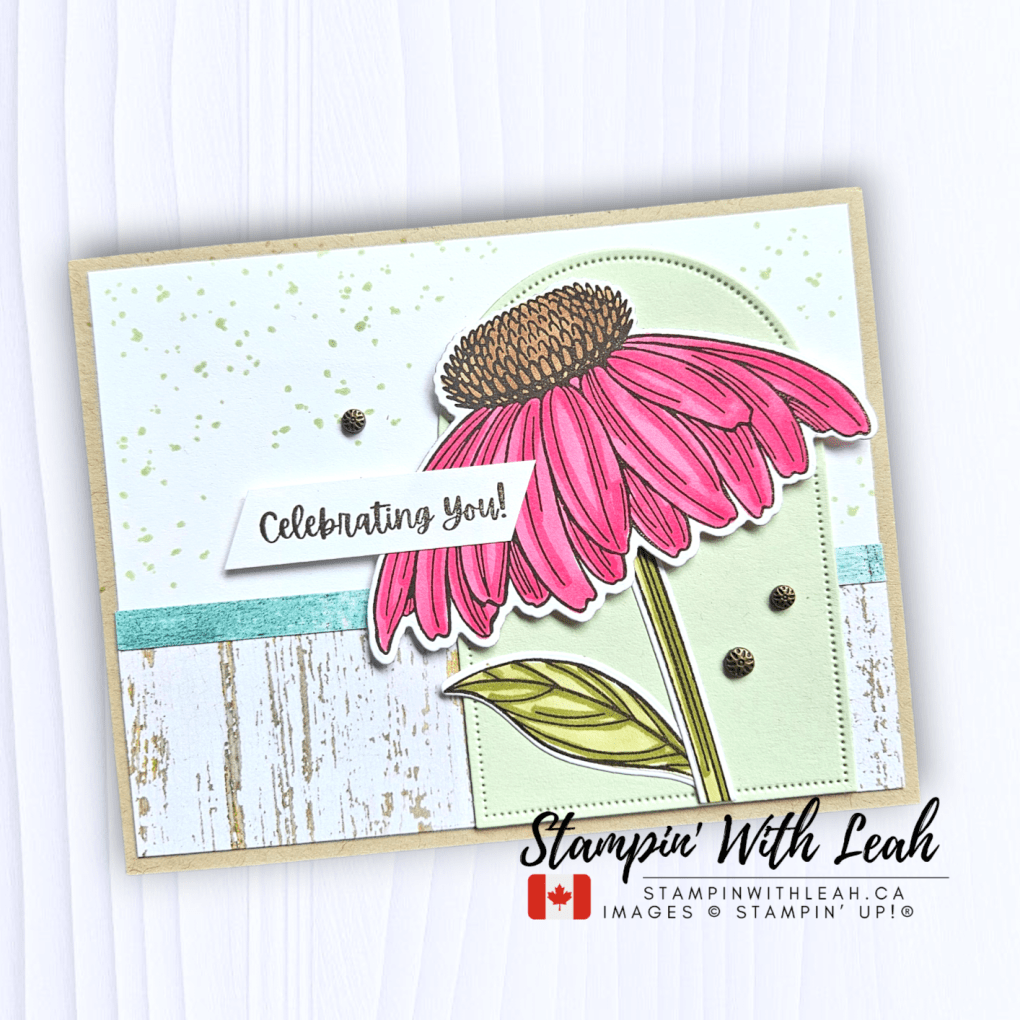
For my card, I reached for the Coneflower Celebrations bundle and combined it with the beautiful Country Woods 12×12 Designer Series Paper. I love the contrast of the bright, bold coneflower against the weathered, woodgrain background—it creates a rustic-yet-fresh summer vibe.
Card Details:
Base: Crumb Cake cardstock for a warm, neutral foundation.
DSP: Country Woods 12×12 DSP for the bottom panel and a coordinating textured strip.
Focal Image: Coneflower from Coneflower Celebrations, coloured in vibrant Strawberry Slush for a bold pop.
Sentiment: “Celebrating You!”—perfect for birthdays, achievements, or just because.
Accents: A soft splatter background, stitched edge details on the Everyday Arch, and Pressed Flower Motif embellishments for texture and interest.
Hop Along!
I hope my take on this sketch has inspired you! Be sure to check out the other amazing creations from my fellow Coast to Coast Creators by clicking the links below—you’re bound to find something that sparks your creativity.
Want to make this card?
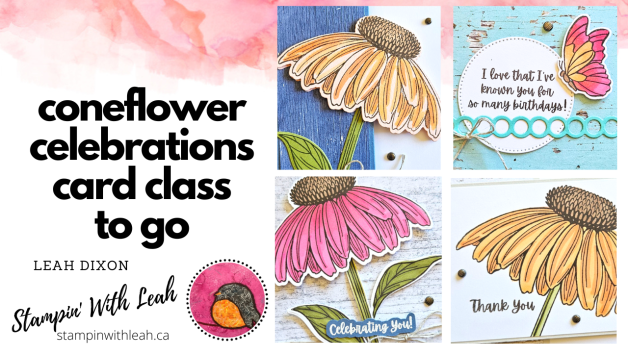
You can! I have a full list of supplies below and a printable recipe card – or keep scrolling to find out more about my Coneflower Celebrations where you will make 4 other cards using the same materials!
Make sure to watch my You Tube live each Wednesday – this week my card class to go features the Coneflower Celebrations Bundle as well – you can find me on You Tube and FB!
Coneflower Celebrations Card Class to Go, available from August 13–19, 2025. The class includes a video replay, PDF instructions, and options for a full kit or PDF-only version. ➡️ Click here for full details and to register
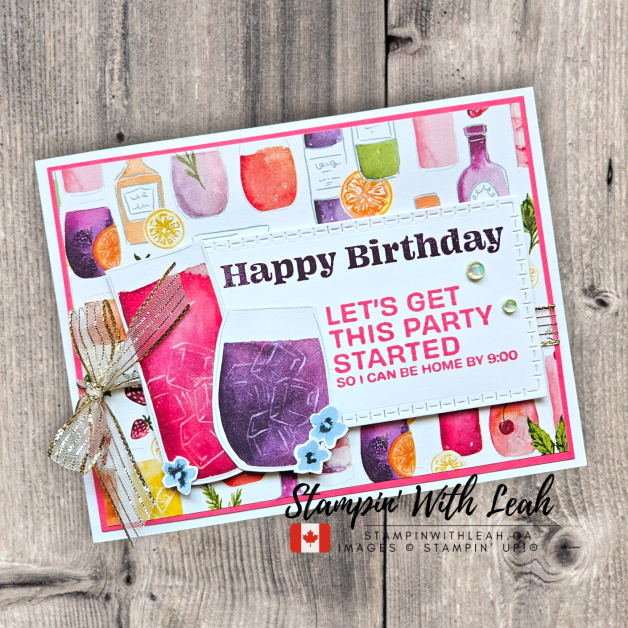
Welcome back, friends! It’s time for another Coast to Coast Creators Blog Hop, and this month we’re celebrating our favourite products from the Online Exclusives (both ones that have been there for a while and the brand NEW ones just dropped. I chose to feature the Not 29 Anymore stamp set ( new), paired with the amazing – slightly older Celebratory Sips DSP, to create a fun and sassy card.
🌟 Card Details:
Card background: Celebratory Sips DSP
Ribbon: Gold-striped Mesh Ribbon
Sentiment: Stamped in Blackberry Bliss and Strawberry Slush Inks.
Embellishments: Holographic Resin Dots
Layout: The sentiment is stamped on a stitched rectangle from the Textured Notes dies. The background DSP brings a fun party vibe. The focal images were fussy cut from another piece of Celebratory Sips DSP.
This card is perfect for all of us middle-aged and beyond partiers who also like a full night of sleep. 🙂
🌈Hop Along With Us!
Be sure to hop along with us and see what the rest of the Coast to Coast team has created using new Annual Catalogue products. So much inspiration ahead!
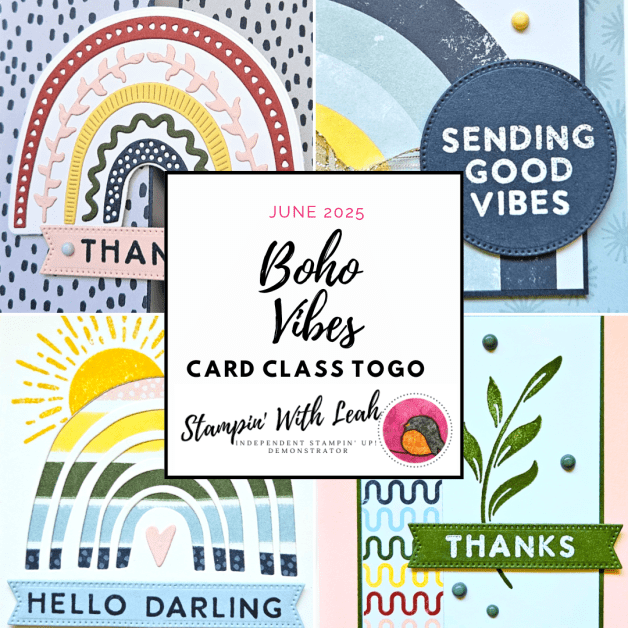
Welcome back, friends! It’s time for another Coast to Coast Creators Blog Hop, and this month we’re celebrating our favourite new products from the 2025–2026 Annual Catalogue. I chose to feature the Boho Vibes Suite, paired with the versatile Everyday Details Arches Dies, to create a vibrant, feel-good card.
🌟 Card Details:
Card base: Secret Sea cardstock
Rainbow: Cut using the Sunshine Vibes Dies in Berry Burst, Timid Tiger, Darling Duckling, and Strawberry Slush
Sentiment: Stamped in Secret Sea ink
Embellishments: Muted Pallette Dots from the suite
Layout: The rainbow is layered inside the stitched arch from the Everyday Details dies. The background DSP (also from the suite) brings a bold graphic flair that contrasts beautifully with the soft whites and vibrant rainbow.
I love how this colour palette and die combo brings instant joy and positivity—just perfect for sending good vibes!
💡 Design Tip: Apply Adhesive Sheets to your cardstock before die-cutting the rainbow pieces. This makes it so much easier to assemble the design—no liquid glue, no sticky fingers, and perfectly clean placement every time!
🌈Hop Along With Us!
Be sure to hop along with us and see what the rest of the Coast to Coast team has created using new Annual Catalogue products. So much inspiration ahead!
🛍️ Don’t Miss This! During June, the BOGO Suite Sale is on! All available suites and suite products from the 2025–2026 Annual Catalog and Online Exclusives are buy one, get one 50% off! If you’ve had your eye on a new suite from the annual catalog or you really like the look of a stamp set from an Online Exclusives suite, you don’t have to choose—you can get both!
Make sure to watch my You Tube live each Wednesday – this week was my monthly card class to go – you can still grab the tutorial in my Card Class To Go section on my blog!
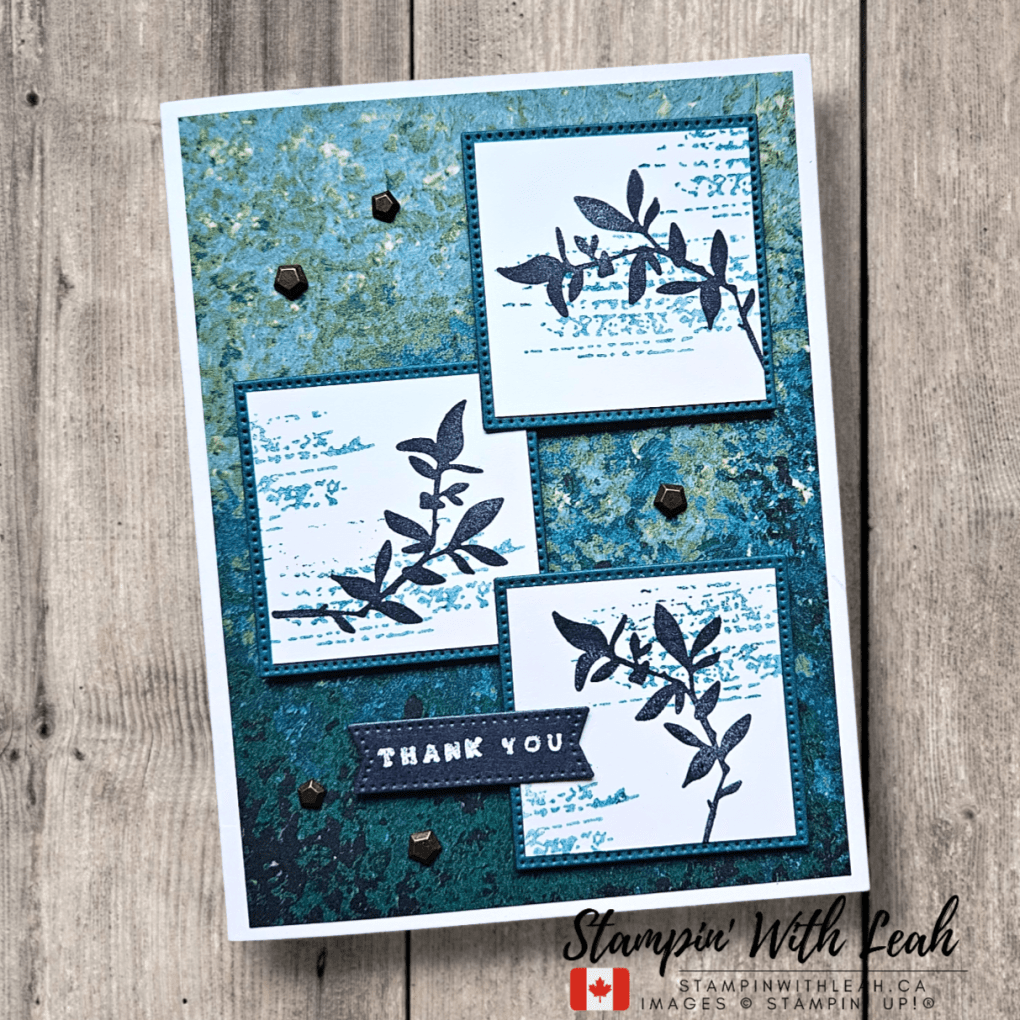
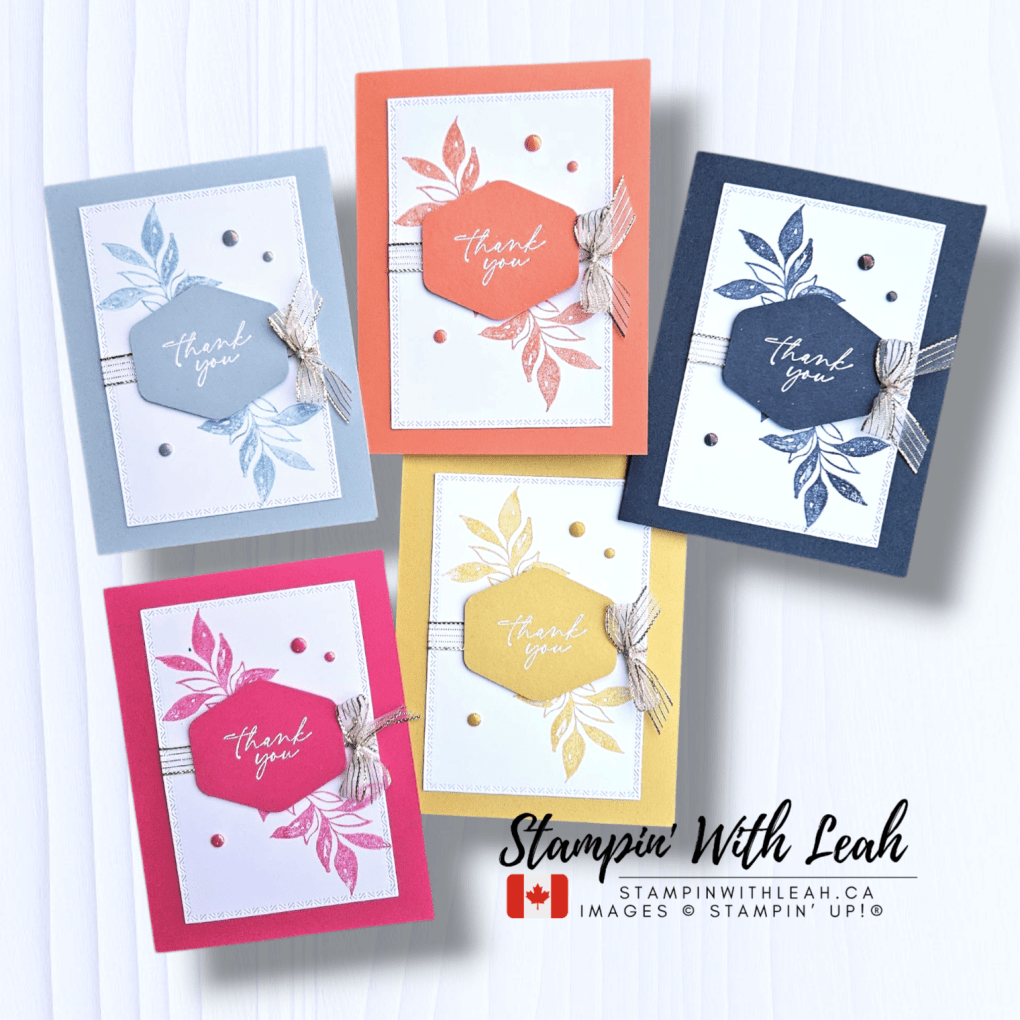
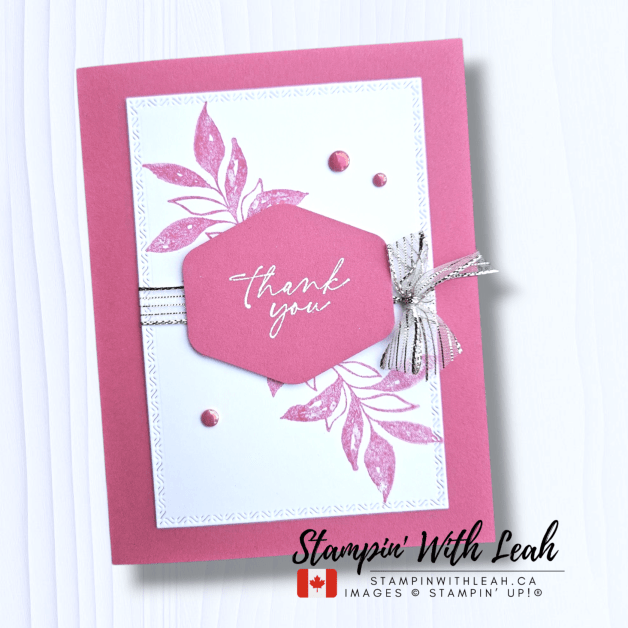
Welcome back to the Coast to Coast Creators Blog Hop! This month, our creative team is thrilled to introduce the brand new 2025–2027 In Colors from Stampin’ Up! These fresh and vibrant hues are perfect for spring and beyond. Whether you love bold brights or softer shades, this new lineup offers something for every style:
Strawberry Slush – a bright, happy pink
Timid Tiger – a soft, orangey-coral
Darling Duckling – a warm, sunny yellow
Cloud Cover – a dreamy, misty blue
Secret Sea – a deep, mysterious navy
Many of the creators in our hop were inspired by a sketch this month… and while I may have missed including the sketch, I didn’t miss the chance to play with these gorgeous new colours!
My Card Set – Textured Notes + In Color Elegance
For my projects, I created a set of thank you cards using the new Textured Notes Bundle paired with the Heartfelt Hexagon Punch. I love how the leafy image fills the space without overpowering the sentiment — it makes for a simple, elegant focal point.
Each card features one of the new In Colors as the card base, coordinating stamped foliage, and a bold punched sentiment layer. I embellished each one with:
✨ Gold Striped Trim – adds a beautiful bit of shine ✨ 2025–2027 In Color Flat Pearls – the perfect subtle accent
I kept the layout clean and repeated the design to let the colors shine. This is a great way to create a coordinated set of cards or even prep a bunch to have on hand for gifts!
💙 Hop Along With Us!
You won’t want to miss what the rest of the Coast to Coast Creators have made this month! These demonstrators are so creative and bring a wide range of styles and techniques to inspire you:
👉 Click the link below to visit each blog and leave a little love 💕
Tips for Using Cloud Cover Ink
If you noticed that my Cloud Cover card looks just as soft and dreamy as the other colours—thank the Stampin’ Write Marker! Since a full-sized Cloud Cover Classic Ink Pad isn’t available due to a unique chemical reaction with the firm foam, I used my Stampin’ Write Marker to ink up the stamp directly. This works beautifully, especially with cling stamps like those in the Textured Notes set.
Why no ink pad for Cloud Cover? Stampin’ Up! discovered that when Cloud Cover ink meets the foam in our classic pads, it causes the colour to shift unpredictably. While they can’t reverse this reaction, there are still great options to enjoy this lovely hue:
Use the Cloud Cover Stampin’ Write Marker (available in the 2025–2027 Marker Pack – 165292)
Pair the Cloud Cover Classic Ink Refill l (165279) with Uninked Stampin’ Spots (141822) for consistent results
Look for the Stampin’ Spot Assortment Pack (166716), which includes a felt-based Cloud Cover spot!
While the 5-colour Classic Ink Pad Bundle won’t be available this year, you can still purchase Strawberry Slush, Timid Tiger, Darling Duckling, and Secret Sea ink pads individually. And trust me, Cloud Cover is still just as usable—you’ll simply reach for it a little differently.
Have you been thinking about joining Stampin’ Up!? Now is the perfect time. In May, you can choose $220 worth of products (including new In Color goodies!) and pay only $135 CAD — and there’s no shipping cost!
Whether you’re looking to save on your own orders or start a small business, the Starter Kit is completely customizable and there’s no obligation to sell. Plus, you’ll be part of my friendly and creative team! In Color productsin my online store here — and don’t forget, orders of $75+ qualify for my customer rewards!
Love the new In Colors but want to collect them gradually? My In Color Club is a fun and affordable way to build your collection over 4 months. Each month, you’ll receive a selection of products in all of the In Colors. See the details and register here: https://form.jotform.com/leahdixon41/in-colour-club-2025
✨ Let’s Stay Connected!
💌 Join my email list for early access to card classes, Stampin’ Up! promotions, and exclusive tutorials 📱 Follow me on Facebook and Instagram 🎥 Watch weekly Facebook Lives every Wednesday!
Thanks for stopping by my blog today! Be sure to hop along and check out what the rest of the Coast to Coast Creators have made with these fabulous new colors — you’re sure to be inspired.
Click here to shop my online store. Click here to access & view the current catalogs. Click here to subscribe to Thanks for hopping by! Make sure to pin this post for future reference and share it with your crafty friends.those fun Paper Pumpkin kits of creativity! Click here for more information about joining my Online Monthly Technique Club. Earn even more goodies by joining a club! Click here to learn more about joining my Ink Pad Pals Team. Get the MOST rewards including a discount on future products! Follow me on social media! I share regularly on Pinterest, YouTube, and Facebook! Please subscribe to my newsletter, too!Click here and enter your email. When you include your birthday you will even be added to my birthday card mailing list 🙂
Welcome to the April edition of the Coast to Coast Creators Blog Hop! We’re a group of talented Stampin’ Up! demonstrators from across Canada, and we hop together on the 14th of every month to share creative inspiration and celebrate the art of stamping.
This month, we’re spotlighting the stunning 2023–2025 In Colors, which are retiring soon. If you’ve been holding out on these trendy shades—now’s the time to stock up before they’re gone! *Boho Blue cardstock and ink are already gone!
💗 My Project: Moody Mauve Baby Card
For this hop, I chose to go monochromatic with Moody Mauve, a warm, rich mauve tone that’s perfect for baby cards, floral themes, and soft romantic projects. It’s one of my all-time favorite In Colors, and I’m sad to see it go!
The soft striped background was stamped with the Painted Stripes background stamp in Moody Mauve ink, adding a bold but gentle pattern. I layered a stitched circle from the Stylish Shapes Dies, added the adorable onesie from the Cutest Onesie bundle, and finished it off with gold trim and sequins for a bit of sparkle. 💫
The sentiment, “A big welcome to your new baby,” is perfect for welcoming a sweet little one—and the scattered heart details add an extra dose of love.
💙 Hop Along With Us!
You won’t want to miss what the rest of the Coast to Coast Creators have made this month! These demonstrators are so creative and bring a wide range of styles and techniques to inspire you:
👉 Click the link below to visit each blog and leave a little love 💕
📌 Why Now’s the Time to Shop the 2023–2025 In Colors
These beautiful In Colors—Moody Mauve, Pebbled Path, Wild Wheat, Boho Blue, and Copper Clay—are retiring soon! That means:
Cardstock, ink pads, refills, ribbon, and DSP are only available while supplies last.
These shades won’t be coming back, so don’t miss out!
They’re perfect for coordinating with current and upcoming bundles.
You can shop all the retiring In Color productsin my online store here — and don’t forget, orders of $75+ qualify for my customer rewards!
💌 Join my email list for early access to card classes, Stampin’ Up! promotions, and exclusive tutorials 📱 Follow me on Facebook and Instagram 🎥 Watch weekly Facebook Lives every Wednesday!
Thanks for stopping by my blog today! Whether you’re welcoming a new baby or just saying goodbye to a favorite color, I hope you found a little inspiration. Don’t forget to check out the rest of the blog hop for more ideas using the retiring 2023–2025 In Colors!
Click here to shop my online store. Click here to access & view the current catalogs. Click here to subscribe to Thanks for hopping by! Make sure to pin this post for future reference and share it with your crafty friends.those fun Paper Pumpkin kits of creativity! Click here for more information about joining my Online Monthly Technique Club. Earn even more goodies by joining a club! Click here to learn more about joining my Ink Pad Pals Team. Get the MOST rewards including a discount on future products! Follow me on social media! I share regularly on Pinterest, YouTube, and Facebook! Please subscribe to my newsletter, too!Click here and enter your email. When you include your birthday you will even be added to my birthday card mailing list 🙂

![Soft Sea Foam 8-1/2" X 11" Cardstock [ 146988 ]](https://assets1.tamsnetwork.com/images/EC042017NF/146988s.jpg "Soft Sea Foam 8-1/2\" X 11\" Cardstock [ 146988 ]")
![Old Olive 8-1/2" X 11" Cardstock [ 100702 ]](https://assets1.tamsnetwork.com/images/EC042017NF/100702s.jpg "Old Olive 8-1/2\" X 11\" Cardstock [ 100702 ]")
![Calypso Coral 8-1/2" X 11" Cardstock [ 122925 ]](https://assets1.tamsnetwork.com/images/EC042017NF/122925s.jpg "Calypso Coral 8-1/2\" X 11\" Cardstock [ 122925 ]")
![Petal Pink 8-1/2" X 11" Cardstock [ 146985 ]](https://assets1.tamsnetwork.com/images/EC042017NF/146985s.jpg "Petal Pink 8-1/2\" X 11\" Cardstock [ 146985 ]")
![Basic White 8 1/2" X 11" Cardstock [ 166780 ]](https://assets1.tamsnetwork.com/images/EC042017NF/166780s.jpg "Basic White 8 1/2\" X 11\" Cardstock [ 166780 ]")
![Flowers Fair Photopolymer Stamp Set [ 167217 ]](https://assets1.tamsnetwork.com/images/EC042017NF/167217s.jpg "Flowers Fair Photopolymer Stamp Set [ 167217 ]")
![Simple Alphabet Photopolymer Stamp Set [ 167541 ]](https://assets1.tamsnetwork.com/images/EC042017NF/167541s.jpg "Simple Alphabet Photopolymer Stamp Set [ 167541 ]")
![Old Olive Classic Stampin' Pad [ 147090 ]](https://assets1.tamsnetwork.com/images/EC042017NF/147090s.jpg "Old Olive Classic Stampin' Pad [ 147090 ]")
![Smoky Slate Classic Stampin' Pad [ 147113 ]](https://assets1.tamsnetwork.com/images/EC042017NF/147113s.jpg "Smoky Slate Classic Stampin' Pad [ 147113 ]")
![Versamark Pad [ 102283 ]](https://assets1.tamsnetwork.com/images/EC042017NF/102283s.jpg "Versamark Pad [ 102283 ]")
![Soft Sea Foam Stampin' Blends Combo Pack [ 154902 ]](https://assets1.tamsnetwork.com/images/EC042017NF/154902s.jpg "Soft Sea Foam Stampin' Blends Combo Pack [ 154902 ]")
![Calypso Coral Stampin' Blends Combo Pack [ 154881 ]](https://assets1.tamsnetwork.com/images/EC042017NF/154881s.jpg "Calypso Coral Stampin' Blends Combo Pack [ 154881 ]")
![Petal Pink Stampin' Blends Combo Pack [ 154893 ]](https://assets1.tamsnetwork.com/images/EC042017NF/154893s.jpg "Petal Pink Stampin' Blends Combo Pack [ 154893 ]")
![Pool Party Stampin' Blends Combo Pack [ 154894 ]](https://assets1.tamsnetwork.com/images/EC042017NF/154894s.jpg "Pool Party Stampin' Blends Combo Pack [ 154894 ]")
![Metallics Wow! Embossing Powder [ 165678 ]](https://assets1.tamsnetwork.com/images/EC042017NF/165678s.jpg "Metallics Wow! Embossing Powder [ 165678 ]")
![Embossing Additions Tool Kit [ 159971 ]](https://assets1.tamsnetwork.com/images/EC042017NF/159971s.jpg "Embossing Additions Tool Kit [ 159971 ]")
![Heat Tool (Us And Canada) [ 129053 ]](https://assets1.tamsnetwork.com/images/EC042017NF/129053s.jpg "Heat Tool (Us And Canada) [ 129053 ]")
![Pearlized Faceted Circles [ 166978 ]](https://assets1.tamsnetwork.com/images/EC042017NF/166978s.jpg "Pearlized Faceted Circles [ 166978 ]")
![White With Gold 3/8" (1 Cm) Ribbon [ 166979 ]](https://assets1.tamsnetwork.com/images/EC042017NF/166979s.jpg "White With Gold 3/8\" (1 Cm) Ribbon [ 166979 ]")
![Multipurpose Liquid Glue [ 110755 ]](https://assets1.tamsnetwork.com/images/EC042017NF/110755s.jpg "Multipurpose Liquid Glue [ 110755 ]")
![Stampin' Dimensionals [ 104430 ]](https://assets1.tamsnetwork.com/images/EC042017NF/104430s.jpg "Stampin' Dimensionals [ 104430 ]")
![Tear & Tape Adhesive [ 154031 ]](https://assets1.tamsnetwork.com/images/EC042017NF/154031s.jpg "Tear & Tape Adhesive [ 154031 ]")
![Exposed Brick 3 D Embossing Folder [ 161600 ]](https://assets1.tamsnetwork.com/images/EC042017NF/161600s.jpg "Exposed Brick 3 D Embossing Folder [ 161600 ]")
![Paper Trimmer [ 152392 ]](https://assets1.tamsnetwork.com/images/EC042017NF/152392s.jpg "Paper Trimmer [ 152392 ]")
![Stampin' Cut & Emboss Machine [ 149653 ]](https://assets1.tamsnetwork.com/images/EC042017NF/149653s.jpg "Stampin' Cut & Emboss Machine [ 149653 ]")


![Hope Love & Joy Bundle (English) [ 166858 ]](https://assets1.tamsnetwork.com/images/EC042017NF/166858s.jpg "Hope Love & Joy Bundle (English) [ 166858 ]")
![Real Red Classic Stampin' Pad [ 147084 ]](https://assets1.tamsnetwork.com/images/EC042017NF/147084s.jpg "Real Red Classic Stampin' Pad [ 147084 ]")
![Flirty Flamingo 8-1/2" X 11" Cardstock [ 141416 ]](https://assets1.tamsnetwork.com/images/EC042017NF/141416s.jpg "Flirty Flamingo 8-1/2\" X 11\" Cardstock [ 141416 ]")
![Strawberry Slush 8 1/2" X 11" Cardstock [ 165625 ]](https://assets1.tamsnetwork.com/images/EC042017NF/165625s.jpg "Strawberry Slush 8 1/2\" X 11\" Cardstock [ 165625 ]")
![Bubble Bath 8 1/2" X 11" Cardstock [ 161718 ]](https://assets1.tamsnetwork.com/images/EC042017NF/161718s.jpg "Bubble Bath 8 1/2\" X 11\" Cardstock [ 161718 ]")
![Poppy Parade 8-1/2" X 11" Cardstock [ 119793 ]](https://assets1.tamsnetwork.com/images/EC042017NF/119793s.jpg "Poppy Parade 8-1/2\" X 11\" Cardstock [ 119793 ]")
![2025–2027 In Color™ 6" X 6" (15.2 X 15.2 Cm) Designer Series Paper [ 165300 ]](https://assets1.tamsnetwork.com/images/EC042017NF/165300s.jpg "2025–2027 In Color™ 6\" X 6\" (15.2 X 15.2 Cm) Designer Series Paper [ 165300 ]")
![Hearts Of Love 3 D Embossing Folder [ 167071 ]](https://assets1.tamsnetwork.com/images/EC042017NF/167071s.jpg "Hearts Of Love 3 D Embossing Folder [ 167071 ]")
![Textured Notes Dies [ 165555 ]](https://assets1.tamsnetwork.com/images/EC042017NF/165555s.jpg "Textured Notes Dies [ 165555 ]")
![Strawberry Slush & Pretty In Pink Gems [ 165615 ]](https://assets1.tamsnetwork.com/images/EC042017NF/165615s.jpg "Strawberry Slush & Pretty In Pink Gems [ 165615 ]")
![Basic White Medium Envelopes [ 159236 ]](https://assets1.tamsnetwork.com/images/EC042017NF/159236s.jpg "Basic White Medium Envelopes [ 159236 ]")


![Secret Sea 8 1/2" X 11" Cardstock [ 165624 ]](https://assets1.tamsnetwork.com/images/EC042017NF/165624s.jpg "Secret Sea 8 1/2\" X 11\" Cardstock [ 165624 ]")
![Regal Distressed Patterns 12" X 12" (30.5 X 30.5 Cm) Specialty Designer Series Paper [ 164037 ]](https://assets1.tamsnetwork.com/images/EC042017NF/164037s.jpg "Regal Distressed Patterns 12\" X 12\" (30.5 X 30.5 Cm) Specialty Designer Series Paper [ 164037 ]")
![Ornamental Christmas Cling Stamp Set (English) [ 165991 ]](https://assets1.tamsnetwork.com/images/EC042017NF/165991s.jpg "Ornamental Christmas Cling Stamp Set (English) [ 165991 ]")
![Secret Sea Classic Stampin' Pad [ 165285 ]](https://assets1.tamsnetwork.com/images/EC042017NF/165285s.jpg "Secret Sea Classic Stampin' Pad [ 165285 ]")
![Uninked Stampin’ Craft Pad & Whisper White Refill [ 147277 ]](https://assets1.tamsnetwork.com/images/EC042017NF/147277s.jpg "Uninked Stampin’ Craft Pad & Whisper White Refill [ 147277 ]")
![Black & White & Gold Baker's Twine [ 166005 ]](https://assets1.tamsnetwork.com/images/EC042017NF/166005s.jpg "Black & White & Gold Baker's Twine [ 166005 ]")
![Iridescent Foil Gems [ 162842 ]](https://assets1.tamsnetwork.com/images/EC042017NF/162842s.jpg "Iridescent Foil Gems [ 162842 ]")
![Spotlight On Nature Dies [ 163580 ]](https://assets1.tamsnetwork.com/images/EC042017NF/163580s.jpg "Spotlight On Nature Dies [ 163580 ]")
![Traditional Wreath 3 D Embossing Folder [ 165874 ]](https://assets1.tamsnetwork.com/images/EC042017NF/165874s.jpg "Traditional Wreath 3 D Embossing Folder [ 165874 ]")
![Traditions Of Christmas 12" X 12" (30.5 X 30.5 Cm) Specialty Designer Series Paper [ 165853 ]](https://assets1.tamsnetwork.com/images/EC042017NF/165853s.jpg "Traditions Of Christmas 12\" X 12\" (30.5 X 30.5 Cm) Specialty Designer Series Paper [ 165853 ]")
![Merry Christmas Photopolymer Stamp Set (English) [ 169233 ]](https://assets1.tamsnetwork.com/images/EC042017NF/169233s.jpg "Merry Christmas Photopolymer Stamp Set (English) [ 169233 ]")
![Peaceful Greenery 3 D Embossing Folder [ 165928 ]](https://assets1.tamsnetwork.com/images/EC042017NF/165928s.jpg "Peaceful Greenery 3 D Embossing Folder [ 165928 ]")
![Traditional Sparkling Sequins [ 165875 ]](https://assets1.tamsnetwork.com/images/EC042017NF/165875s.jpg "Traditional Sparkling Sequins [ 165875 ]")


![Crumb Cake 8-1/2" X 11" Cardstock [ 120953 ]](https://assets1.tamsnetwork.com/images/EC042017NF/120953s.jpg "Crumb Cake 8-1/2\" X 11\" Cardstock [ 120953 ]")
![Country Woods 12" X 12" (30.5 X 30.5 Cm) Designer Series Paper [ 163393 ]](https://assets1.tamsnetwork.com/images/EC042017NF/163393s.jpg "Country Woods 12\" X 12\" (30.5 X 30.5 Cm) Designer Series Paper [ 163393 ]")
![Coneflower Celebration Bundle (English) [ 165251 ]](https://assets1.tamsnetwork.com/images/EC042017NF/165251s.jpg "Coneflower Celebration Bundle (English) [ 165251 ]")
![Early Espresso Classic Stampin' Pad [ 147114 ]](https://assets1.tamsnetwork.com/images/EC042017NF/147114s.jpg "Early Espresso Classic Stampin' Pad [ 147114 ]")
![Soft Sea Foam Classic Stampin' Pad [ 147102 ]](https://assets1.tamsnetwork.com/images/EC042017NF/147102s.jpg "Soft Sea Foam Classic Stampin' Pad [ 147102 ]")
![Pecan Pie Stampin’ Blends Combo Pack [ 161674 ]](https://assets1.tamsnetwork.com/images/EC042017NF/161674s.jpg "Pecan Pie Stampin’ Blends Combo Pack [ 161674 ]")
![Strawberry Slush Stampin’ Blends Combo Pack [ 165290 ]](https://assets1.tamsnetwork.com/images/EC042017NF/165290s.jpg "Strawberry Slush Stampin’ Blends Combo Pack [ 165290 ]")
![Old Olive Stampin' Blends Combo Pack [ 154892 ]](https://assets1.tamsnetwork.com/images/EC042017NF/154892s.jpg "Old Olive Stampin' Blends Combo Pack [ 154892 ]")
![Everyday Arches Dies [ 164629 ]](https://assets1.tamsnetwork.com/images/EC042017NF/164629s.jpg "Everyday Arches Dies [ 164629 ]")
![Pressed Flower Motifs [ 165215 ]](https://assets1.tamsnetwork.com/images/EC042017NF/165215s.jpg "Pressed Flower Motifs [ 165215 ]")


![Basic White 8 1/2" X 11" Thick Cardstock [ 159229 ]](https://assets1.tamsnetwork.com/images/EC042017NF/159229s.jpg "Basic White 8 1/2\" X 11\" Thick Cardstock [ 159229 ]")
![Celebratory Sips 12" X 12" (30.5 X 30.5 Cm) Designer Series Paper [ 165586 ]](https://assets1.tamsnetwork.com/images/EC042017NF/165586s.jpg "Celebratory Sips 12\" X 12\" (30.5 X 30.5 Cm) Designer Series Paper [ 165586 ]")
![Not 29 Anymore Photopolymer Stamp Set (English) [ 166182 ]](https://assets1.tamsnetwork.com/images/EC042017NF/166182s.jpg "Not 29 Anymore Photopolymer Stamp Set (English) [ 166182 ]")
![Blackberry Bliss Classic Stampin' Pad [ 147092 ]](https://assets1.tamsnetwork.com/images/EC042017NF/147092s.jpg "Blackberry Bliss Classic Stampin' Pad [ 147092 ]")
![Strawberry Slush Classic Stampin' Pad [ 165286 ]](https://assets1.tamsnetwork.com/images/EC042017NF/165286s.jpg "Strawberry Slush Classic Stampin' Pad [ 165286 ]")
![Gold Striped 3/8" (1 Cm) Mesh Ribbon [ 165599 ]](https://assets1.tamsnetwork.com/images/EC042017NF/165599s.jpg "Gold Striped 3/8\" (1 Cm) Mesh Ribbon [ 165599 ]")
![Holographic Resin Dots [ 165598 ]](https://assets1.tamsnetwork.com/images/EC042017NF/165598s.jpg "Holographic Resin Dots [ 165598 ]")


![Berry Burst 8-1/2" X 11" Cardstock [ 144243 ]](https://assets1.tamsnetwork.com/images/EC042017NF/144243s.jpg "Berry Burst 8-1/2\" X 11\" Cardstock [ 144243 ]")
![Timid Tiger 8 1/2" X 11" Cardstock [ 165626 ]](https://assets1.tamsnetwork.com/images/EC042017NF/165626s.jpg "Timid Tiger 8 1/2\" X 11\" Cardstock [ 165626 ]")
![Darling Duckling 8 1/2" X 11" Cardstock [ 165622 ]](https://assets1.tamsnetwork.com/images/EC042017NF/165622s.jpg "Darling Duckling 8 1/2\" X 11\" Cardstock [ 165622 ]")
![Florals In Bloom 12" X 12" (30.5 X 30.5 Cm) Designer Series Paper [ 165175 ]](https://assets1.tamsnetwork.com/images/EC042017NF/165175s.jpg "Florals In Bloom 12\" X 12\" (30.5 X 30.5 Cm) Designer Series Paper [ 165175 ]")
![Boho Vibes Suite Collection (English) [ 165156 ]](https://assets1.tamsnetwork.com/images/EC042017NF/165156s.jpg "Boho Vibes Suite Collection (English) [ 165156 ]")
![Adhesive Sheets [ 152334 ]](https://assets1.tamsnetwork.com/images/EC042017NF/152334s.jpg "Adhesive Sheets [ 152334 ]")


![2025–2027 In Color™ 8 1/2" X 11" Cardstock [ 165623 ]](https://assets1.tamsnetwork.com/images/EC042017NF/165623s.jpg "2025–2027 In Color™ 8 1/2\" X 11\" Cardstock [ 165623 ]")
![Textured Notes Bundle (English) [ 165556 ]](https://assets1.tamsnetwork.com/images/EC042017NF/165556s.jpg "Textured Notes Bundle (English) [ 165556 ]")
![Heartfelt Hexagon Punch [ 162888 ]](https://assets1.tamsnetwork.com/images/EC042017NF/162888s.jpg "Heartfelt Hexagon Punch [ 162888 ]")
![2025–2027 In Color™ Flat Pearls [ 165192 ]](https://assets1.tamsnetwork.com/images/EC042017NF/165192s.jpg "2025–2027 In Color™ Flat Pearls [ 165192 ]")
![Timid Tiger Classic Stampin' Pad [ 165278 ]](https://assets1.tamsnetwork.com/images/EC042017NF/165278s.jpg "Timid Tiger Classic Stampin' Pad [ 165278 ]")
![Darling Duckling Classic Stampin' Pad [ 165277 ]](https://assets1.tamsnetwork.com/images/EC042017NF/165277s.jpg "Darling Duckling Classic Stampin' Pad [ 165277 ]")
![2025–2027 In Color™ Stampin' Write Markers [ 165292 ]](https://assets1.tamsnetwork.com/images/EC042017NF/165292s.jpg "2025–2027 In Color™ Stampin' Write Markers [ 165292 ]")
![Basics Wow! Embossing Powder [ 165679 ]](https://assets1.tamsnetwork.com/images/EC042017NF/165679s.jpg "Basics Wow! Embossing Powder [ 165679 ]")