Festive Friday Week 5 – Quick & Simple with the Christmas Labels Stamp Set

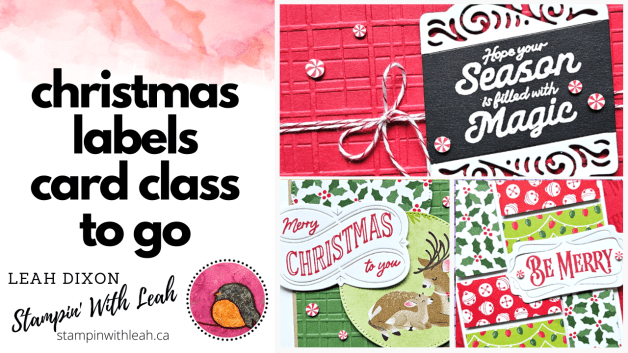
Welcome back to Festive Friday! This week’s card is a special one—it’s my first card post-surgery, and I’m so happy to be back crafting! Since I needed something easy and stress-free, I created a quick and simple Christmas card featuring the Christmas Labels Stamp Set & Dies. This bundle is currently on the Last Chance List, so if you love it, now is the time to grab it before it’s gone! ⏳

Let’s take a closer look at this week’s design! 🎄✨


The Card Design

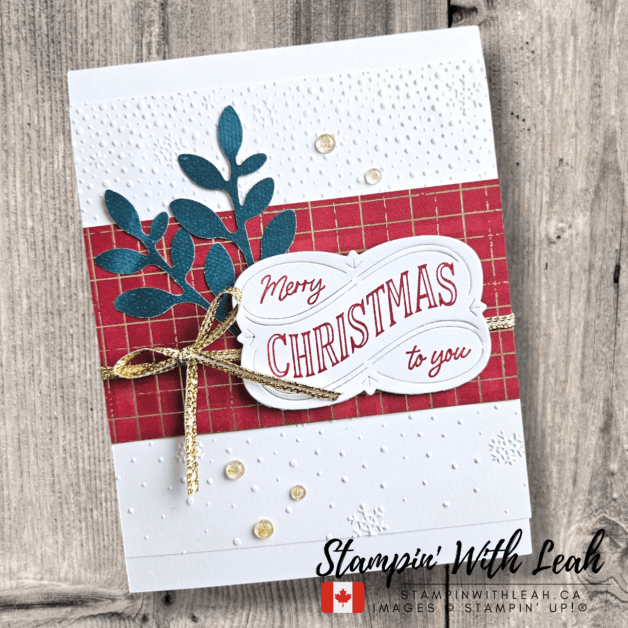
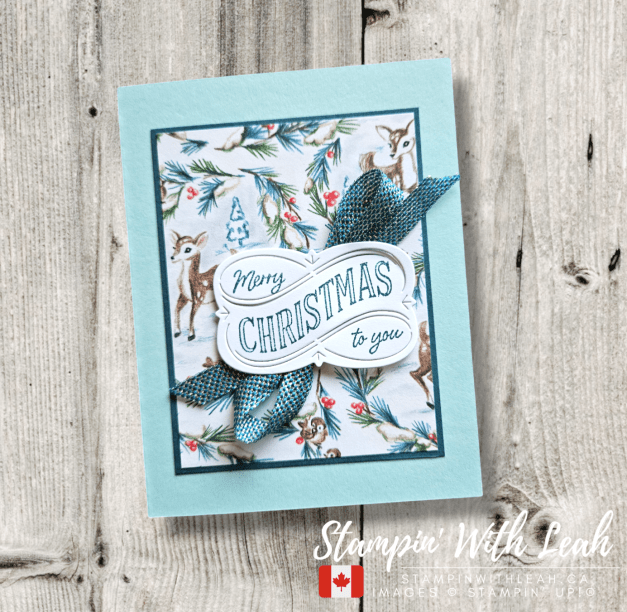
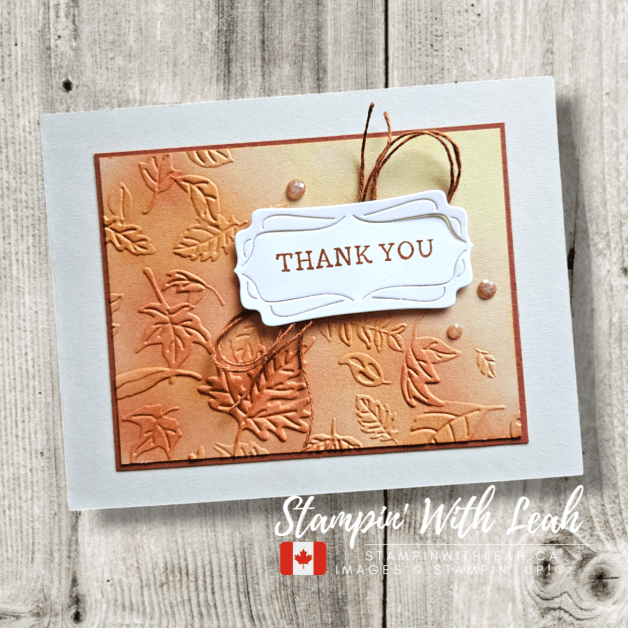
For this week’s layout, I kept things clean and simple, focusing on the gorgeous label die and festive stamped elements. This design is perfect for mass-producing if you’re getting a head start on holiday cards for Christmas 2025!

Card Highlights:

  • Stamp Set & Dies: Christmas Labels Stamp Set & Dies (Last Chance List!)
  • Quick & Simple Layout: A great go-to design when you need an easy yet beautiful card.
  • Festive Color Palette: A rich combination of Cherry Cobbler, Basic White, and Pretty Peacock for a classic holiday feel.
  • Elegant Texture: The embossed background adds a soft snowfall effect, making the design extra special.
  • Metallic Accents: A gold trim bow and subtle embellishments bring warmth and shimmer to the card.

Supplies Used

Here’s what I used to create this card:


Bough Punch
[157711]
$33.00
Paper Snips
[103579]
$16.50

Step-by-Step Instructions

  1. Prepare the Card Base: Cut a piece of Thick Basic White cardstock to 4-1/4” x 11”, scored at 5-1/2”.
  2. Emboss the 2nd layer: Use the Snowflake Sky 3D embossing folder to add a soft snowfall texture to a 4-1/4” x 4-3/4” piece of Basic White cardstock.
  3. Add Designer Series Paper: Cut a 4-1/4″ X 2-1/4″strip of Regal Distressed Pattern DSP (Cherry Cobbler and gold grid) and adhere it across the center of the embossed layer.
  4. Add Ribbon: Wrap a piece of gold trim and make a bow on the left side for a touch of elegance and then secure the whole layer to the card base.
  5. Die-Cut the Label: Using the Christmas Labels Dies, cut a decorative label from Basic White cardstock.
  6. Stamp the Sentiment: In Cherry Cobbler ink, stamp a holiday sentiment from the Christmas Labels Stamp Set onto the label. Attach this label to the right side of the card front using Dimenisonals.
  7. Create the Foliage Accent: Use the Bough Punch to create the Pretty Peacock foliage from the Season of Elegance DSP and tuck them behind the sentiment label, hold in place with Mini Glue Dots.
  8. Add Finishing Touches: Scatter a few Iridescent Foil Gems for subtle sparkle.

Why I Love This Design

Sometimes, simple is best! 💕 This layout is fast, elegant, and easy to replicate, making it a great choice for mass-producing holiday cards. Whether you’re crafting after a break (like me!) or just need a quick holiday project, this design is perfect.

If you love this Christmas Labels Stamp Set & Dies, don’t wait—it’s on the Last Chance List and won’t be around for long! 🎁 Shop now to grab yours before it retires!

Don’t forget to pin this post for inspiration and share with your crafty friends!

Happy stamping, and see you next week for another Festive Friday creation!

A perk to ordering with me in the month of February is that with any order over $75cdn, you will receive a FREE SAB item and I am emailing out an amazing 37 project Tutorial Bundle. Just use the host code below. As a member of my team you get free access to this Tutorial Bundle.

Let’s Craft Together!

I’d love for you to join one of my in-person card classes:

These classes are perfect for all skill levels and are a great way to learn new techniques, try out Stampin’ Up! products, and connect with other cardmakers. Spots fill up quickly, so be sure to register early!

Also, don’t forget to sign up for my Stampin’ With Leah Newsletter to get all the details on upcoming events, promotions, and creative tips. You won’t want to miss out!

Live in Canada, don’t have a demonstrator? Contact me to get a catalogue or find out why right now is a great time to join my team.

You can see all the benefits of joining my team (the Ink Pad Pals) by clicking the image below. Right now there are even more perks to joining during Sale-a-bration!

Click here to shop my online store.
Click here to access & view the current catalogs.
Click here to subscribe to Thanks for hopping by! Make sure to pin this post for future reference and share it with your crafty friends.those fun Paper Pumpkin kits of creativity!
Click here for more information about joining my Online Monthly Technique Club. Earn even more goodies by joining a club!
Click here to learn more about joining my Ink Pad Pals Team. Get the MOST rewards including a discount on future products!
Follow me on social media! I share regularly on PinterestYouTube, and Facebook!
Please subscribe to my newsletter, too! Click here and enter your email. When you include your birthday you will even be added to my birthday card mailing list 🙂


A Happy Hibiscus Card Tutorial!

Hi, friends!

I wanted to let you know there won’t be a live video today as I’m spending time with family. Thank you for your understanding! I’ll be back soon to share more crafty inspiration and fun projects with you.

In the meantime, I’m excited to share this beautiful card I created using the online-exclusive Happy Hibiscus stamp set and hybrid embossing folder. This set is packed with tropical vibes and stunning details, perfect for adding a touch of sunshine to your projects!

Card Details

Here’s a closer look at the card:

The vibrant hibiscus flower is the star of this card, complemented by the intricate embossed background created with the hybrid embossing folder. I used a bright color palette to bring the tropical theme to life, but you can customize it to fit your style!

You can find a full list of materials used below. You can order any of these supplies from me here: https://www.stampinup.ca?hostcode=X7VTGRN4


Paper Snips
[103579]
$16.50

To create this card – emboss a 4″ X 5-1/4″ piece of Basic White with the Happy Hibiscus embossing folder and a ttach to the Thick Basic White cardbase. Then die cut and emboss two of the flowers using the hybrid dies. Add Daffodil Delight and Flirty Flamingo Ink to the cut outs using sponge daubers and/or blending brushes.

Then use a blending brush to add Balmy Blue Ink to a Greetings of the Season tag die cut. Stamp the sentiment in Balmy Blue and attach the flowers around it. Add the twine to the top and use Dimensionals to attach the tag to the card front. Finally, embellish with Iridescent Pearls. This is a simple card to create and you can have so much fun switching up the colours.

When you place a $65 order this month I will also send you the link to a fantastic 29 project Tutorial Bundle as a thank you!

I hope this card inspires you to get creative! Let me know in the comments if you’ve tried these fabulous products yet or if you have any questions about the process. I’d love to see what you’re making!

Click here to shop my online store.
Click here to access & view the current catalogs.
Click here to subscribe to those fun Paper Pumpkin kits of creativity!
Click here for more information about joining my Online Monthly Technique Club. Earn even more goodies by joining a club!
Click here to learn more about joining my Ink Pad Pals Team. Get the MOST rewards including a discount on future products!
Follow me on social media! I share regularly on PinterestYouTube, and Facebook!
Please subscribe to my newsletter, too! Click here and enter your email. When you include your birthday you will even be added to my birthday card mailing list 🙂

#StampinWithLeah #HappyHibiscus #StampinUp #Cardmaking #HandmadeCards


Winter Meadow Gift Card Holder

Every week I go live on my FB – this week I featured the Winter Meadow DSP from the annual catalogue and the Christmas Labels bundle from the Sep – Dec Mini Catalogue to create a fast and beautiful gift card holder.

Here are some other gift card holders using the same design, just decorated differently.

You can find a full list of materials used below, as well as a printable recipe card for making this gift card holder. You can order any of these supplies from me here: https://www.stampinup.ca?hostcode=NJWTYMDG


Winter Meadow 12" X 12" (30.5 X 30.5 Cm) Designer Series Paper
$17.00
Basic White 8 1/2" X 11" Cardstock
$18.00
Christmas Labels Bundle (English)
$64.75
Blueberry Bushel Classic Stampin' Pad
$12.25
1-3/4" (4.4 Cm) Circle Punch
$32.00
Nested Essentials Dies
$47.00
Paper Trimmer
$39.00
Tear & Tape Adhesive
$9.50
Stampin' Dimensionals
$6.00

Here is the replay of the video where I created this quick and easy gift card holder.

When you place a $65 order this month I will also send you the link to a fantastic 36 project Tutorial Bundle as a thank you! I am also offering a FREE Mystery Embellishment for order over $75 this month using my host code!

Looking for some more fun stamping experiences in person or online?

Check out my Weekly LIVE videos on Wednesdays at 9am Pacific Time. ( Facebook and You Tube)

If you are local to Port Coquitlam, join me in person for Coffee and Cards on December 7th (my November class sold out – but you can still get the PDF from my card classes to go page) or contact me to book your own card class. Check out my calendar of events at my website.

I am also offering an ONLINE Bingo night Dec 30th. We will create 4 cards and play some Bingo. See all the details below.

To make sure you learn about all my upcoming events and don’t miss any sales join my newsletter or check out everything at linktr.ee/stampinwithleah. You can also sign up for my newsletter (link below) so you don’t miss out on any of my events.

Live in Canada, don’t have a demonstrator? Contact me to get a catalogue or find out why right now is a great time to join my team.

Please leave a comment below and make sure to follow this blog for more great inspiration!

Click here to shop my online store.
Click here to access & view the current catalogs.
Click here to subscribe to those fun Paper Pumpkin kits of creativity!
Click here for more information about joining my Online Monthly Technique Club. Earn even more goodies by joining a club!
Click here to learn more about joining my Ink Pad Pals Team. Get the MOST rewards including a discount on future products!
Follow me on social media! I share regularly on PinterestYouTube, and Facebook!
Please subscribe to my newsletter, too! Click here and enter your email. When you include your birthday you will even be added to my birthday card mailing list 🙂


September 2024 – 1 Layout/ 3 Cards

This morning I used one of the layouts from page 22 of the Stampin’ Up! 2024 Annual Catalogue! Here are the 3 cards that I created live – you can see the full video below. You’ll want to read this email all the way to the very end – I’ve included a link to the BRAND NEW SCRAPBOOKING CATALOGUE!!!

Watch this video replay or look below to grab the printable PDF Tutorials and a full printable image of the card templates from page 22 .

If you’ve got a wishlist created after seeing some of the great cards – contact me directly or click below to go to my Stampin’ Up! shop.

Looking for some other fun stamping experiences in person or online? If you are local to Port Coquitlam, join me in person for Coffee and Cards or contact me to book your own card class. You can always check out my calendar of events at my website.

Orders over $65 (and members of my Ink Pad Pals team) also qualify to receive this fantastic 40 project Tutorial Bundle as a thank you from me.

STARTING SEPTEMBER 2024 – you will also find 2 new kits in the online store (both Christmas themed), our new holiday mini catalogue will be live to order from AND we will have online Scrapbook Items. Click the image below to see the catalogue!!

Want to be the first to hear about my upcoming classes? Subscribe to my newsletter!

Please leave a comment below and make sure to follow this blog for more great inspiration!

Click here to shop my online store.
Click here to access & view the current catalogs.
Click here to subscribe to those fun Paper Pumpkin kits of creativity!
Click here for more information about joining my Online Monthly Technique Club. Earn even more goodies by joining a club!
Click here to learn more about joining my Ink Pad Pals Team. Get the MOST rewards including a discount on future products!
Follow me on social media! I share regularly on PinterestYouTube, and Facebook!
Please subscribe to my newsletter, too! Click here and enter your email. When you include your birthday you will even be added to my birthday card mailing list 🙂


Christmas Labels Card Class To Go

Join me on the first Wednesday of each month (9am Pacific Time) for a FREE with purchase Card Class To Go. This week I featured Stampin’ Up!’s brand new Christmas Labels bundle. You can see the replay of this month’s class and learn about how to get your make’n’take kit for this class below.

When you place an order ($60 minimum before tax and shipping) by the end of the day on Wednesday, September 11th, I will send you the Make and Takes for this month’s class FREE.

For this week’s projects, you’ll want the following items to complete the projects as instructed:


Paper Snips
[103579]
$16.50

I don’t send any pre-stamped images per Stampin’ Up! policy. You can substitute the items listed for supplies you already own as well.

Your order must be in by the end of the day on Wednesday, September 11th , 2024 to get these Make and Takes. I will ship packets on September 14th, 2024.

Click here to order and get these Make and Takes for FREE!

Don’t live in Canada? You can still get the tutorial for this class from my Crafting Class Tutorials To Go section of my blog. You’ll find this tutorial and many others there for purchase.

You can view the replay of this card class here. Make sure to subscribe to my You Tube channel while you are there so you don’t miss any of my other crafty creations.

Here are the three cards I created for you:

You will receive the cardstock, DSP, embossed cardstock, die cut shapes, the pieces of baker’s twine and the embellishments you require for these cards , but you may want to grab these products and tools for your own future creations 🙂


We also have some new holiday kits!!!

AND a new Scrapbooking line!!

Looking for some more fun stamping experiences in person or online? If you are local to Port Coquitlam, join me in person for Coffee and Cards or contact me to book your own card class. You can always check out my calendar of events at my website. Or JOIN my Ink Pad Pals team to really get crafting.

Orders over $65 (and members of my Ink Pad Pals team) also qualify to receive a fantastic 40 project Tutorial Bundle as a thank you from me.

Want to be the first to hear about my upcoming classes? Subscribe to my newsletter!

Please leave a comment below and make sure to follow this blog for more great inspiration!

Click here to shop my online store.
Click here to access & view the current catalogs.
Click here to subscribe to those fun Paper Pumpkin kits of creativity!
Click here for more information about joining my Online Monthly Technique Club. Earn even more goodies by joining a club!
Click here to learn more about joining my Ink Pad Pals Team. Get the MOST rewards including a discount on future products!
Follow me on social media! I share regularly on PinterestYouTube, and Facebook!
Please subscribe to my newsletter, too! Click here and enter your email. When you include your birthday you will even be added to my birthday card mailing list 🙂