Festive Friday #12 – Celebrate the Season with Last Chance Deals!

Happy Festive Friday, crafters! This week, I’m highlighting some incredible Last Chance Items—the Iconic Imagery Stamp Set and Dies, paired beautifully with the brand-new Textured Notes Dies. Plus, these Last Chance Items are on sale for a steal of a deal, so don’t miss out! 🎄✨


How It Came Together:

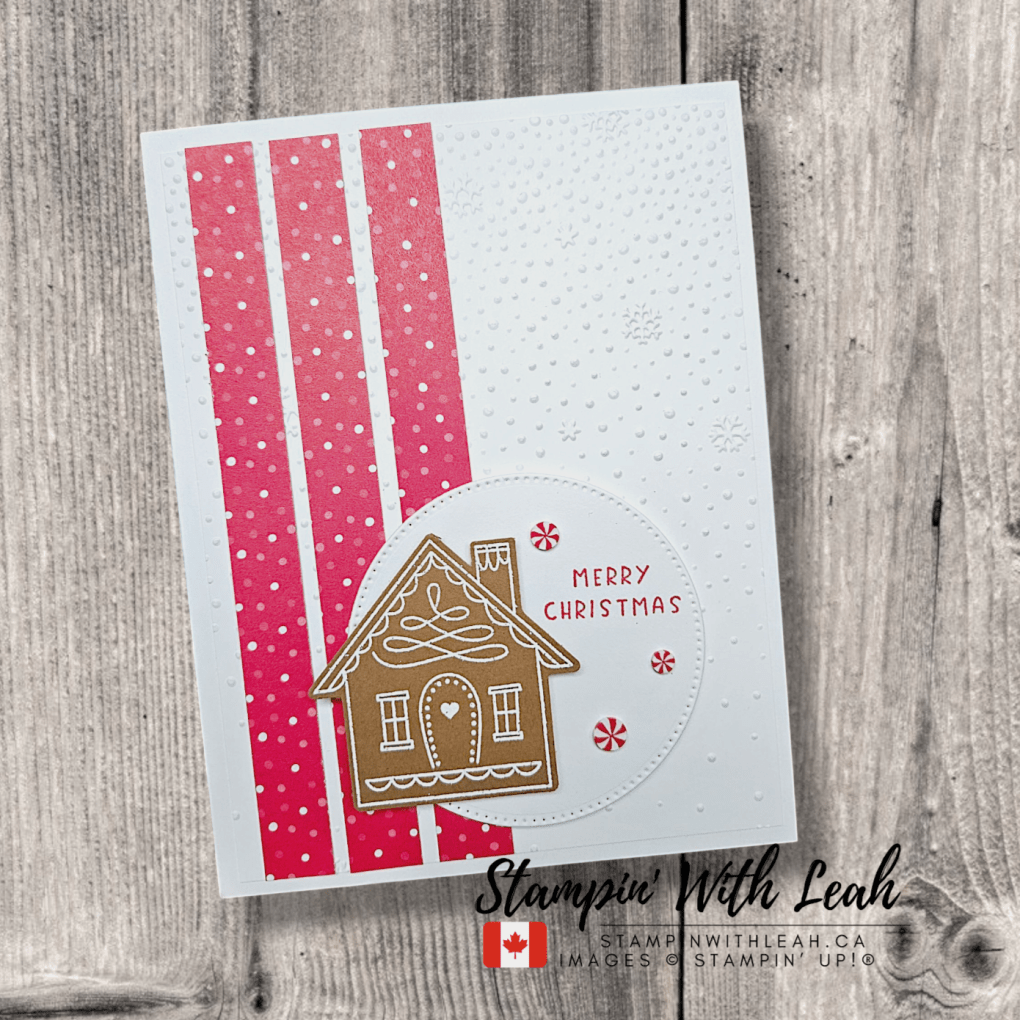
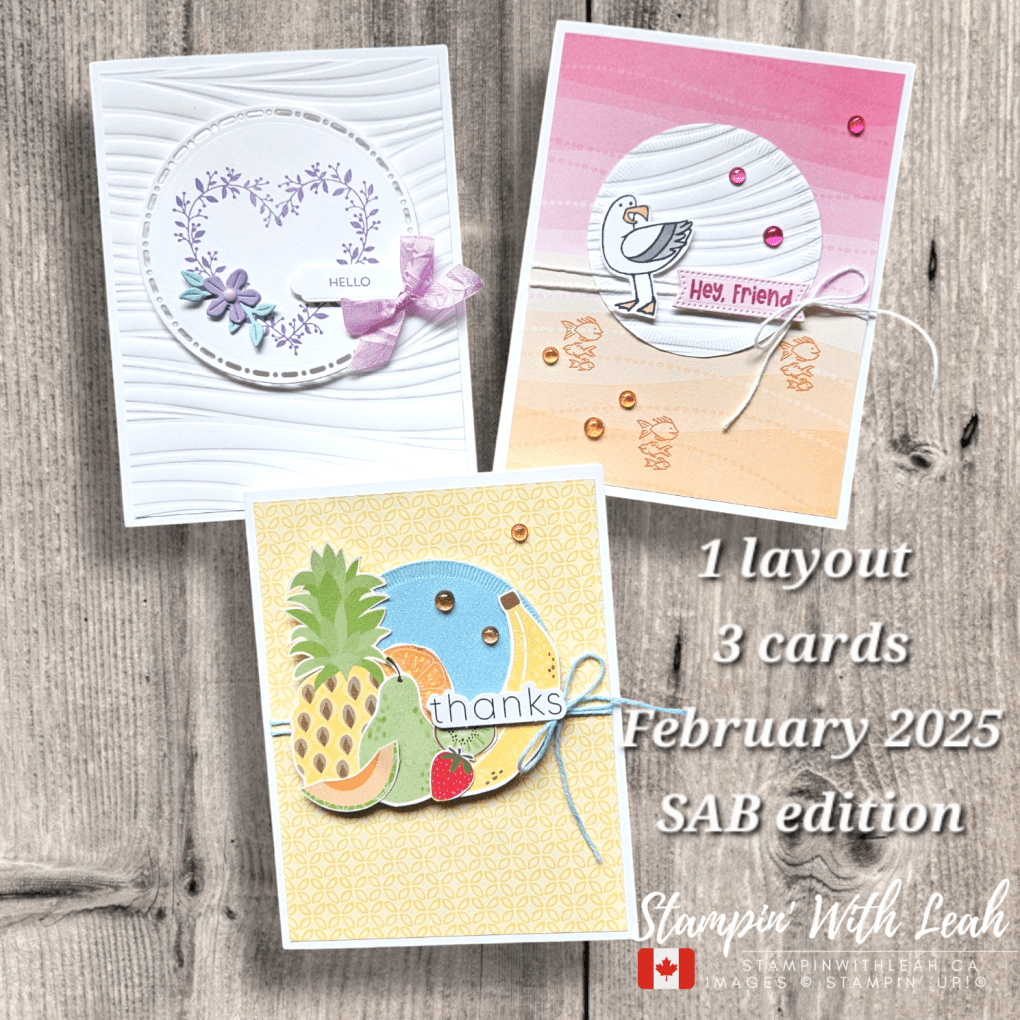
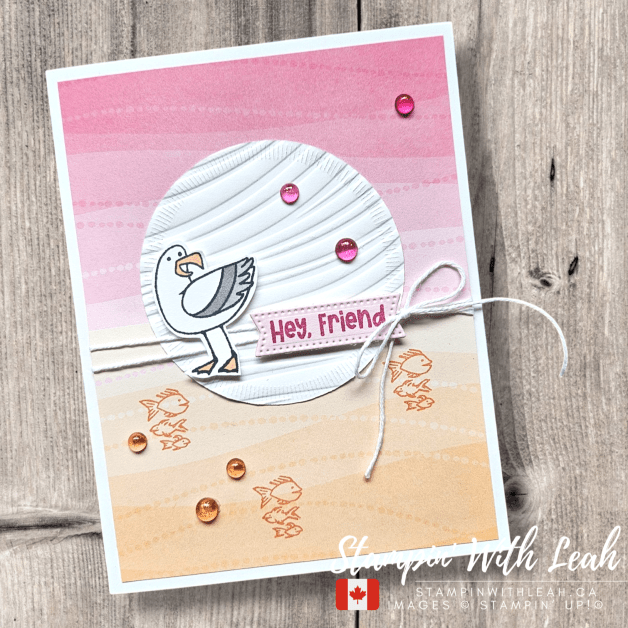
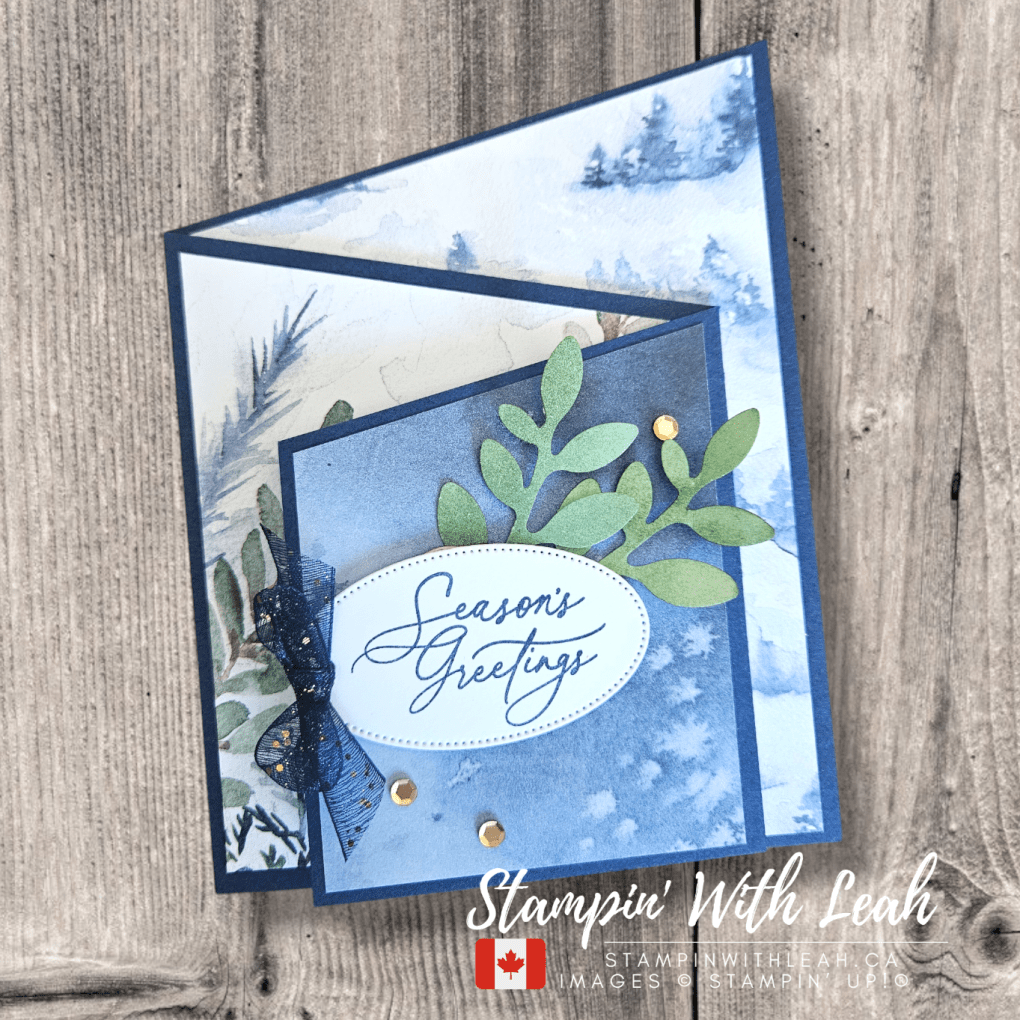
This card came to life with layers of Textured Notes dies in Pretty Peacock, Lost Lagoon, and Pool Party, creating an ombré look that’s both modern and festive. The Iconic Imagery Stamp Set adds extra charm with its snowflake images, stamped in Pretty Peacock Ink on Pool Party cardstock before being die cut for dimensional details.

The sentiment, “Celebrate the Season,” is heat-embossed in white on Lost Lagoon for a bold, frosty focal point. To tie everything together, I added Pretty Peacock sequins for a touch of holiday sparkle!

Why You’ll Love This Card:

✔ Easy to recreate with bold, geometric details
✔ Perfect for creating modern and elegant holiday cards
✔ Features a sophisticated ombré color palette

🔗 Shop Last Chance Deals and Online Exclusives in MY SHOP or click on the items below:


Versamark Pad
$13.00

What Do You Think?

💬 Would you try this color palette for your holiday cards? Let me know in the comments!

Click here to shop my online store.
Click here to access & view the current catalogs.
Click here to subscribe to Thanks for hopping by! Make sure to pin this post for future reference and share it with your crafty friends.those fun Paper Pumpkin kits of creativity!
Click here for more information about joining my Online Monthly Technique Club. Earn even more goodies by joining a club!
Click here to learn more about joining my Ink Pad Pals Team. Get the MOST rewards including a discount on future products!
Follow me on social media! I share regularly on PinterestYouTube, and Facebook!
Please subscribe to my newsletter, too! Click here and enter your email. When you include your birthday you will even be added to my birthday card mailing list 🙂


Cheers to Another Year of You!

I’m so excited to share this vibrant birthday card I created during my recent Facebook Live. It features the Arched Wishes Stamp Set and Everyday Arch Dies, both of which are Online Exclusives. This design was inspired by Loni Spendlove’s gorgeous card, which you can see here.

What makes this card truly special is the masked balloon technique I used to create the colorful blended background. By combining stamped images with a soft ink-blended effect, I added depth and a festive vibe perfect for any celebration.

Card Details:
🎈 Masked balloons and a rainbow blended background
🧁 Bright, cheerful cupcake stamped and fussy cut
🌟 Added embellishments for extra sparkle and fun

Watch the Tutorial! 🎥

Want to see how this card came together? Watch the replay of my Facebook Live on YouTube.

📌 Love this design? Be sure to check out my blog for more inspiration and get my class tutorials!StampinWithLeah.ca

If you’d like to recreate this design or try your own twist, shop the products used:


Versamark Pad
$13.00
Paper Snips
$16.50

March 2025 Online Exclusives PDF

Some of the supplies used on this card are part of the new collection of Online Exclusive products for March 2025, and I have a special PDF guide showcasing all the latest must-have crafting goodies! Grab it here:

Bonus Gift! 🎁

When you place a $65+ order, you’ll receive the 34 project March Crafty Collaborations Tutorial PDF as an extra gift from me! This is an amazing resource full of creative inspiration from many talented demonstrators. Want to stay updated on all my events and classes? Subscribe to my newsletter!

Join Me for More Stamping Fun

Looking for more ways to craft? Here’s how you can connect with me:

  • In-Person Events: If you’re local to Port Coquitlam, join me for Coffee and Cards or book your own card class.
  • Online Events: Birthday Celebrations Card Class (you can still register – although packages may arrive late)
  • Ink Pad Pals Team: Join my team for exclusive perks, discounts, and a supportive crafting community.
See the details here! (You can still join – but your supplies will arrive late)

Have any questions? Feel free to reach out—I’d love to help!Shop & Connect

Thank you for crafting with me—I can’t wait to see what you create! Don’t forget to leave a comment below and follow this blog for more inspiration.


Festive Friday #11 – Humble Home Bundle Christmas Card

Happy Festive Friday, crafters! This week, I’m featuring the Humble Home Bundle to create a cozy, classic Christmas card with warm gingerbread vibes. If you love simple yet elegant holiday cards, this design is perfect for you!


How It Came Together:

I started by embossing a Basic White 4″ X 5-1/4″ panel with the Snowflake Sky 3D Embossing Folder to create a subtle, textured background. The 1/2″ vertical strips of Take a Bow DSP add a modern yet festive look with their real red design.

The star of the card is the adorable house from the Humble Home Bundle, which I heat embossed in white on Pecan Pie cardstock. This gives it that charming gingerbread house effect! I punched out the image and popped it up on a Stylish Shapes stitched circle die-cut to help it stand out.

To finish it off, I stamped Merry Christmas in Real Red and scattered some tiny Peppermint Dots around the house.

Why You’ll Love This Card:

✔ Quick and easy holiday design
✔ Great way to use DSP scraps
✔ The embossed background adds dimension without bulk
✔ Perfect for mass-producing Christmas cards

Want to recreate this card? I’ve linked all the supplies below! 🎄✨


Versamark Pad
$13.00
Simply Shammy
$12.25

What Do You Think?

Would you make this card? Let me know in the comments! And if you’re crafting along, tag me @StampinWithLeah so I can see your creations.

Click here to shop my online store.
Click here to access & view the current catalogs.
Click here to subscribe to Thanks for hopping by! Make sure to pin this post for future reference and share it with your crafty friends.those fun Paper Pumpkin kits of creativity!
Click here for more information about joining my Online Monthly Technique Club. Earn even more goodies by joining a club!
Click here to learn more about joining my Ink Pad Pals Team. Get the MOST rewards including a discount on future products!
Follow me on social media! I share regularly on PinterestYouTube, and Facebook!
Please subscribe to my newsletter, too! Click here and enter your email. When you include your birthday you will even be added to my birthday card mailing list 🙂


Festive Friday – Classic Gold & Neutral Christmas Card

Welcome to Week 10 of my Festive Friday series! Each week, I share a brand-new Christmas card design to inspire your holiday crafting. This week’s creation is a true classic! With gold heat embossing, rich textures, and timeless neutrals, this handmade Christmas card is both stylish and simple to recreate. Plus, the Greeting of the Season stamp set and coordinating dies are on the Last Chance List—making this the perfect time to grab them before they’re gone!


Card Details & Supplies:

Stamp Set & Dies: Greeting of the Season (Last Chance List – Buy separately for the best deal!)

Cardstock: Pebbled Path (Retiring In Color – Available until April)

Designer Series Paper: Timeless Plaid 6×6 DSP

Ink & Embossing: Gold Embossing Powder, Versamark Ink Pad

Ribbon & Embellishments:Basic Beige Bordered Ribbon, Antique Pearls

Tools & Adhesives: Heat Tool, Layering Leaves Stamp Set (for gold speckles), Mini Glue Dots and Dimensionals


Why You’ll Love This Card!

Classic & Timeless: The gold embossing and neutral tones create a traditional holiday look.
Quick & Easy: Heat embossing adds a big impact with minimal effort!
Last Chance Products: Greeting of the Season stamp set and Pebbled Path cardstock are retiring—so grab them before they’re gone!

Shop the Supplies & Create Your Own!

Don’t wait—these Last Chance items won’t be around for long! Click below to shop the supplies and recreate this stylish Festive Friday card for your own holiday collection.

Here’s what I used to create this card:


Versamark Pad
$13.00
Paper Trimmer
$39.00
Simply Shammy
$12.25

Step-by-Step Instructions:

1. Create the Card Base & Layers

Start with a Pebbled Path cardstock base (5-1/2″ X 8-1/2″, scored at 4-1/4″)—a stunning deep neutral that pairs beautifully with the gold accents. Layer a piece of Timeless Plaid 6×6 DSP (4″ X 5-1/4″) on top, centering it for a clean, polished look.

2. Prepare the Label

Using the Greeting of the Season dies, cut a stitched label from Basic Black cardstock. This dark base makes the gold embossing truly pop!

3. Add the Heat Embossing

Stamp the “Wishing You a Merry Christmas” sentiment onto the label using Versamark Ink. Sprinkle Gold Embossing Powder over the stamped image, tap off the excess, and heat set with a Heat Tool for a luxurious metallic finish.

*Tip – since these words are all seperate in the stamp set, I laid them out on the label in the position I wanted, then I place a clear block on top of them so they were all aligned on one block and easy to stamp at once. This allows me to make multiples of this card quickly and easily.

For extra sophistication, use a speckled texture stamp from the Layering Leaves Stamp Set to add gold-embossed details to the edges of the label.

4. Add the Finishing Touches

Use Stampin’ Dimensionals to pop the label off the background, adding depth to your design.

Tie a bow with Basic Beige Bordered Ribbon and attach it to the top of the label.

Embellish with Antique Pearls for subtle texture and shine.

Adhere a piece of Basic White cardstock to the inside for a clean space to write.

I’d love to see your version of this card! Share it with me in the comments or tag me on social media @StampinWithLeah.

Click here to shop my online store.
Click here to access & view the current catalogs.
Click here to subscribe to Thanks for hopping by! Make sure to pin this post for future reference and share it with your crafty friends.those fun Paper Pumpkin kits of creativity!
Click here for more information about joining my Online Monthly Technique Club. Earn even more goodies by joining a club!
Click here to learn more about joining my Ink Pad Pals Team. Get the MOST rewards including a discount on future products!
Follow me on social media! I share regularly on PinterestYouTube, and Facebook!
Please subscribe to my newsletter, too! Click here and enter your email. When you include your birthday you will even be added to my birthday card mailing list 🙂


Festive Friday Week 9 – Elegant Holiday & Winter Wedding Cards

Welcome back to another Festive Friday, where I share a brand-new holiday card idea every week! This time, I’m featuring not one, but two elegant card designs—both perfect for Christmas, winter celebrations, and even winter weddings! ❄️✨

Timeless Plaid Meets Last Chance Deals!

Both cards feature the Timeless Plaid Designer Series Paper on a Pebbled Path cardstock layer. This neutral plaid pattern is a must-have for classic and cozy designs! I also used the Christmas Labels stamp set & coordinating dies, which are currently on the Last Chance list—and here’s a fun tip: purchasing them separately is actually a better deal than the bundle right now! So if you’ve had your eye on these, now is the time to grab them.

Two Color Variations – Which One is Your Favorite?

I had so much fun creating two different versions of this design. While both cards share the same layout and embellishments, the color palettes give them completely different vibes!

❤️ Classic Cherry Cobbler – This version has a traditional holiday feel with Cherry Cobbler cardstock & ribbon paired with a Thick Basic White card base. The sentiment is heat embossed in white, making it pop beautifully against the Pebbled Path label.

💜 Regal Blackberry Bliss – For a more luxurious and unique look, I created this card with Blackberry Bliss cardstock & ribbon (which is also on the Last Chance list!). The sentiment is heat embossed in gold, adding a rich and elegant finish.

Both cards are adorned with Antique Pearls, which add just the right amount of shine and sophistication.


Shop the Supplies Before They’re Gone!

Since some of these items are on the Last Chance list, they won’t be around for long. Grab them before they sell out! Click below to shop directly.

Here’s what I used to create this card:


Versamark Pad
$13.00
Paper Trimmer
$39.00
Simply Shammy
$12.25

Beyond Christmas – Perfect for Winter Weddings!

I love that this sentiment isn’t strictly Christmas-themed! While these make gorgeous holiday cards, they would also be stunning for a winter wedding, anniversary, or even a special thank-you card. The classic fonts and elegant label design make them super versatile.

I’d love to hear what you think! Which version is your favorite – Cherry Cobbler ❤️ or Blackberry Bliss 💜? Let me know in the comments!

Don’t forget to pin this idea for later and follow along for more Festive Friday inspiration each week! 🎄✨

Click here to shop my online store.
Click here to access & view the current catalogs.
Click here to subscribe to Thanks for hopping by! Make sure to pin this post for future reference and share it with your crafty friends.those fun Paper Pumpkin kits of creativity!
Click here for more information about joining my Online Monthly Technique Club. Earn even more goodies by joining a club!
Click here to learn more about joining my Ink Pad Pals Team. Get the MOST rewards including a discount on future products!
Follow me on social media! I share regularly on PinterestYouTube, and Facebook!
Please subscribe to my newsletter, too! Click here and enter your email. When you include your birthday you will even be added to my birthday card mailing list 🙂


Festive Friday Week 8 – A Classic Christmas with More Wishes & Take a Bow DSP

Welcome back to Festive Friday! This week’s card brings classic Christmas charm with bold typography and festive holly details. I used the More Wishes Stamp Set, Take a Bow 6×6 DSP, and the Snowflake Sky 3D Embossing Folder to create a clean and modern holiday design. ❄️❤️

Let’s take a closer look at this week’s festive creation! 🎄


The Card Design

This design is all about layers, texture, and festive details! The sentiment is fussy cut and placed at an angle, adding a dynamic touch to the layout. The holly leaves were carefully trimmed from the Take a Bow DSP, bringing in a natural element that ties everything together. Layered patterned paper creates a fun backdrop, and the crisp border of the Nested Essentials Die with rounded corners frames the sentiment beautifully. The Cherry Cobbler & Pearl Adhesive-backed Berries add the perfect sparkle, making the holly come to life with a festive shimmer.

Card Highlights:

  • Fussy-cut sentiment angled for a playful layout
  • Holly elements hand-cut from DSP for a coordinated embellishment
  • Layered DSP panels add depth and contrast
  • Embossed background for subtle texture
  • Nested Essentials Die with rounded corners for a polished frame
  • Sparkling adhesive-backed berries for a festive finishing touch

Supplies Used

Here’s what I used to create this card:


Paper Snips
$16.50

Step-by-Step Instructions

  1. Create the Card Base: Cut Basic White cardstock to 5-1/2” x 8-1/2”, score at 4-1/4”, and fold.
  2. Emboss the Background: Use the Snowflake Sky 3D Embossing Folder on a 4″ X 5-1/4″ Basic White panel for a subtle textured backdrop. Adher the panel to the card base with Liquid Glue.
  3. Layer the DSP: Cut two panels of Take a Bow 6×6 DSP at 2-3/4″ X 4″, adhere them to the card front slightly offset for dimension.
  4. Stamp the Sentiment: Ink the MERRY image from the More Wishes stamp set in Real Red and stamp onto the top left corner of the 2nd largest rounded rectangle from the Nested Essential Dies. Then stamp the christmas image on a scrap paper in Real Red Ink, fussy cut and adhere to the die-cut panel using Mini Glue Dots. Adhere this panel to the center left of the card front using Dimensionals.
  5. Fussy Cut the Holly: Trim holly leaves from the Take a Bow DSP and adhere near the sentiment.
  6. Embellish: Add Cherry Cobbler & Pearl Adhesive-backed Berries to the holly leaves for the perfect finishing touch.

Why I Love This Design

This card is bright, fun, and festive! The Take a Bow DSP brings in cheerful holiday patterns, while the embossed background adds elegant texture. The fussy-cut holly and berries provide a special handmade touch that makes this design feel extra merry! 🎄✨

Don’t Miss Out – Today is the Last Day of Sale-a-bration!

🚨 Act now! Today is the FINAL DAY of Sale-a-bration! Don’t miss your chance to earn FREE exclusive products with your purchase or take advantage of the amazing Starter Kit special to join my team! More details are below.

📌 Shop now or sign up before it’s too late!

Are you crafting your Christmas cards yet? Don’t wait until the holiday rush—start now and enjoy the process!

📌 Pin this post for inspiration & share it with your crafty friends!

See you next week for another Festive Friday creation! 🎄✨

A perk to ordering with me in the month of February is that with any order over $75cdn, you will receive a FREE SAB item and I am emailing out an amazing 37 project Tutorial Bundle. Just use the host code below. As a member of my team you get free access to this Tutorial Bundle.

Let’s Craft Together!

I’d love for you to join one of my in-person card classes:

These classes are perfect for all skill levels and are a great way to learn new techniques, try out Stampin’ Up! products, and connect with other cardmakers. Spots fill up quickly, so be sure to register early!

Also, don’t forget to sign up for my Stampin’ With Leah Newsletter to get all the details on upcoming events, promotions, and creative tips. You won’t want to miss out!

Live in Canada, don’t have a demonstrator? Contact me to get a catalogue or find out why right now is a great time to join my team.

You can see all the benefits of joining my team (the Ink Pad Pals) by clicking the image below. Right now there are even more perks to joining during Sale-a-bration!

Click here to shop my online store.
Click here to access & view the current catalogs.
Click here to subscribe to Thanks for hopping by! Make sure to pin this post for future reference and share it with your crafty friends.those fun Paper Pumpkin kits of creativity!
Click here for more information about joining my Online Monthly Technique Club. Earn even more goodies by joining a club!
Click here to learn more about joining my Ink Pad Pals Team. Get the MOST rewards including a discount on future products!
Follow me on social media! I share regularly on PinterestYouTube, and Facebook!
Please subscribe to my newsletter, too! Click here and enter your email. When you include your birthday you will even be added to my birthday card mailing list 🙂


February 2025 – 1 Layout/ 3 Cards – Featuring Sale-A-Bration Products!

Sale-A-Bration is ending in just 3 days (February 28th), and I had to showcase some of my favorite SAB items before they’re gone! I created three different cards using the same layout from page 22 of the Stampin’ Up! Annual Catalogue—each one featuring a unique and fun Sale-A-Bration product. If you haven’t grabbed these goodies yet, now is the time!

Card #1: Heart Shaped Bundle

This elegant card highlights the Heart Shaped Bundle, stamped in Highland Heather Ink and accented with the Fresh Freesia Seam Binding Ribbon. I love how the delicate heart wreath creates a soft and pretty focal point. Perfect for sending a sweet note!

Card #2: Friendly Seagulls

For a more playful look, I used the Friendly Seagulls Stamp Set and paired it with soft ombré tones from the Ocean Friends 12X12 DSP. The background gives an ocean-inspired feel, and those little fish add the perfect whimsical touch!

Card #3: Fruit Salad DSP

This card is all about fresh and fruity vibes! Featuring the Fruit Salad 6×6 DSP, I fussy cut some of the fruit elements to create a vibrant, dimensional look. Such a fun and cheerful card!

Watch the Video Tutorial!

Want to see these cards come together step by step? Watch the video replay here:

Supplies Used:


Paper Snips
$16.50

I’ve linked all the supplies used in these cards below. Click the images to shop and add them to your cart! You will also find a printable copy of the templates from the Annual Catalogue and some printable PDFs for the 3 cards I created today.

Want These Products? Shop Before They’re Gone!

Sale-A-Bration rewards are earned with every $75 or $150 order. Don’t miss your chance to get these items for free before February 28th!

Looking for some other fun stamping experiences in person or online? If you are local to Port Coquitlam, join me in person for Coffee and Cards or contact me to book your own card class. You can always check out my calendar of events at my website.

Orders over $65 (and members of my Ink Pad Pals team) also qualify to receive this fantastic 37 project Tutorial Bundle as a thank you from me.

Want to be the first to hear about my upcoming classes? Subscribe to my newsletter!

Please leave a comment below and make sure to follow this blog for more great inspiration!

Click here to shop my online store.
Click here to access & view the current catalogs.
Click here to subscribe to those fun Paper Pumpkin kits of creativity!
Click here for more information about joining my Online Monthly Technique Club. Earn even more goodies by joining a club!
Click here to learn more about joining my Ink Pad Pals Team. Get the MOST rewards including a discount on future products!
Follow me on social media! I share regularly on PinterestYouTube, and Facebook!
Please subscribe to my newsletter, too! Click here and enter your email. When you include your birthday you will even be added to my birthday card mailing list 🙂


Festive Friday Week 7 – Nests of Winter with Everyday Arches Dies

Welcome back to Festive Friday! This week’s card features the Everyday Arches Dies, Greetings of the Season Stamp Set, and the Nests of Winter DSP for a soft, wintery holiday look. ❄️ The background, embossed with the Snowflake Sky 3D Embossing Folder and brushed with White Craft Ink, adds the perfect snowy effect. Plus, I’ve added a touch of shimmer using the FREE Sale-A-Bration Night of Navy & Gold Glittered Ribbon! ✨

Let’s take a closer look at this week’s festive design! 🎄


The Card Design

This design showcases elegant winter birds, layered with the Everyday Arches Dies to frame the delicate branches from the Nests of Winter DSP. The cool tones and subtle texture create a calm and cozy holiday feel—perfect for sending warm winter wishes!

Card Highlights:

  • Dies & Stamps: Everyday Arches Dies & Greetings of the Season Stamp Set
  • Designer Series Paper: Nests of Winter DSP
  • Embossing: Snowflake Sky 3D Embossing Folder (with White Craft Ink for added depth)
  • Color Palette: Gray Granite, Night of Navy, Basic White
  • Embellishments: Neutrals Adhesive-backed Sequins & FREE Night of Navy & Gold Glittered Ribbon

Supplies Used

Here’s what I used to create this card:


Paper Snips
[103579]
$16.50

Step-by-Step Instructions

  1. Create the Card Base: Cut Gray Granite cardstock to 5-1/2” x 8-1/2”, score at 4-1/4”, and fold.
  2. Emboss the Background: Run a 4″ X 5-1/4″ Gray Granite panel through the Snowflake Sky 3D Embossing Folder, then lightly brush with White Craft Ink for contrast.
  3. Die-Cut the Arch Frame: Use the Everyday Arches Dies (3rd and 4th largest) to cut Night of Navy and DSP layers, adhere together and attach to the embosssed layer.
  4. Tie it all together: Tie a Night of Navy & Gold Glittered Ribbon around the embossed layer and make a bow on the right side. Adhere this layer to the card base.
  5. Stamp the Sentiment: Stamp “Merry” and “Christmas” in Night of Navy ink on the left side of the largest Basic White Stylish Shapes banner. Use Mini Dimensionals to attach to the card front, then trim the right edge off of the label.
  6. Embellish: Attach 3 white Neutrals Adhesive-backed Sequins for a snowy finish!

Why I Love This Design

This card has sophisticated elegance with minimal effort! The Everyday Arches Dies create a beautiful frame, and the embossed snowflake background gives a subtle, frosty effect. Plus, the Nests of Winter DSP provides a soft and serene winter scene, making this card perfect for the holidays!


Love this look? Don’t miss out on the FREE Night of Navy & Gold Glittered Ribbon—available during Sale-A-Bration with a qualifying purchase! 🎁

📌 Pin this post for inspiration & share it with your crafty friends!

See you next week for another Festive Friday creation! 🎄✨

A perk to ordering with me in the month of February is that with any order over $75cdn, you will receive a FREE SAB item and I am emailing out an amazing 37 project Tutorial Bundle. Just use the host code below. As a member of my team you get free access to this Tutorial Bundle.

Let’s Craft Together!

I’d love for you to join one of my in-person card classes:

These classes are perfect for all skill levels and are a great way to learn new techniques, try out Stampin’ Up! products, and connect with other cardmakers. Spots fill up quickly, so be sure to register early!

Also, don’t forget to sign up for my Stampin’ With Leah Newsletter to get all the details on upcoming events, promotions, and creative tips. You won’t want to miss out!

Live in Canada, don’t have a demonstrator? Contact me to get a catalogue or find out why right now is a great time to join my team.

You can see all the benefits of joining my team (the Ink Pad Pals) by clicking the image below. Right now there are even more perks to joining during Sale-a-bration!

Click here to shop my online store.
Click here to access & view the current catalogs.
Click here to subscribe to Thanks for hopping by! Make sure to pin this post for future reference and share it with your crafty friends.those fun Paper Pumpkin kits of creativity!
Click here for more information about joining my Online Monthly Technique Club. Earn even more goodies by joining a club!
Click here to learn more about joining my Ink Pad Pals Team. Get the MOST rewards including a discount on future products!
Follow me on social media! I share regularly on PinterestYouTube, and Facebook!
Please subscribe to my newsletter, too! Click here and enter your email. When you include your birthday you will even be added to my birthday card mailing list 🙂


Festive Friday Week 6 – Elegant Z-Fold with Winter Meadow DSP

Welcome back to Festive Friday! This week, I’m featuring a beautiful Z-Fold Christmas card using the Winter Meadow Designer Series Paper (DSP) and the Greeting of the Season Bundle—which is currently on the Last Chance List! ❄️ If you love this elegant holiday set, now is the time to grab it before it’s gone!

Let’s take a closer look at this week’s design! 🎄✨


The Card Design

Z-Fold cards are a fun and easy way to add dimension to your projects while keeping the design simple and elegant. The stunning watercolor prints in the Winter Meadow DSP set the perfect wintery backdrop, while the oval die-cut and Bough punch greenery adds a festive touch.

Card Highlights:

  • Stamp Set & Dies: Greetings of the Season Bundle (Last Chance List!)
  • Fancy Fold: Z-Fold layout for added interest
  • Color Palette: A cool and elegant mix of Night of Navy, Misty Moonlight, and Garden Green
  • Elegant Accents: Navy and gold ribbon with sequins embellishments for a festive sparkle
  • Wintery Vibes: Soft watercolor backgrounds from Winter Meadow DSP

Supplies Used

Here’s what I used to create this card:


Bough Punch
[157711]
$33.00
Paper Snips
[103579]
$16.50

Step-by-Step Instructions

  1. Create the Card Base: Mark a full sheet of Night of Navy cardstock at 3″ down on the right and 3″ up on the left. Then cut lengthwise on that diagonal. Then score at 3” and 6-3/4” to create the Z-Fold. This will create 2 card bases.
  2. Add Designer Paper: Cut tops on a diagonal and adhere pieces of Winter Meadow DSP to each panel of the card base. (2-3/4″ X 3-1/2″ ( front panel), 3-1/2″ X 4-1/4″ (middle panel), 4″ X 5-1/4″ ( back panel).
  3. Stamp & Die Cut: Stamp the sentiment in Night of Navy ink on a Basic White die-cut oval from the Greeting of the Season Bundle. Adhere to the card front using Dimensionals.
  4. Add Greenery: Use Garden Green Ink and a blending brush to apply colour to two Bough Punch cut-outs. Tuck them behind the sentiment and adhere with Liquid Glue.
  5. Finishing Touches: Attach a Navy & Gold ribbon bow to the oval and scatter a few gold sequins for extra sparkle.

Why I Love This Design

Z-Fold cards are simple yet impressive, making them great for special holiday greetings. The Winter Meadow DSP creates a soft, snowy background, while the Greeting of the Season Bundle provides an elegant finishing touch. This is a design you can easily recreate with different colors and papers!


Love this card? Don’t forget—the Greeting of the Season Bundle is on the Last Chance List, so grab it while you can!

📌 Pin this post for inspiration and share with your crafty friends!

Happy stamping, and see you next week for another Festive Friday creation! 🎄

A perk to ordering with me in the month of February is that with any order over $75cdn, you will receive a FREE SAB item and I am emailing out an amazing 37 project Tutorial Bundle. Just use the host code below. As a member of my team you get free access to this Tutorial Bundle.

Let’s Craft Together!

I’d love for you to join one of my in-person card classes:

These classes are perfect for all skill levels and are a great way to learn new techniques, try out Stampin’ Up! products, and connect with other cardmakers. Spots fill up quickly, so be sure to register early!

Also, don’t forget to sign up for my Stampin’ With Leah Newsletter to get all the details on upcoming events, promotions, and creative tips. You won’t want to miss out!

Live in Canada, don’t have a demonstrator? Contact me to get a catalogue or find out why right now is a great time to join my team.

You can see all the benefits of joining my team (the Ink Pad Pals) by clicking the image below. Right now there are even more perks to joining during Sale-a-bration!

Click here to shop my online store.
Click here to access & view the current catalogs.
Click here to subscribe to Thanks for hopping by! Make sure to pin this post for future reference and share it with your crafty friends.those fun Paper Pumpkin kits of creativity!
Click here for more information about joining my Online Monthly Technique Club. Earn even more goodies by joining a club!
Click here to learn more about joining my Ink Pad Pals Team. Get the MOST rewards including a discount on future products!
Follow me on social media! I share regularly on PinterestYouTube, and Facebook!
Please subscribe to my newsletter, too! Click here and enter your email. When you include your birthday you will even be added to my birthday card mailing list 🙂


Festive Friday Week 5 – Quick & Simple with the Christmas Labels Stamp Set

Welcome back to Festive Friday! This week’s card is a special one—it’s my first card post-surgery, and I’m so happy to be back crafting! Since I needed something easy and stress-free, I created a quick and simple Christmas card featuring the Christmas Labels Stamp Set & Dies. This bundle is currently on the Last Chance List, so if you love it, now is the time to grab it before it’s gone! ⏳

Let’s take a closer look at this week’s design! 🎄✨


The Card Design

For this week’s layout, I kept things clean and simple, focusing on the gorgeous label die and festive stamped elements. This design is perfect for mass-producing if you’re getting a head start on holiday cards for Christmas 2025!

Card Highlights:

  • Stamp Set & Dies: Christmas Labels Stamp Set & Dies (Last Chance List!)
  • Quick & Simple Layout: A great go-to design when you need an easy yet beautiful card.
  • Festive Color Palette: A rich combination of Cherry Cobbler, Basic White, and Pretty Peacock for a classic holiday feel.
  • Elegant Texture: The embossed background adds a soft snowfall effect, making the design extra special.
  • Metallic Accents: A gold trim bow and subtle embellishments bring warmth and shimmer to the card.

Supplies Used

Here’s what I used to create this card:


Bough Punch
[157711]
$33.00
Paper Snips
[103579]
$16.50

Step-by-Step Instructions

  1. Prepare the Card Base: Cut a piece of Thick Basic White cardstock to 4-1/4” x 11”, scored at 5-1/2”.
  2. Emboss the 2nd layer: Use the Snowflake Sky 3D embossing folder to add a soft snowfall texture to a 4-1/4” x 4-3/4” piece of Basic White cardstock.
  3. Add Designer Series Paper: Cut a 4-1/4″ X 2-1/4″strip of Regal Distressed Pattern DSP (Cherry Cobbler and gold grid) and adhere it across the center of the embossed layer.
  4. Add Ribbon: Wrap a piece of gold trim and make a bow on the left side for a touch of elegance and then secure the whole layer to the card base.
  5. Die-Cut the Label: Using the Christmas Labels Dies, cut a decorative label from Basic White cardstock.
  6. Stamp the Sentiment: In Cherry Cobbler ink, stamp a holiday sentiment from the Christmas Labels Stamp Set onto the label. Attach this label to the right side of the card front using Dimenisonals.
  7. Create the Foliage Accent: Use the Bough Punch to create the Pretty Peacock foliage from the Season of Elegance DSP and tuck them behind the sentiment label, hold in place with Mini Glue Dots.
  8. Add Finishing Touches: Scatter a few Iridescent Foil Gems for subtle sparkle.

Why I Love This Design

Sometimes, simple is best! 💕 This layout is fast, elegant, and easy to replicate, making it a great choice for mass-producing holiday cards. Whether you’re crafting after a break (like me!) or just need a quick holiday project, this design is perfect.

If you love this Christmas Labels Stamp Set & Dies, don’t wait—it’s on the Last Chance List and won’t be around for long! 🎁 Shop now to grab yours before it retires!

Don’t forget to pin this post for inspiration and share with your crafty friends!

Happy stamping, and see you next week for another Festive Friday creation!

A perk to ordering with me in the month of February is that with any order over $75cdn, you will receive a FREE SAB item and I am emailing out an amazing 37 project Tutorial Bundle. Just use the host code below. As a member of my team you get free access to this Tutorial Bundle.

Let’s Craft Together!

I’d love for you to join one of my in-person card classes:

These classes are perfect for all skill levels and are a great way to learn new techniques, try out Stampin’ Up! products, and connect with other cardmakers. Spots fill up quickly, so be sure to register early!

Also, don’t forget to sign up for my Stampin’ With Leah Newsletter to get all the details on upcoming events, promotions, and creative tips. You won’t want to miss out!

Live in Canada, don’t have a demonstrator? Contact me to get a catalogue or find out why right now is a great time to join my team.

You can see all the benefits of joining my team (the Ink Pad Pals) by clicking the image below. Right now there are even more perks to joining during Sale-a-bration!

Click here to shop my online store.
Click here to access & view the current catalogs.
Click here to subscribe to Thanks for hopping by! Make sure to pin this post for future reference and share it with your crafty friends.those fun Paper Pumpkin kits of creativity!
Click here for more information about joining my Online Monthly Technique Club. Earn even more goodies by joining a club!
Click here to learn more about joining my Ink Pad Pals Team. Get the MOST rewards including a discount on future products!
Follow me on social media! I share regularly on PinterestYouTube, and Facebook!
Please subscribe to my newsletter, too! Click here and enter your email. When you include your birthday you will even be added to my birthday card mailing list 🙂