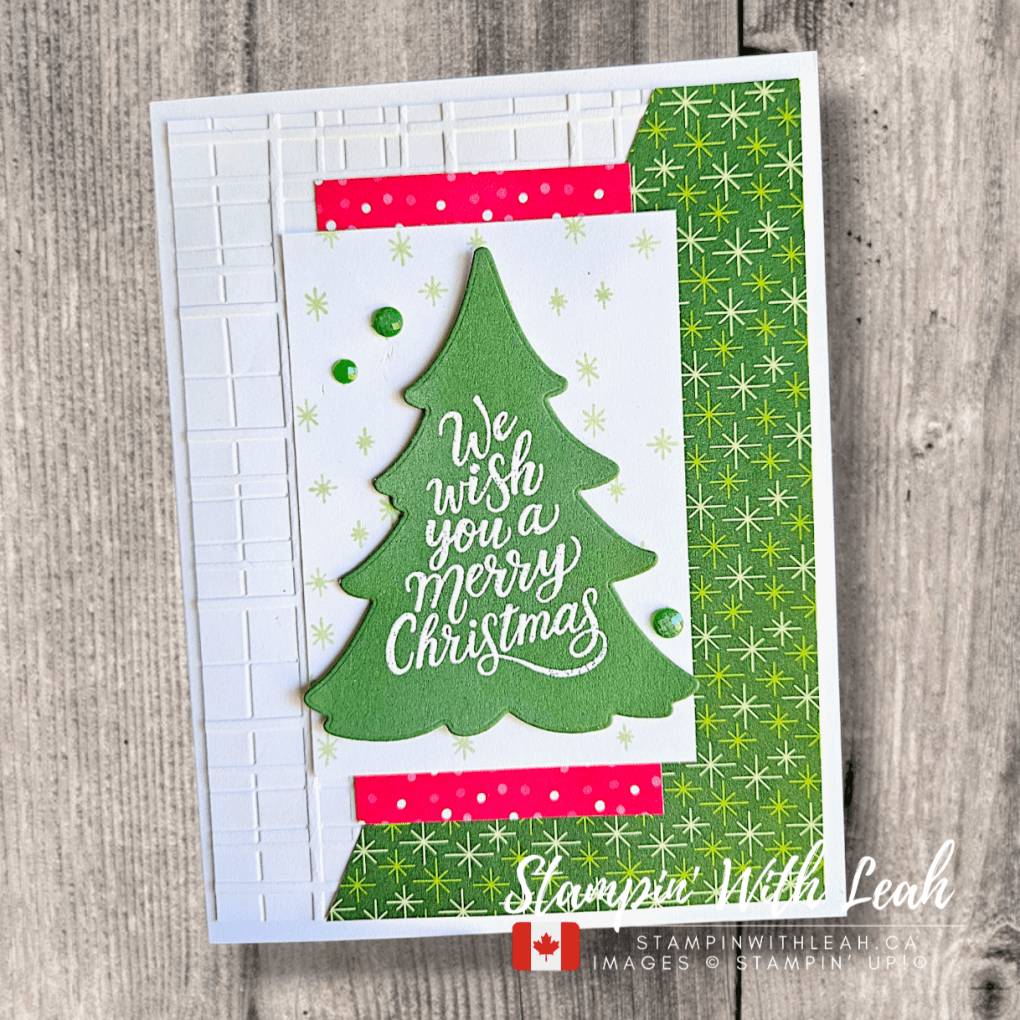
If you’re like me and love prepping Christmas cards all year long, you’re going to want to snag these Last Chance goodies before they’re gone! This week’s Festive Friday card features a bold and classic design using the Merriest Trees stamp set and dies, along with some fabulous coordinating Last Chance items—all at discounted prices!

🎨 Featured Products:
Merriest Trees Stamp Set and Dies – Last Chance
Take a Bow 6″ x 6″ Designer Series Paper – Last Chance
Forever Plaid 3D Embossing Folder
Earth Tones Shimmer Gems – Last Chance
🔧 Step-by-Step Card Instructions:
1. Card Base:
Start with a standard A2 card base (5-1/2″ x 8-1/2″, scored at 4-1/4″) in Basic White Thick cardstock.
2. Embossed Background:
Cut a 4″ x 5-1/4″ piece of Basic White cardstock. Emboss it using the Forever Plaid 3D Embossing Folder. Then cut this piece on a diagonal and adhere one triangle to the top left corner of the card front.
3. Designer Series Paper:
Add a 4″ x 5-1/4″ panel of Take a Bow DSP on the opposite corner. This striking pattern brings bold holiday energy!
4. Center Panel & Tree:
Stamp the star background on a 2-1/2″ x 3-1/2″ piece of Basic White using Soft Sea Foam Ink. Heat emboss the tree sentiment from Merriest Trees onto Garden Green cardstock using white embossing powder, then die cut using the coordinating tree die. Pop it up with Stampin’ Dimensionals.
5. Red Accents:
Add two 2″ x 1″ strips of red DSP to the top and bottom of the white panel to add a pop of brightness and balance.
6. Embellishments:
Finish it off with Earth Tones Shimmer Gems for sparkle and dimension.
Here is a full list of supplies:
![Basic White 8 1/2" X 11" Thick Cardstock [ 159229 ]](https://assets1.tamsnetwork.com/images/EC042017NF/159229s.jpg "Basic White 8 1/2\" X 11\" Thick Cardstock [ 159229 ]") $15.50 | ![Basic White 8 1/2" X 11" Cardstock [ 166780 ]](https://assets1.tamsnetwork.com/images/EC042017NF/166780s.jpg "Basic White 8 1/2\" X 11\" Cardstock [ 166780 ]") $20.00 | ![Garden Green 8-1/2" X 11" Cardstock [ 102584 ]](https://assets1.tamsnetwork.com/images/EC042017NF/102584s.jpg "Garden Green 8-1/2\" X 11\" Cardstock [ 102584 ]") $15.75 | ![Take A Bow 6" X 6" (15.2 X 15.2 Cm) Designer Series Paper [ 164309 ]](https://assets1.tamsnetwork.com/images/EC042017NF/164309s.jpg "Take A Bow 6\" X 6\" (15.2 X 15.2 Cm) Designer Series Paper [ 164309 ]") $17.00 | ![Merriest Trees Photopolymer Stamp Set (English) [ 162043 ]](https://assets1.tamsnetwork.com/images/EC042017NF/162043s.jpg "Merriest Trees Photopolymer Stamp Set (English) [ 162043 ]") $34.00 | ![Merriest Trees Dies [ 162047 ]](https://assets1.tamsnetwork.com/images/EC042017NF/162047s.jpg "Merriest Trees Dies [ 162047 ]") $51.00 |
![Soft Sea Foam Classic Stampin' Pad [ 147102 ]](https://assets1.tamsnetwork.com/images/EC042017NF/147102s.jpg "Soft Sea Foam Classic Stampin' Pad [ 147102 ]") $12.25 | ![Versamark Pad [ 102283 ]](https://assets1.tamsnetwork.com/images/EC042017NF/102283s.jpg "Versamark Pad [ 102283 ]") $13.00 | ![Basics Wow! Embossing Powder [ 165679 ]](https://assets1.tamsnetwork.com/images/EC042017NF/165679s.jpg "Basics Wow! Embossing Powder [ 165679 ]") $29.00 | ![Embossing Additions Tool Kit [ 159971 ]](https://assets1.tamsnetwork.com/images/EC042017NF/159971s.jpg "Embossing Additions Tool Kit [ 159971 ]") $37.00 | ![Heat Tool (Us And Canada) [ 129053 ]](https://assets1.tamsnetwork.com/images/EC042017NF/129053s.jpg "Heat Tool (Us And Canada) [ 129053 ]") $44.00 | ![Earth Tones Shimmer Gems [ 164070 ]](https://assets1.tamsnetwork.com/images/EC042017NF/164070s.jpg "Earth Tones Shimmer Gems [ 164070 ]") $11.75 |
![Forever Plaid 3 D Embossing Folder [ 164049 ]](https://assets1.tamsnetwork.com/images/EC042017NF/164049s.jpg "Forever Plaid 3 D Embossing Folder [ 164049 ]") $16.50 | ![Multipurpose Liquid Glue [ 110755 ]](https://assets1.tamsnetwork.com/images/EC042017NF/110755s.jpg "Multipurpose Liquid Glue [ 110755 ]") $8.25 | ![Stampin' Dimensionals [ 104430 ]](https://assets1.tamsnetwork.com/images/EC042017NF/104430s.jpg "Stampin' Dimensionals [ 104430 ]") $6.00 |
This card is the perfect way to combine creative joy with savvy savings.
✨ NEW! Earn Rewards Every Time You Stamp ✨
Introducing Stampin’ Rewards—Because You Deserve a Little Extra!
I’m so excited to share that Stampin’ Up! has launched a brand-new Stampin’ Rewards program—and YOU can start earning perks just for shopping your favourite crafty products!
Here’s how it works:
- When you place a qualifying order and have opted in to the rewards program, you’ll earn Stampin’ Rewards automatically.
- These rewards can be redeemed on future orders for even more fun products.
- If you check out as a guest or haven’t opted in, you won’t earn rewards—so be sure to create an account and update your preferences!
Want help getting started or maximizing your rewards? I’ve got you! Reach out anytime or let me build a custom cart for you with my new tools. 🛍️
Start today—your next crafty treat could be FREE!
Looking for more ways to stamp with me? Make sure to watch my You Tube live each Wednesday and if you are local – join my card class!

Looking for even more ways to enjoy stamping? Join my Stampin’ Up! Ink Pad Pals team!
- Save 20%+ on your orders.
- Get free access to my monthly card class tutorials.
- Enjoy our monthly team meetings with stamping fun and collaboration.
Contact me to find out more or see the details on my website.


Click here to shop my online store.
Click here to access & view the current catalogs.
Click here to subscribe to those fun Paper Pumpkin kits of creativity!
Click here for more information about joining my Online Monthly Technique Club. Earn even more goodies by joining a club!
Click here to learn more about joining my Ink Pad Pals Team. Get the MOST rewards including a discount on future products!
Follow me on social media! I share regularly on Pinterest, YouTube, and Facebook!
Please subscribe to my newsletter, too! Click here and enter your email. When you include your birthday you will even be added to my birthday card mailing list 🙂


![Basic Gray 8-1/2" X 11" Cardstock [ 121044 ]](https://assets1.tamsnetwork.com/images/EC042017NF/121044s.jpg "Basic Gray 8-1/2\" X 11\" Cardstock [ 121044 ]")
![2024–2026 In Color™ 6" X 6" (15.2 X 15.2 Cm) Designer Series Paper [ 163777 ]](https://assets1.tamsnetwork.com/images/EC042017NF/163777s.jpg "2024–2026 In Color™ 6\" X 6\" (15.2 X 15.2 Cm) Designer Series Paper [ 163777 ]")
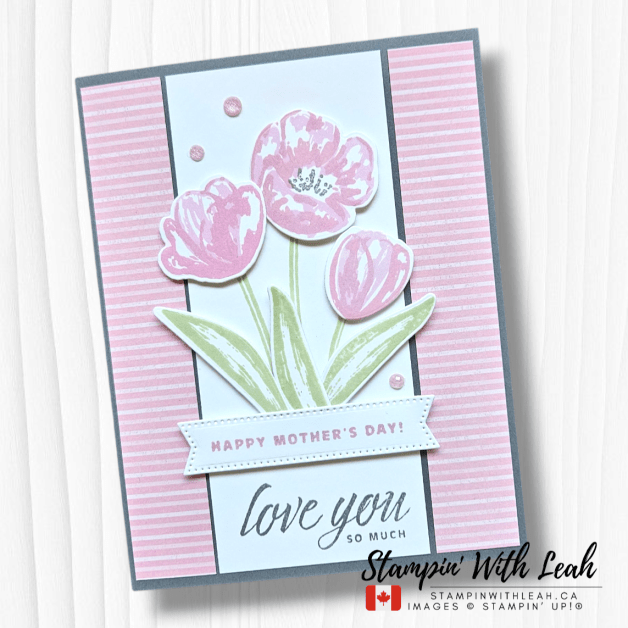
![Flowering Tulips Bundle (English) [ 157678 ]](https://assets1.tamsnetwork.com/images/EC042017NF/157678s.jpg "Flowering Tulips Bundle (English) [ 157678 ]")
![Pretty In Pink Classic Stampin Pad [ 163807 ]](https://assets1.tamsnetwork.com/images/EC042017NF/163807s.jpg "Pretty In Pink Classic Stampin Pad [ 163807 ]")
![Bubble Bath Classic Stampin' Pad [ 161664 ]](https://assets1.tamsnetwork.com/images/EC042017NF/161664s.jpg "Bubble Bath Classic Stampin' Pad [ 161664 ]")
![Basic Gray Classic Stampin' Pad [ 149165 ]](https://assets1.tamsnetwork.com/images/EC042017NF/149165s.jpg "Basic Gray Classic Stampin' Pad [ 149165 ]")
![2024–2026 In Color™ Shimmer Gems [ 163781 ]](https://assets1.tamsnetwork.com/images/EC042017NF/163781s.jpg "2024–2026 In Color™ Shimmer Gems [ 163781 ]")
![Stylish Shapes Dies [ 159183 ]](https://assets1.tamsnetwork.com/images/EC042017NF/159183s.jpg "Stylish Shapes Dies [ 159183 ]")


![Lost Lagoon 8-1/2" X 11" Cardstock [ 133679 ]](https://assets1.tamsnetwork.com/images/EC042017NF/133679s.jpg "Lost Lagoon 8-1/2\" X 11\" Cardstock [ 133679 ]")
![Pebbled Path 8 1/2" X 11" Cardstock [ 161722 ]](https://assets1.tamsnetwork.com/images/EC042017NF/161722s.jpg "Pebbled Path 8 1/2\" X 11\" Cardstock [ 161722 ]")
![Timeless Plaid 6" X 6" (15.2 X 15.2 Cm) Designer Series Paper [ 164678 ]](https://assets1.tamsnetwork.com/images/EC042017NF/164678s.jpg "Timeless Plaid 6\" X 6\" (15.2 X 15.2 Cm) Designer Series Paper [ 164678 ]")
![Cutest Onesie Bundle (English) [ 163740 ]](https://assets1.tamsnetwork.com/images/EC042017NF/163740s.jpg "Cutest Onesie Bundle (English) [ 163740 ]")
![Lost Lagoon Classic Stampin' Pad [ 161678 ]](https://assets1.tamsnetwork.com/images/EC042017NF/161678s.jpg "Lost Lagoon Classic Stampin' Pad [ 161678 ]")
![Pebbled Path Classic Stampin' Pad [ 161648 ]](https://assets1.tamsnetwork.com/images/EC042017NF/161648s.jpg "Pebbled Path Classic Stampin' Pad [ 161648 ]")
![Lost Lagoon Stampin’ Blends Combo Pack [ 161680 ]](https://assets1.tamsnetwork.com/images/EC042017NF/161680s.jpg "Lost Lagoon Stampin’ Blends Combo Pack [ 161680 ]")
![Adhesive Backed Textured Dots [ 163338 ]](https://assets1.tamsnetwork.com/images/EC042017NF/163338s.jpg "Adhesive Backed Textured Dots [ 163338 ]")

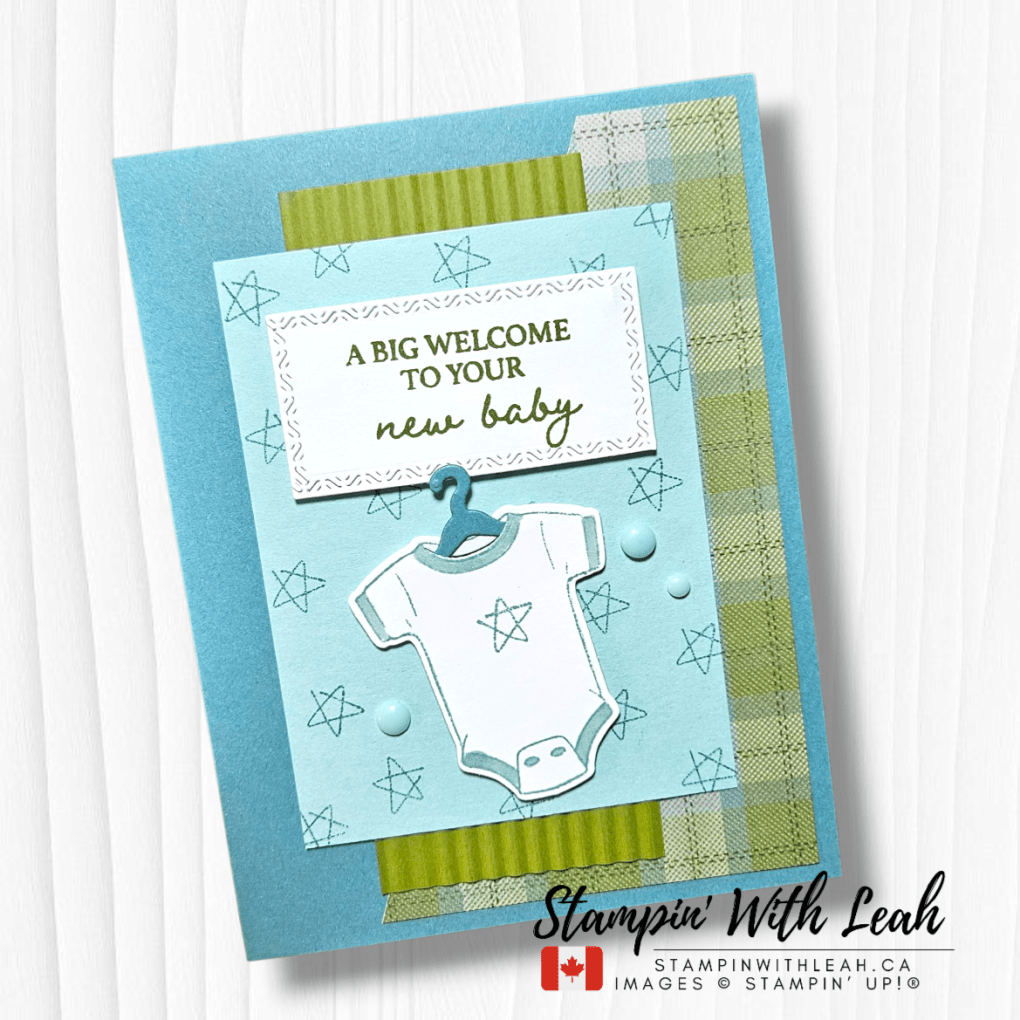


![Old Olive 8-1/2" X 11" Cardstock [ 100702 ]](https://assets1.tamsnetwork.com/images/EC042017NF/100702s.jpg "Old Olive 8-1/2\" X 11\" Cardstock [ 100702 ]")
![Pool Party 8-1/2" X 11" Cardstock [ 122924 ]](https://assets1.tamsnetwork.com/images/EC042017NF/122924s.jpg "Pool Party 8-1/2\" X 11\" Cardstock [ 122924 ]")
![Old Olive Classic Stampin' Pad [ 147090 ]](https://assets1.tamsnetwork.com/images/EC042017NF/147090s.jpg "Old Olive Classic Stampin' Pad [ 147090 ]")
![Rainbow Adhesive Backed Dots [ 162758 ]](https://assets1.tamsnetwork.com/images/EC042017NF/162758s.jpg "Rainbow Adhesive Backed Dots [ 162758 ]")
![Textured Notes Dies [ 165555 ]](https://assets1.tamsnetwork.com/images/EC042017NF/165555s.jpg "Textured Notes Dies [ 165555 ]")
![Mini Corrugated 3 D Embossing Folder [ 165559 ]](https://assets1.tamsnetwork.com/images/EC042017NF/165559s.jpg "Mini Corrugated 3 D Embossing Folder [ 165559 ]")


![Summer Splash 8 1/2" X 11 Cardstock [ 163797 ]](https://assets1.tamsnetwork.com/images/EC042017NF/163797s.jpg "Summer Splash 8 1/2\" X 11 Cardstock [ 163797 ]")
![Night Of Navy 8-1/2" X 11" Cardstock [ 100867 ]](https://assets1.tamsnetwork.com/images/EC042017NF/100867s.jpg "Night Of Navy 8-1/2\" X 11\" Cardstock [ 100867 ]")
![Petunia Pop 8 1/2" X 11" Cardstock [ 163801 ]](https://assets1.tamsnetwork.com/images/EC042017NF/163801s.jpg "Petunia Pop 8 1/2\" X 11\" Cardstock [ 163801 ]")
![Peach Pie 8 1/2" X 11" Cardstock [ 163799 ]](https://assets1.tamsnetwork.com/images/EC042017NF/163799s.jpg "Peach Pie 8 1/2\" X 11\" Cardstock [ 163799 ]")

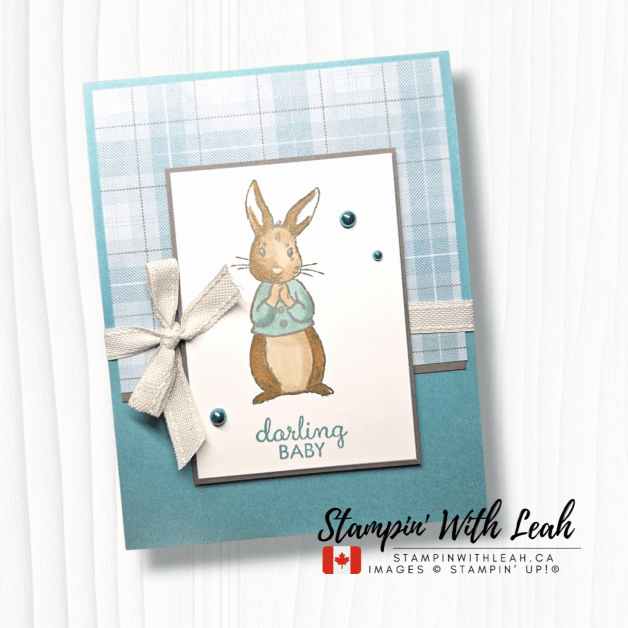
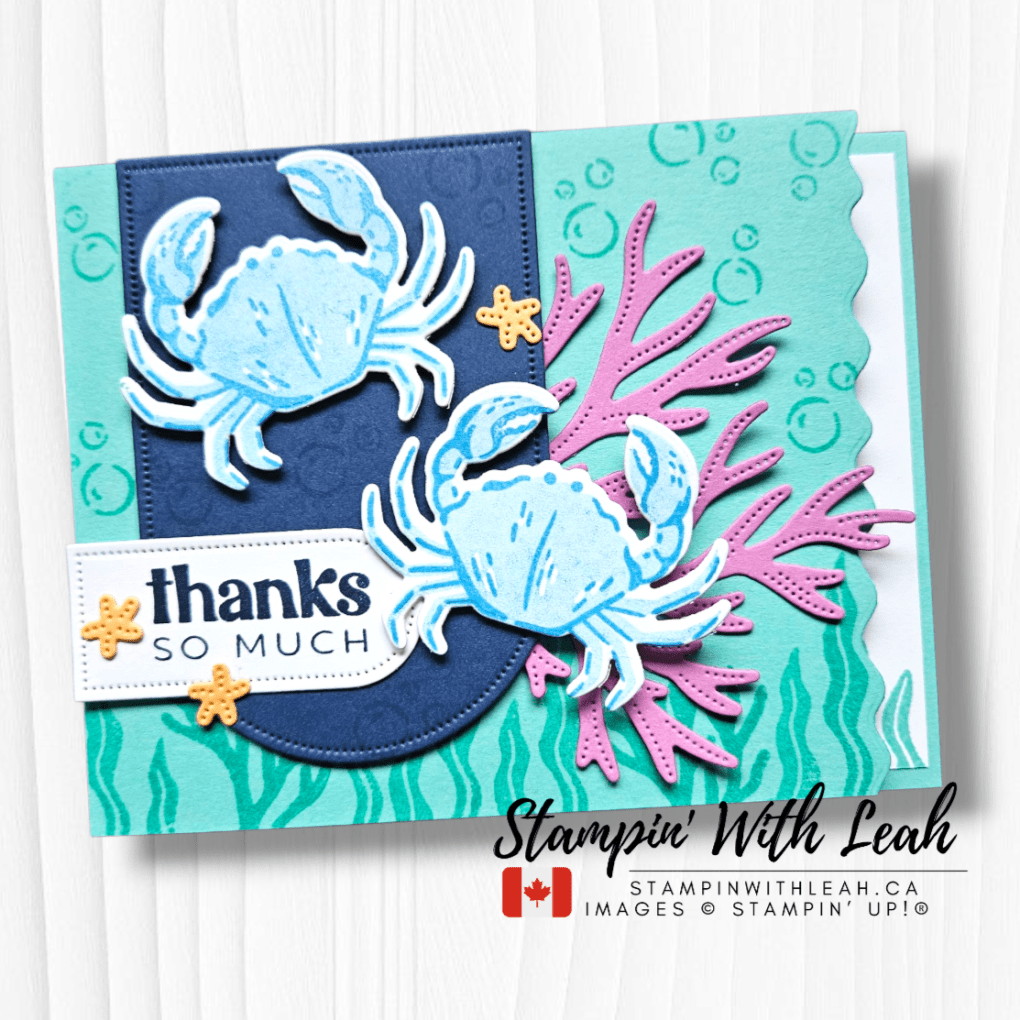
![Ocean Friends Bundle (English) [ 164692 ]](https://assets1.tamsnetwork.com/images/EC042017NF/164692s.jpg "Ocean Friends Bundle (English) [ 164692 ]")
![Azure Afternoon Classic Stampin' Pad [ 161663 ]](https://assets1.tamsnetwork.com/images/EC042017NF/161663s.jpg "Azure Afternoon Classic Stampin' Pad [ 161663 ]")
![Summer Splash Classic Stampin Pad [ 163809 ]](https://assets1.tamsnetwork.com/images/EC042017NF/163809s.jpg "Summer Splash Classic Stampin Pad [ 163809 ]")
![Night Of Navy Classic Stampin' Pad [ 147110 ]](https://assets1.tamsnetwork.com/images/EC042017NF/147110s.jpg "Night Of Navy Classic Stampin' Pad [ 147110 ]")
![Petunia Pop Classic Stampin Pad [ 163811 ]](https://assets1.tamsnetwork.com/images/EC042017NF/163811s.jpg "Petunia Pop Classic Stampin Pad [ 163811 ]")
![Everyday Arches Dies [ 164629 ]](https://assets1.tamsnetwork.com/images/EC042017NF/164629s.jpg "Everyday Arches Dies [ 164629 ]")


 Designer Series Paper")
")


")


 Sheer Ribbon")