Throwback Thursday: Sweet Strawberry Meets Fresh New DSP! 🍓

Hey, crafty friends! 
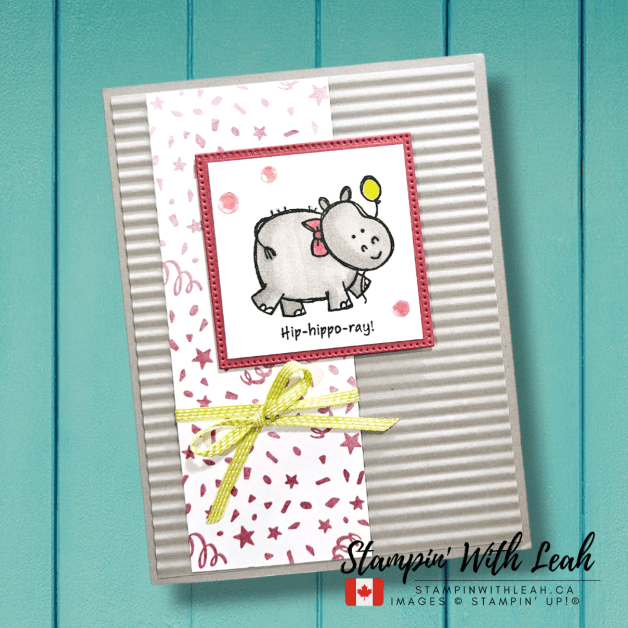
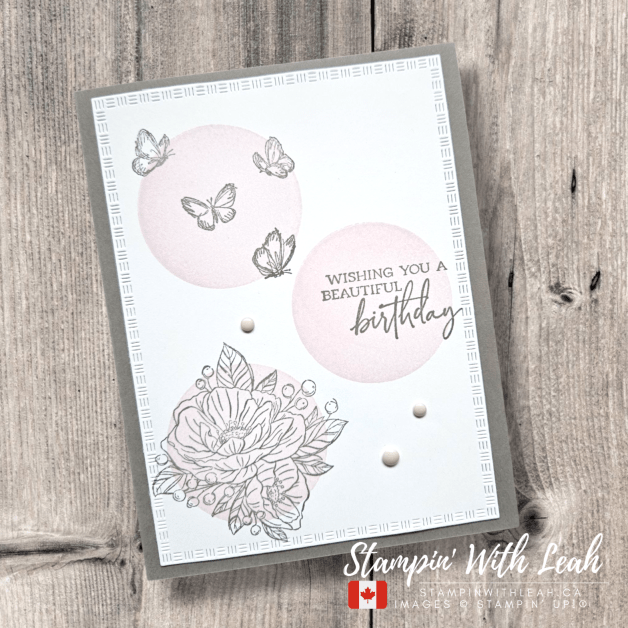
It’s time for another Throwback Thursday, and today I’m spotlighting the retired Sweet Strawberry stamp set and punch bundle—a fan-favorite that I still love pulling out!

Even though this bundle is no longer available, I’ve paired it with current products to give it a fresh new look. The background is a mix of strips from the Take a Bow 6”x6” DSP layered onto Real Red cardstock. To add extra detail, I used the largest Textured Notes die (one of the Online Exclusives!) to create that stitched frame effect.

The strawberries, leaves, and flowers are stamped, colored, and punched out, then popped up for dimension. And for a little shimmer, I added Iridescent Pearls to the flower centers. ✨

This is a great way to use up patterned paper scraps while giving retired favorites a fresh twist! Have a set you haven’t used in a while? Pull it out and mix it with some newer goodies!

💬 Do you have a retired set you just can’t part with? Let me know in the comments!

👉 Want to grab the Textured Notes Dies or Take a Bow DSP? Shop my Online Store! Or check out my full list of the supplies I used (minus the retired Sweet Strawberry Stamp Set and Punch):


Paper Snips
$16.50
Paper Trimmer
$39.00
Simply Shammy
$12.25

Want to see more? Check out my upcoming Card Classes!

Looking for more ways to enjoy stamping? Join my Stampin’ Up! Ink Pad Pals team!

  • Save 20%+ on your orders.
  • Get free access to my monthly card class tutorials.
  • Enjoy our monthly team meetings with stamping fun and collaboration.

Contact me to find out more or see the details on my website.

Click here to shop my online store.
Click here to access & view the current catalogs.
Click here to subscribe to those fun Paper Pumpkin kits of creativity!
Click here for more information about joining my Online Monthly Technique Club. Earn even more goodies by joining a club!
Click here to learn more about joining my Ink Pad Pals Team. Get the MOST rewards including a discount on future products!
Follow me on social media! I share regularly on PinterestYouTube, and Facebook!
Please subscribe to my newsletter, too! Click here and enter your email. When you include your birthday you will even be added to my birthday card mailing list 🙂


Throwback Thursday: A Peaceful Sympathy Card with Embossing & Blending

There’s something truly special about handmade cards—they can express what words sometimes cannot. Today, I’m sharing a Throwback Thursday project featuring a heartfelt sympathy card that I created using a mix of retired and current Stampin’ Up! products.

This card design is simple yet elegant, combining soft ink blending, embossed textures, and a touch of shimmer to create a peaceful, wintry scene.

Card Details & Techniques:

To create this look, I started by die-cutting a stitched circle from Pool Party cardstock and ink-blending it with Night of Navy ink. The trees from the Peaceful Evergreens set were stamped in a full strength Night of Navy Ink to create depth. To add an extra wow factor, I heat-embossed the sentiment in white embossing powder—a simple technique that always makes a card feel extra special.

The background is embossed with the Painted Trees 3D Embossing Folder, adding subtle dimension without overpowering the design. A bow made from the Night of Navy & Gold Glittered Ribbon ties it all together, adding a hint of shimmer.

Why I Love This Card

This card reminds me of the beauty in simplicity. Sometimes, when we don’t know what to say, a handmade card speaks for us. The peaceful blues and soft textures make this a perfect sympathy or thinking-of-you card.

Products Used:
Here is a full list of the supplies I used (minus the Peaceful Evergreens Stamp Set (Retired) – you could always use another tree set and a more generic With sympathy sentiment to create your own version of this card):

Product List
Versamark Pad
$13.00
Paper Trimmer
$39.00
Simply Shammy
$12.25

Let’s Chat!

Do you have a favorite retired Stampin’ Up! stamp set that you still love to use? Drop a comment below—I’d love to hear about it!

Want to see more? Check out my upcoming Card Classes!

Looking for more ways to enjoy stamping? Join my Stampin’ Up! Ink Pad Pals team!

  • Save 20%+ on your orders.
  • Get free access to my monthly card class tutorials.
  • Enjoy our monthly team meetings with stamping fun and collaboration.

Contact me to find out more or see the details on my website.

Click here to shop my online store.
Click here to access & view the current catalogs.
Click here to subscribe to those fun Paper Pumpkin kits of creativity!
Click here for more information about joining my Online Monthly Technique Club. Earn even more goodies by joining a club!
Click here to learn more about joining my Ink Pad Pals Team. Get the MOST rewards including a discount on future products!
Follow me on social media! I share regularly on PinterestYouTube, and Facebook!
Please subscribe to my newsletter, too! Click here and enter your email. When you include your birthday you will even be added to my birthday card mailing list 🙂


Create a Fun Fold Dinosaur Card with Stampin’ Up!’s Darling Dinos! 🦖🎈

Who’s ready for a DINO-mite birthday card? 🦕💖 This bright and cheerful card features the Darling Dinos Bundle and some brand-new Online Exclusives from Stampin’ Up! such as the Mini Corrugated 3D Embossing Folder and the Pack Your Bags Three Pack Twine. Plus, I used a unique popped up panel layout to make it extra special! Keep reading for all the details and a video for step-by-step instructions!

Card Details & Supplies

Here’s a closer look at the products I used to bring this card to life:

Darling Dinos Bundle – The cutest dino stamps and coordinating dies!
Mini Corrugated 3D Embossing Folder – Adds amazing texture to the background.
Pack Your Bags Twine – A perfect finishing touch.
Rainbow Adhesive Back Dots – Because every card needs a little embellishing!
Stampin’ Blends in Granny Apple Green/Shaded Spruce, Azure Afternoon/Fresh Freesia, and Pretty in Pink/Calypso Coral for smooth blending!

Fun Popped Up Panel Layout: A Unique Twist!

This isn’t your typical card—here’s how I created the popped up panel effect:

📏 Card Base: Start with a 4-1/4” x 11” piece of cardstock, scored at 5-1/2”.
✂️ Modify the Front Panel: Cut the front panel in half at 2-3/4” and turn it sideways to create the pop-up effect!
🌟 Decorate & Assemble: Layer your stamped & die-cut dinos, add textured details with the Mini Corrugated 3D Embossing Folder, and finish with twine and embellishments!

💡 Pro Tip: This layout is a great way to add dimension and interest while still fitting in a standard envelope!

Watch the Tutorial! 🎥

Want to see exactly how I made this card? Watch my Facebook Live replay where I walk you through all the steps!

📌 Love this design? Be sure to check out my blog for more inspiration and get my class tutorials!StampinWithLeah.ca

Supplies You’ll Need:

If you’d like to recreate this card exactly as shown, here are the supplies used:


Paper Trimmer
$39.00
Simply Shammy
$12.25

March 2025 Online Exclusives PDF

Some of the supplies used on this card are part of the new collection of Online Exclusive products for March 2025, and I have a special PDF guide showcasing all the latest must-have crafting goodies! Grab it here:

Bonus Gift! 🎁

When you place a $65+ order, you’ll receive the 30+-project March Crafty Collaborations Tutorial PDF as an extra gift from me! This is an amazing resource full of creative inspiration from many talented demonstrators. Want to stay updated on all my events and classes? Subscribe to my newsletter!

Join Me for More Stamping Fun

Looking for more ways to craft? Here’s how you can connect with me:

  • In-Person Events: If you’re local to Port Coquitlam, join me for Coffee and Cards or book your own card class.
  • Online Events: Birthday Celebrations Card Class (you can still register – although packages may arrive late)
  • Ink Pad Pals Team: Join my team for exclusive perks, discounts, and a supportive crafting community.

Have any questions? Feel free to reach out—I’d love to help!Shop & Connect

Thank you for crafting with me—I can’t wait to see what you create! Don’t forget to leave a comment below and follow this blog for more inspiration.


March Card Class To Go – Kiss of Texture!

Are you ready to add beautiful texture to your handmade cards? My latest Card Class to Go features the Kiss of Texture stamp set, an incredible Online Exclusive that makes it easy to create layered, textured designs with just ink and stamps—no extra tools required!

How It Works: When you place an order of $60 or more (before tax & shipping) in my online store using host code – 6HQ62V46, you’ll receive the Kiss of Texture Card Class to Go Kit and PDF instructions absolutely FREE! This kit includes pre-cut cardstock, embossed layers, ribbon bits, and embellishments to create six stunning cards (two each of three designs). You will need your own stamps, ink and adhesives at home.

Bonus Gift! Place an order of $75+, and you’ll also receive a pack of Antique Pearls embellishments as my thank-you gift!

📅 Order Deadline: March 11th, 2025
📦 Kits ship by: March 15th, 2025


Watch the Replay!

Missed the live class? Watch the replay here:

In the video I mentioned a Door Prize Draw , you can enter now until Friday (March 7th, 2025) in the evening (PT)! Good Luck!

Card Designs in This Class:

🌸 Floral Elegance Card – A lovely mix of Bubble Bath and Pebbled Path, this design highlights how texture stamps can add depth to floral elements.

🌸 Textured Circles Card – A playful combination of Bubble Bath, Pretty in Pink soft layered circles on a Pebbled Path card base and a touch of Pretty in Pink ribbon.

💙 Soft & Subtle Texture Card – Featuring a pastel rainbow of Flirty Flamingo, Lemon Lolly, Balmy Blue, and Fresh Freesia textured with Pebbled Path, this card showcases the “kissing” technique beautifully for a soft, layered look. 

Note: Pebbled Path is an In Color that will retire this year! These colors often sell out fast, so don’t wait to grab yours!

Supplies You’ll Need:

If you’d like to recreate these cards exactly as shown, here are the key supplies used:


Paper Snips
$16.50

Although you will receive the pieces of cardstock, embossed pieces, embellishments and die cut pieces that you need to create the 6 cards- but you may want to order some of the items below to create even more cards at home: 


March 2025 Online Exclusives PDF

Exciting news! Stampin’ Up! has just released a new collection of Online Exclusive products for March 2025, and I have a special PDF guide showcasing all the latest must-have crafting goodies! Grab it here:

Don’t live in Canada? You can still get the tutorial for this class from my Crafting Class Tutorials To Go section of my blog. You’ll find this tutorial and many others there for purchase.

Bonus Gift! 🎁

When you place a $65+ order, you’ll also receive the 30+-project March Crafty Collaborations Tutorial PDF as an extra gift! This is an amazing resource full of creative inspiration from many talented demonstrators. Want to stay updated on all my events and classes? Subscribe to my newsletter!

Join Me for More Stamping Fun

Looking for more ways to craft? Here’s how you can connect with me:

  • In-Person Events: If you’re local to Port Coquitlam, join me for Coffee and Cards or book your own card class.
  • Online Events: Birthday Celebrations Card Class (today is the last day to register!!)
  • Ink Pad Pals Team: Join my team for exclusive perks, discounts, and a supportive crafting community.

Have any questions? Feel free to reach out—I’d love to help!Shop & Connect

Thank you for crafting with me—I can’t wait to see what you create! Don’t forget to leave a comment below and follow this blog for more inspiration.


February Card Class To Go – Delightful Wishes!

If you love soft florals, delicate die cuts, and beautiful color combinations, you’re going to adore this month’s Card Class To Go! Featuring the Delightful Wishes Bundle, these cards are filled with elegance and charm, making them perfect for birthdays, thank-you notes, or just because! And the best part? You can earn the Fresh Freesia Seam Binding Ribbon FREE during Sale-A-Bration! 🎀

👉 Watch the Replay Here:

Want to Craft Along?

Get your own FREE Make and Take Kit by placing a $75 order (before tax and shipping) by Tuesday, February 25th, 2025. Use Host Code NSTY47WP at checkout, and I’ll send you everything you need to create these cards, including:
✅ Pre-cut cardstock, including embossed layers and die-cut pieces (Textured Note Dies)
✅ Adhesive Sheets and some Iridescent Facted Gems
✅ Detailed instructions

Due to Stampin’ Up! policy, I cannot include pre-stamped images, but you can use the stamps and tools you already own or add them to your order.

What You’ll Need to Complete the Cards

To create these beautiful projects at home, you’ll need the following supplies:

(**Don’t forget to order your FREE Fresh Freesia Seam Binding when you place your order!)


Important Dates

🗓️ Order Deadline: Tuesday, February 25th, 2025
📤 Kits Ship By: Saturday, March 1st, 2025

Ready to Create?

🛒 Shop Here: https://www.stampinup.ca/?hostcode=NSTY47WP

Don’t Wait – Sale-A-Bration Ends February 28!

This is your LAST CHANCE to earn Sale-A-Bration freebies before they’re gone! And if you’ve been eyeing the Textured Notes Dies, you can even add them to your Starter Kit when you join my Ink Pad Pals team!

Don’t live in Canada? You can still get the tutorial for this class from my Crafting Class Tutorials To Go section of my blog. You’ll find this tutorial and many others there for purchase.

Here Are the Cards We Created Together

This month’s class features three card designs using the FREE SAB Fresh Freesia Seam Binding and the gorgeous Delightful Wishes Bundle! Your Make-and-Take kit will include the pre-cut cardstock, embossed layers, Textured Note die-cut shapes, adhesive sheet and gems you need to create these projects. However, you may want to add the following products to your crafting collection for future projects:


Bonus Gift! 🎁

When you place a $65+ order, you’ll also receive the 37-project February Crafty Collaborations Tutorial PDF as an extra gift! This is an amazing resource full of creative inspiration from many talented demonstrators. Want to stay updated on all my events and classes? Subscribe to my newsletter!

Join Me for More Stamping Fun

Looking for more ways to craft? Here’s how you can connect with me:

  • In-Person Events: If you’re local to Port Coquitlam, join me for Coffee and Cards or book your own card class.
  • Ink Pad Pals Team: Join my team for exclusive perks, discounts, and a supportive crafting community. Plus, there’s an amazing deal on right now!

Shop & Connect

Thank you for crafting with me—I can’t wait to see what you create! Don’t forget to leave a comment below and follow this blog for more inspiration.