Throwback Thursday: A Peaceful Sympathy Card with Embossing & Blending

There’s something truly special about handmade cards—they can express what words sometimes cannot. Today, I’m sharing a Throwback Thursday project featuring a heartfelt sympathy card that I created using a mix of retired and current Stampin’ Up! products.

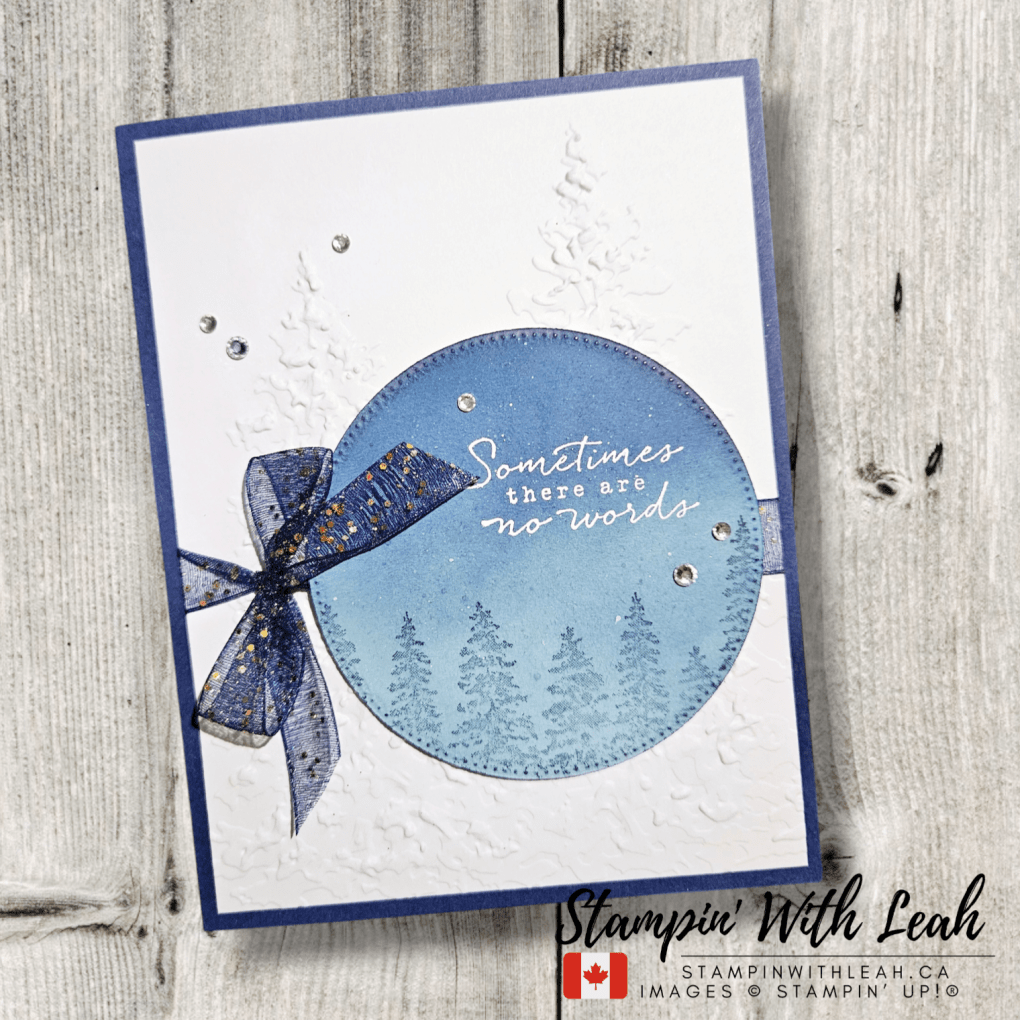
This card design is simple yet elegant, combining soft ink blending, embossed textures, and a touch of shimmer to create a peaceful, wintry scene.

Card Details & Techniques:

To create this look, I started by die-cutting a stitched circle from Pool Party cardstock and ink-blending it with Night of Navy ink. The trees from the Peaceful Evergreens set were stamped in a full strength Night of Navy Ink to create depth. To add an extra wow factor, I heat-embossed the sentiment in white embossing powder—a simple technique that always makes a card feel extra special.

The background is embossed with the Painted Trees 3D Embossing Folder, adding subtle dimension without overpowering the design. A bow made from the Night of Navy & Gold Glittered Ribbon ties it all together, adding a hint of shimmer.

Why I Love This Card

This card reminds me of the beauty in simplicity. Sometimes, when we don’t know what to say, a handmade card speaks for us. The peaceful blues and soft textures make this a perfect sympathy or thinking-of-you card.

Products Used:
Here is a full list of the supplies I used (minus the Peaceful Evergreens Stamp Set (Retired) – you could always use another tree set and a more generic With sympathy sentiment to create your own version of this card):

Product List
Versamark Pad
$13.00
Paper Trimmer
$39.00
Simply Shammy
$12.25

Let’s Chat!

Do you have a favorite retired Stampin’ Up! stamp set that you still love to use? Drop a comment below—I’d love to hear about it!

Want to see more? Check out my upcoming Card Classes!

Looking for more ways to enjoy stamping? Join my Stampin’ Up! Ink Pad Pals team!

  • Save 20%+ on your orders.
  • Get free access to my monthly card class tutorials.
  • Enjoy our monthly team meetings with stamping fun and collaboration.

Contact me to find out more or see the details on my website.

Click here to shop my online store.
Click here to access & view the current catalogs.
Click here to subscribe to those fun Paper Pumpkin kits of creativity!
Click here for more information about joining my Online Monthly Technique Club. Earn even more goodies by joining a club!
Click here to learn more about joining my Ink Pad Pals Team. Get the MOST rewards including a discount on future products!
Follow me on social media! I share regularly on PinterestYouTube, and Facebook!
Please subscribe to my newsletter, too! Click here and enter your email. When you include your birthday you will even be added to my birthday card mailing list 🙂


Festive Friday Week 8 – A Classic Christmas with More Wishes & Take a Bow DSP

Welcome back to Festive Friday! This week’s card brings classic Christmas charm with bold typography and festive holly details. I used the More Wishes Stamp Set, Take a Bow 6×6 DSP, and the Snowflake Sky 3D Embossing Folder to create a clean and modern holiday design. ❄️❤️

Let’s take a closer look at this week’s festive creation! 🎄


The Card Design

This design is all about layers, texture, and festive details! The sentiment is fussy cut and placed at an angle, adding a dynamic touch to the layout. The holly leaves were carefully trimmed from the Take a Bow DSP, bringing in a natural element that ties everything together. Layered patterned paper creates a fun backdrop, and the crisp border of the Nested Essentials Die with rounded corners frames the sentiment beautifully. The Cherry Cobbler & Pearl Adhesive-backed Berries add the perfect sparkle, making the holly come to life with a festive shimmer.

Card Highlights:

  • Fussy-cut sentiment angled for a playful layout
  • Holly elements hand-cut from DSP for a coordinated embellishment
  • Layered DSP panels add depth and contrast
  • Embossed background for subtle texture
  • Nested Essentials Die with rounded corners for a polished frame
  • Sparkling adhesive-backed berries for a festive finishing touch

Supplies Used

Here’s what I used to create this card:


Paper Snips
$16.50

Step-by-Step Instructions

  1. Create the Card Base: Cut Basic White cardstock to 5-1/2” x 8-1/2”, score at 4-1/4”, and fold.
  2. Emboss the Background: Use the Snowflake Sky 3D Embossing Folder on a 4″ X 5-1/4″ Basic White panel for a subtle textured backdrop. Adher the panel to the card base with Liquid Glue.
  3. Layer the DSP: Cut two panels of Take a Bow 6×6 DSP at 2-3/4″ X 4″, adhere them to the card front slightly offset for dimension.
  4. Stamp the Sentiment: Ink the MERRY image from the More Wishes stamp set in Real Red and stamp onto the top left corner of the 2nd largest rounded rectangle from the Nested Essential Dies. Then stamp the christmas image on a scrap paper in Real Red Ink, fussy cut and adhere to the die-cut panel using Mini Glue Dots. Adhere this panel to the center left of the card front using Dimensionals.
  5. Fussy Cut the Holly: Trim holly leaves from the Take a Bow DSP and adhere near the sentiment.
  6. Embellish: Add Cherry Cobbler & Pearl Adhesive-backed Berries to the holly leaves for the perfect finishing touch.

Why I Love This Design

This card is bright, fun, and festive! The Take a Bow DSP brings in cheerful holiday patterns, while the embossed background adds elegant texture. The fussy-cut holly and berries provide a special handmade touch that makes this design feel extra merry! 🎄✨

Don’t Miss Out – Today is the Last Day of Sale-a-bration!

🚨 Act now! Today is the FINAL DAY of Sale-a-bration! Don’t miss your chance to earn FREE exclusive products with your purchase or take advantage of the amazing Starter Kit special to join my team! More details are below.

📌 Shop now or sign up before it’s too late!

Are you crafting your Christmas cards yet? Don’t wait until the holiday rush—start now and enjoy the process!

📌 Pin this post for inspiration & share it with your crafty friends!

See you next week for another Festive Friday creation! 🎄✨

A perk to ordering with me in the month of February is that with any order over $75cdn, you will receive a FREE SAB item and I am emailing out an amazing 37 project Tutorial Bundle. Just use the host code below. As a member of my team you get free access to this Tutorial Bundle.

Let’s Craft Together!

I’d love for you to join one of my in-person card classes:

These classes are perfect for all skill levels and are a great way to learn new techniques, try out Stampin’ Up! products, and connect with other cardmakers. Spots fill up quickly, so be sure to register early!

Also, don’t forget to sign up for my Stampin’ With Leah Newsletter to get all the details on upcoming events, promotions, and creative tips. You won’t want to miss out!

Live in Canada, don’t have a demonstrator? Contact me to get a catalogue or find out why right now is a great time to join my team.

You can see all the benefits of joining my team (the Ink Pad Pals) by clicking the image below. Right now there are even more perks to joining during Sale-a-bration!

Click here to shop my online store.
Click here to access & view the current catalogs.
Click here to subscribe to Thanks for hopping by! Make sure to pin this post for future reference and share it with your crafty friends.those fun Paper Pumpkin kits of creativity!
Click here for more information about joining my Online Monthly Technique Club. Earn even more goodies by joining a club!
Click here to learn more about joining my Ink Pad Pals Team. Get the MOST rewards including a discount on future products!
Follow me on social media! I share regularly on PinterestYouTube, and Facebook!
Please subscribe to my newsletter, too! Click here and enter your email. When you include your birthday you will even be added to my birthday card mailing list 🙂