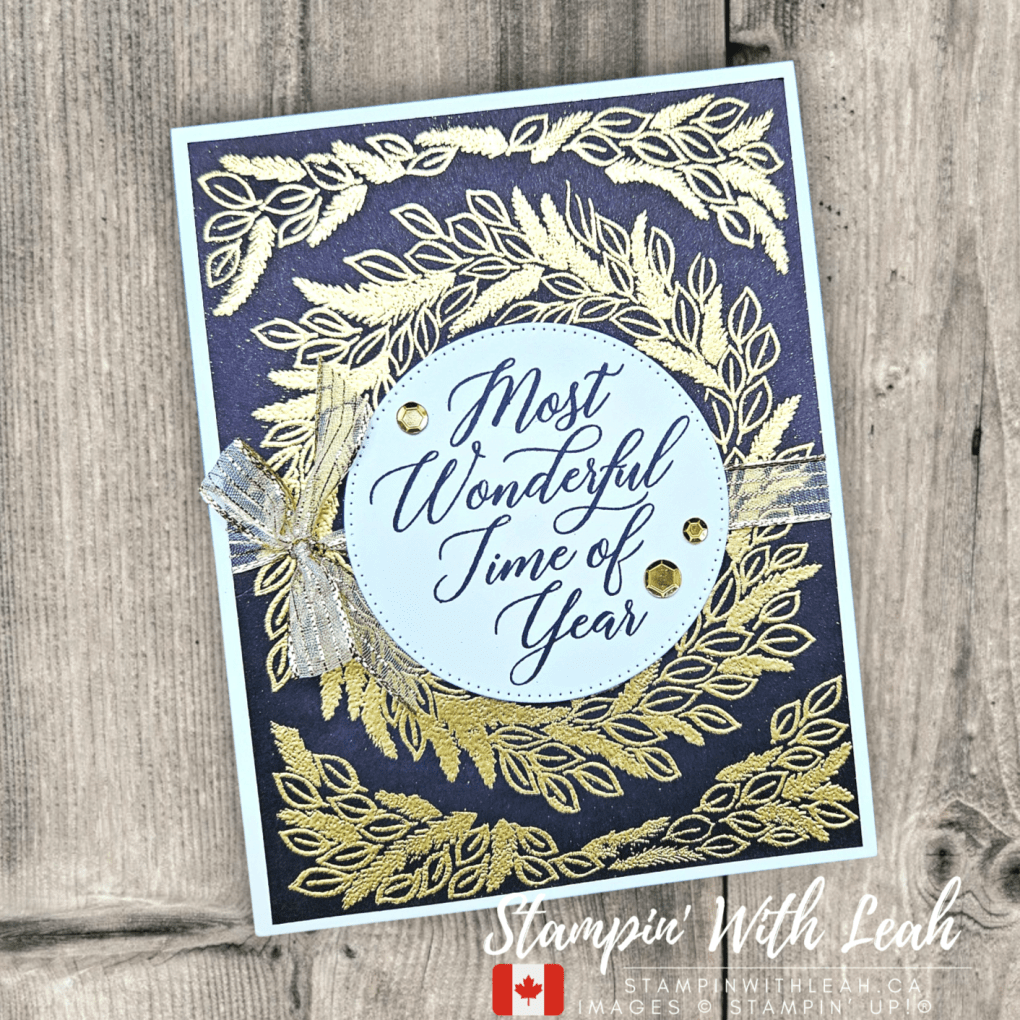
This week’s Global Design Project Challenge #GDP507 is all about celebrating the holidays early. I decided to go modern and bold with my Festive Friday creation—featuring a black background, shining gold embossing, and the stunning Most Wonderful stamp set.
✂️ How I Made This Card:
Card Base: Thick Basic White
Background Panel: Basic Black cardstock stamped with Most Wonderful stamp set – all stamps mounted together
See the details and register here – there is still time to register from any where in the world! The event has happened – but I still have a kit available and you can access the replay videos.
❤️ Thanks for crafting with me! Be sure to subscribe so you never miss a Festive Friday!
Click here to shop my online store. Click here to access & view the current catalogs. Click here to subscribe to those fun Paper Pumpkin kits of creativity! Click here for more information about joining my Online Monthly Technique Club. Earn even more goodies by joining a club! Click here to learn more about joining my Ink Pad Pals Team. Get the MOST rewards including a discount on future products! Follow me on social media! I share regularly on Pinterest, YouTube, and Facebook! Please subscribe to my newsletter, too!Click here and enter your email. When you include your birthday you will even be added to my birthday card mailing list 🙂
Today’s card is a sweet birthday throwback featuring one of my all-time favourite retired stamp sets—Adorable Owls—brought to life with some fun new products!
This owl is celebrating in style with:
The vibrant Wildflower Birthday 12×12 DSP
Peach Pie Bordered Ribbon (currently on the Last Chance list—grab it while you can!)
A textured base using the Exposed Brick 3D Embossing Folder
A sprinkle of sparkle with Starburst Sequins
🎨 How to Make This Card:
Start with a Thick Basic White card base.
Emboss a 4″ x 5-¼” Basic White panel with the Exposed Brick 3D Embossing Folder and adhere it to your base.
Cut 2 angled rectangles from the Wildflower Birthday DSP and layer them slightly askew for interest.
Wrap the Peach Pie Bordered Ribbon across the layers and tie a bow on the left side.
Die cut a stitched circle (Pool Party cardstock or similar) and pop it up with Dimensionals.
Stamp the owl from Adorable Owls, colour with Stampin’ Blends, fussy cut, and adhere.
Stamp a birthday sentiment and die-cut or banner cut it, then adhere with Dimensionals.
Add a few Starburst Sequins for a pop of sparkle.
🧡 This card is bright, happy, and full of texture—perfect for any birthday celebration. While the Adorable Owls are retired, the layout and product mix can work with so many images you already have in your stash.
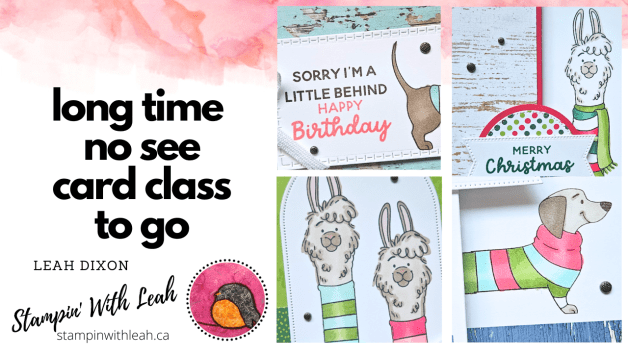
Looking for variety, colour, and crafty inspiration? My July 2025 Coffee & Cards Class To Go is here — and it’s a fun one! Instead of spotlighting one stamp set, this class features four fresh and fabulous card designs that were first shared in my July in-person event.
🎥 Watch the Class Replay: I already shared the class live — but don’t worry! You can still watch the full replay here and stamp along whenever it fits your schedule:
💖 Why You’ll Love This Class:
4 cards covering a variety of styles and occasions
No need to own one specific stamp set
Great for building your skills and card stash
Bright, fun, and creative layouts using texture, die cuts & colouring
Don’t miss this cheerful and creative class — order your kit today or download the tutorial and get crafting!
Here are the 4 unique cards:
🛍 How to Get It FREE: Place a $60+ order (before tax/shipping) in my Stampin’ Up!® online store between July 30 and August 5, and you’ll receive the PDF tutorial + prepped card kit FREE in the mail. 🛒 Shop here: https://www.stampinup.ca/?demoid=2189587
Click here to shop my online store. Click here to access & view the current catalogs. Click here to subscribe to those fun Paper Pumpkin kits of creativity! Click here for more information about joining my Online Monthly Technique Club. Earn even more goodies by joining a club! Click here to learn more about joining my Ink Pad Pals Team. Get the MOST rewards including a discount on future products! Follow me on social media! I share regularly on Pinterest, YouTube, and Facebook! Please subscribe to my newsletter, too!Click here and enter your email. When you include your birthday you will even be added to my birthday card mailing list 🙂
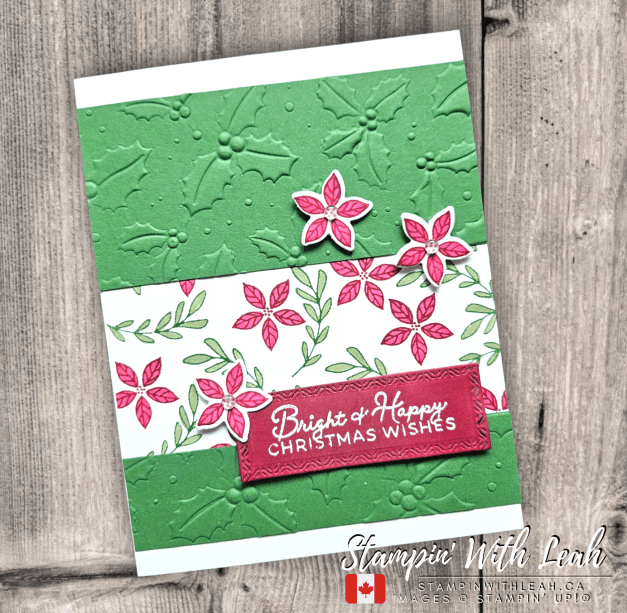
Happy Festive Friday! Today’s holiday card was created using the brand new Jolly Holly Bundle (an Online Exclusive!) and the GDP506 sketch for layout inspiration. With custom-stamped floral accents, bold texture, and a rich traditional palette, this is a fun, cheerful addition to your Christmas card stash.
And don’t forget — Stampin’ Up!’s FREE Shipping ends TONIGHT (July 25 at 11:59pm MT). Stock up on Online Exclusives like Jolly Holly while you can!
💡 Leah’s Crafting Tips:
🖼 Create your own patterned paper! The centre strip isn’t from DSP — I hand-stamped and coloured the florals and greenery from the Jolly Holly stamp set using Stampin’ Blends. It’s a beautiful way to customize your colour palette or match any project theme!
✂️ Modify your dies: The sentiment label was created using the Textured Notes Dies, but I trimmed it with a double cut technique to make it narrower — perfect for this long sentiment while keeping those stitched details.
Today is your final chance to enjoy FREE SHIPPING on qualifying orders at Stampin’ Up! ✔️ No code needed ✔️ Automatically applied at checkout ✔️ Ends July 25 at 11:59 PM (MT)
See the details and register here – there is still time to register from any where in the world! The event has happened – but I still have a kit available and you can access the replay videos.
❤️ Thanks for crafting with me! Be sure to subscribe so you never miss a Festive Friday!
Click here to shop my online store. Click here to access & view the current catalogs. Click here to subscribe to those fun Paper Pumpkin kits of creativity! Click here for more information about joining my Online Monthly Technique Club. Earn even more goodies by joining a club! Click here to learn more about joining my Ink Pad Pals Team. Get the MOST rewards including a discount on future products! Follow me on social media! I share regularly on Pinterest, YouTube, and Facebook! Please subscribe to my newsletter, too!Click here and enter your email. When you include your birthday you will even be added to my birthday card mailing list 🙂
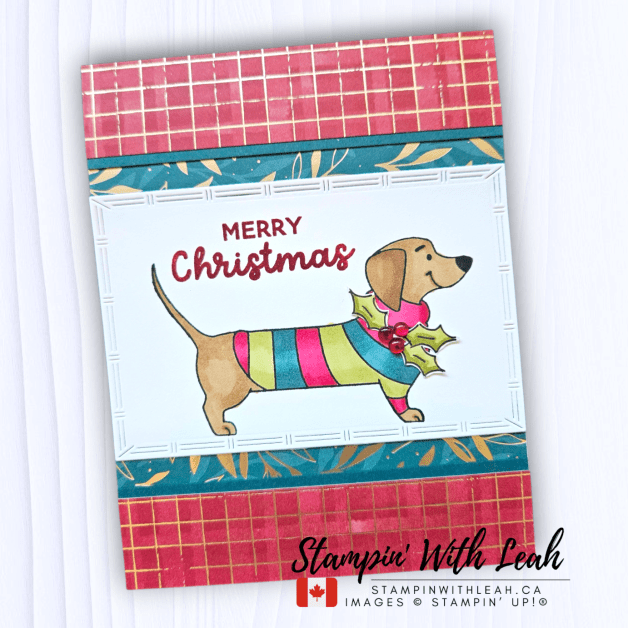
It’s another Festive Friday, and I’m sharing a card that’s sure to make you smile! This week’s card features the Long Time No See stamp set — a super cute Online Exclusive — paired with the beautifully rich Regal Distressed Patterns 12” x 12” Designer Series Paper.
The star of this card? A fashionable little dachshund decked out for Christmas in a cozy, hand-coloured sweater!
Card Details:
🐾 Stamp Set:Long Time No See (Online Exclusive) 🎄 DSP:Regal Distressed Patterns 🖍 Colours Used:
Dog: Pecan Pie
Sweater: Cherry Cobbler, Pretty Peacock, Old Olive
Sentiment: Cherry Cobbler
🎨 Extra Touches:
Holly at the collar was hand drawn, coloured, and fussy cut
Accented with Cherry Cobbler & Pearl Adhesive-Backed Berries
Framed with a Texture Notes rectangle die
🎨 Leah’s Pro Tip:
When placing the dachshund on your block, tilt his tail back slightly. This creates space for the sentiment between his tail and head — keeping your layout clean and balanced!
This card is a wonderful reminder that you can get creative even with small touches — like drawing and cutting your own holly for that festive flair. And don’t forget, the Long Time No See set is an Online Exclusive, so you’ll only find it in the online shop — not in any printed catalogues.
See the details and register here – there is still time to register from any where in the world! The event has happened – but I still have a kit available and you can access the replay videos.
❤️ Thanks for crafting with me! Be sure to subscribe so you never miss a Festive Friday!
Click here to shop my online store. Click here to access & view the current catalogs. Click here to subscribe to those fun Paper Pumpkin kits of creativity! Click here for more information about joining my Online Monthly Technique Club. Earn even more goodies by joining a club! Click here to learn more about joining my Ink Pad Pals Team. Get the MOST rewards including a discount on future products! Follow me on social media! I share regularly on Pinterest, YouTube, and Facebook! Please subscribe to my newsletter, too!Click here and enter your email. When you include your birthday you will even be added to my birthday card mailing list 🙂
GIf you love a cheeky birthday card, this class is for you! I just wrapped up my latest Card Class To Go, featuring the brand-newNot 29 Anymore stamp set — packed with playful, age-defying sentiments perfect for birthdays with a wink. 🥳
I paired it with the fabulous Birthday Treats Mix & Match Ephemera for easy, coordinated accents, and finished each card with Online Exclusive Petunia Pop 1/4″ Iridescent Ribbon and Charming Shimmer Faceted Dots.
🎥 Missed the live? No worries! 👉 Watch the replay here:
💌 What You’ll Create
This class includes 4 unique cards, each with a pop of personality and texture:
“So. Many.Candles.” – an intricate background piece and beautiful watercolour cake ephemera paired with many candles and a bold embossed sentiment.
“Let’s Get This Party Started” – A playful card with Dotted Circles embossing, banners, balloons & layered messages.
“Not 29 Anymore” – With a lattice background, watercolour cupcake ephemera and a stitched circle sentiment.
“Free Cake! I mean… Happy Birthday” – Featuring a watercoloured cake ephemera piece from the Birthday Treats Mix & Match Pack , bold embossing for the sentiment and a sneaky trick to extend the banner die.
Three of the cards feature a coordinating bow using our NEW Petunia Pop ribbon and they all have the Charming Shimmer Faceted Dots!
🛍️ How to Get the Kit
Place a $60 order (before tax/shipping) in my online store (between July 16 – 22) and you’ll get the full card kit plus the PDF tutorial. 👉 Shop here: https://www.stampinup.ca/?demoid=2189587 📍Live outside Canada? Purchase the PDF tutorial here: https://payhip.com/b/br05G
📦 The card kit includes pre-cut pieces, die cuts, ribbon, dots, and envelopes.
Laugh-out-loud humour: Perfect for friends and family who love a bit of sass with their birthday wishes.
Great for “older” recipients: These sentiments are especially hilarious for anyone who’s gracefully aged past 29 (or at least pretends they haven’t!).
No stamping experience required: The mix-and-match ephemera does the heavy lifting — just assemble and enjoy.
Fun embellishments: From iridescent ribbon to shimmer dots, these details add sparkle and joy to every design.
Easy-to-follow format: Whether you’re watching the replay or using the PDF, you’ll have everything you need to create four fantastic cards at your own pace.
Want to stamp with me some more?
Join myAugust Card Class to learn new techniques and create beautiful projects. Spots are limited, so reserve yours today!
Click here to shop my online store. Click here to access & view the current catalogs. Click here to subscribe to those fun Paper Pumpkin kits of creativity! Click here for more information about joining my Online Monthly Technique Club. Earn even more goodies by joining a club! Click here to learn more about joining my Ink Pad Pals Team. Get the MOST rewards including a discount on future products! Follow me on social media! I share regularly on Pinterest, YouTube, and Facebook! Please subscribe to my newsletter, too!Click here and enter your email. When you include your birthday you will even be added to my birthday card mailing list 🙂
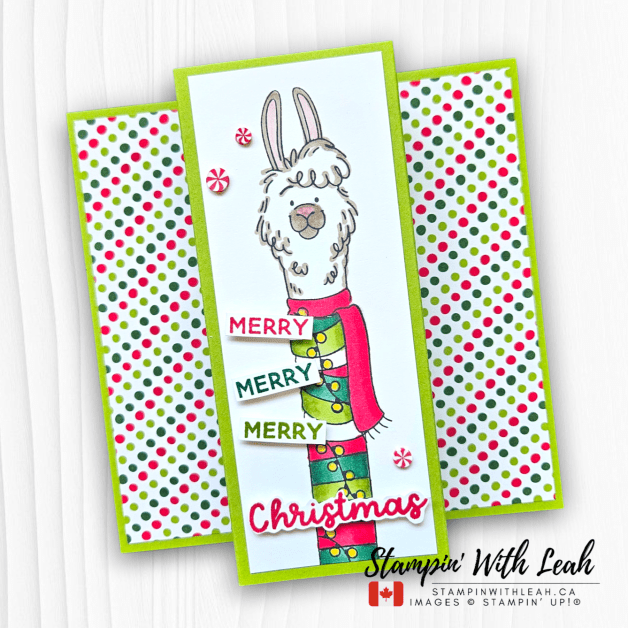
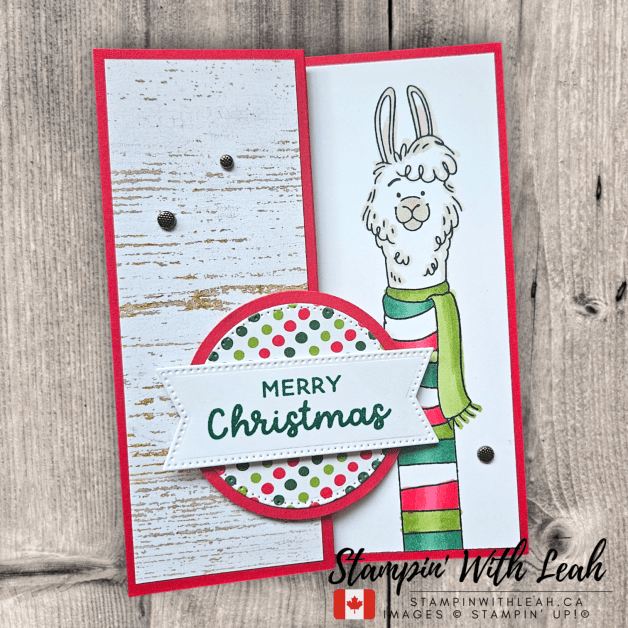
Welcome back to another Festive Friday! This week I’m continuing my Christmas card series with a fun and festive creation using the Long Time No See stamp set — the same set I featured in this week’s Card Class To Go.
This card is all about holiday cheer, bright colours, and a playful layout! It features a bold Granny Apple Green card base with a fun fold layout, making it extra interactive and perfect for sending a bit of joy this holiday season.
🎨 Design Details:
Stamp Set: Long Time No See
Card Base: Granny Apple Green
Designer Series Paper: Take a Bow DSP (retiring – Last Chance!)
Colouring: Stampin’ Blends in Crumb Cake, Real Red, Granny Apple Green, and Shaded Spruce
Embellishments: Peppermint Dots add a sweet, dimensional touch
Sentiment: “Merry Merry Merry Christmas” – a playful stacked greeting to match the llama’s long scarf!
I love how this card combines whimsy with traditional Christmas colours. The Take a Bow DSP adds a fun polka-dot backdrop, and this fold is sure to stand out on the mantel.
✂️ Tips & Tricks:
Mix and match Stampin’ Blends for a soft, blended fur effect on the llama.
Stack your sentiments with dimensionals for added depth.
Use a white gel pen to add highlights to your lights or scarf for a pop of brightness.
📦 Don’t Forget! The Take a Bow DSP is on the Last Chance List, so grab it before it’s gone! And if you loved this stamp set, check out this week’s Card Class To Go featuring more fun llama-themed designs!
See the details and register here – there is still time to register from any where in the world! The event has happened – but I still have a kit available and you can access the replay videos.
❤️ Thanks for crafting with me! Be sure to subscribe so you never miss a Festive Friday!
Click here to shop my online store. Click here to access & view the current catalogs. Click here to subscribe to those fun Paper Pumpkin kits of creativity! Click here for more information about joining my Online Monthly Technique Club. Earn even more goodies by joining a club! Click here to learn more about joining my Ink Pad Pals Team. Get the MOST rewards including a discount on future products! Follow me on social media! I share regularly on Pinterest, YouTube, and Facebook! Please subscribe to my newsletter, too!Click here and enter your email. When you include your birthday you will even be added to my birthday card mailing list 🙂
Get ready to smile! This month’s Card Class To Go features the absolutely adorable Long Time No See stamp set. You’ll create 4 unique and cheerful cards—including fun folds and versatile greetings that make these cards great for all occasions!
🌟 How to Get the Class Kit: Place a $60+ order (before shipping/tax) in my online shop and you’ll receive:
✂️ A pre-cut 4-card kit
📘 A full PDF tutorial
📦 Shipped to you, ready to assemble!
📍 Live outside Canada? You can still grab the PDF only from my website right here.
💌 What’s in the Class?
Here’s a quick look at the 4 cards you’ll create in this class:
“Long Time No See” Fun Fold Card This clever accordion-style card features the full stretch of the dachshund from head to tail—perfect for a laugh and a joyful “hello” across the miles. 🟢 Colour Combo: Granny Apple Green, Pool Party, Strawberry Splash and Misty Moonlight 🪵 Paired with Country Woods DSP for texture and warmth.
Llama Holiday Cheer Card Send festive greetings with this llama decked out in a candy-cane striped scarf. A simple Z-fold layout and holiday palette make this card a standout! 🔴 Colours: Real Red, Granny Apple Green, Shaded Spruce 🎄 Sentiment: “Merry Christmas” with a polka dot pop.
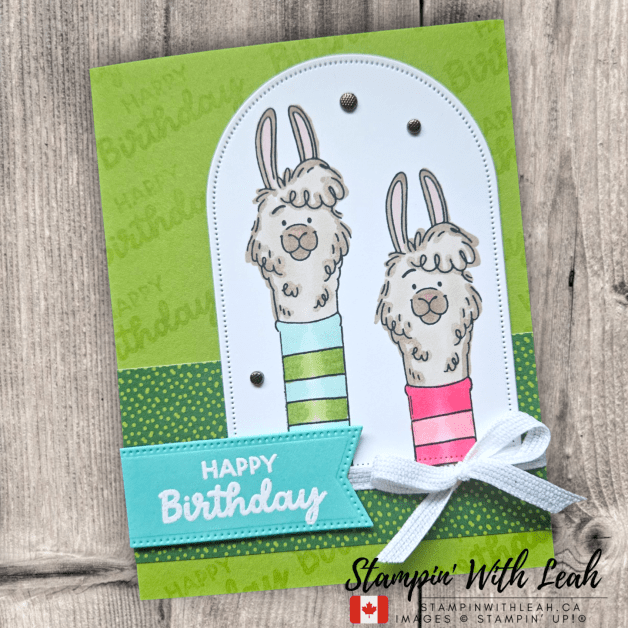
Birthday Llama Duo Card Celebrate with double the fun! Two llamas in cozy sweaters wish someone a very happy birthday. A stitched arch die and playful background complete the look. 🎉 Technique: Embossed sentiment, layered ribbon detail 🟢 Colour Combo: Granny Apple Green, Pool Party, Strawberry Slush and Flirty Flamingo
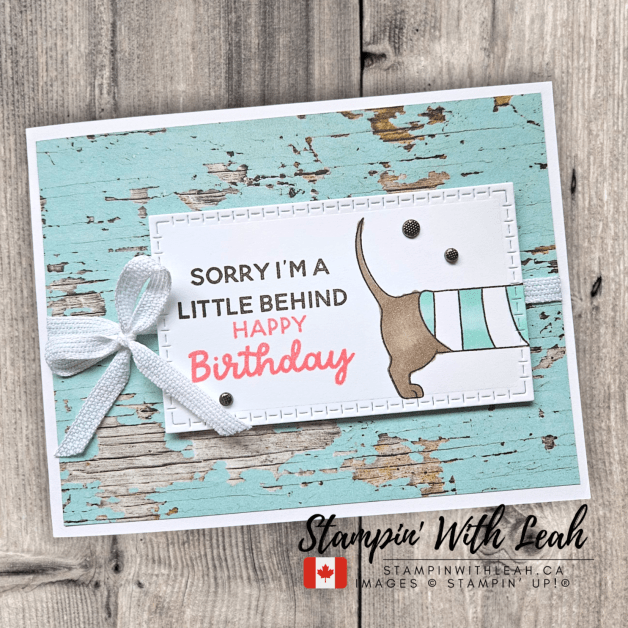
A Little Daschund Behind for those belated birthday wishes Send birthday wishes to loved ones with this sweet little card. 🎉 Technique: Partial stamping, layered ribbon detail 🟢 Colour Combo: Crumb Cake, Pool Party, Early Espresso and Flirty Flamingo
Here’s how to get your kit: Place a $60+ order (before tax & shipping) in my online store between July 9–15, 2025, and I’ll send you all four card kits (1 of each design) as a thank-you gift. See below for a full list of supplies used to create these cards.
Click here to shop my online store. Click here to access & view the current catalogs. Click here to subscribe to those fun Paper Pumpkin kits of creativity! Click here for more information about joining my Online Monthly Technique Club. Earn even more goodies by joining a club! Click here to learn more about joining my Ink Pad Pals Team. Get the MOST rewards including a discount on future products! Follow me on social media! I share regularly on Pinterest, YouTube, and Facebook! Please subscribe to my newsletter, too!Click here and enter your email. When you include your birthday you will even be added to my birthday card mailing list 🙂
I’m so excited to play along with this week’s Global Design Project Challenge #GDP504– a “CASE the Designer” featuring the incredibly talented Mikaela Titheridge. Her soft colour blending and layout were so inspiring, and I knew I wanted to echo that joyful background and layered look.
For my version, I went bold, bright, and fruity using the Cheers & Sips Bundle – the perfect pick for summer celebrations!
🖌 How I Created This Card:
1. The Background: I started with a piece of Fluid 100 Watercolor Paper and painted three horizontal washes using these vibrant Stampin’ Up! colours:
Timid Tiger (top)
Strawberry Slush (middle)
Lemon Lime Twist (bottom)
I kept the strokes loose and organic for that fresh, summery look. Once dry, I cut the panel using the stitched rectangle from the Textured Notes Dies.
2. Embossed Gate Fold Base: My card base is a gatefold design using Summer Splash cardstock. I embossed both front flaps using the gorgeous Glass & Gardens 3D Embossing Folder, which adds such an elegant texture to frame the bright centre panel.
3. Stamped & Coloured Elements: Using the Cheers & Sips Bundle, I stamped the citrus, strawberry, and lime images in Calypso Coral, Secret Sea and Old Olive Inks and coloured them in with Stampin’ Blends (matching the watercolour stripes – Peach Pie for the citrus, Strawberry Slush for the strawberry and Granny Apple Green for the lime).
4. Sentiment & Finishing Touches: The sentiment, “Cheers – Let’s Celebrate!”, is stamped in Secret Sea and die-cut with the banner from the Stylish Shapes Dies. For a final bit of sparkle, I added a few Holographic Resin Dots.
Want to create this at home? All the supplies I used are listed below – just click to shop!
It’s bright, playful, and perfect for summer birthdays, BBQ invites, or just saying “cheers” to a friend. I love how the fruit and colours play together and how the embossed gatefold makes it extra special.
July 2 – 9 – See details HERE (Tutorial only available beyond these dates)
See the details and register here! – The live videos have happened – but I still have a kit available and the replays are available to watch at your convenience!
Thanks for stopping by – and don’t forget to check out all the inspiring CASE entries over at the Global Design Project FB page!
Click here to shop my online store. Click here to access & view the current catalogs. Click here to subscribe to those fun Paper Pumpkin kits of creativity! Click here for more information about joining my Online Monthly Technique Club. Earn even more goodies by joining a club! Click here to learn more about joining my Ink Pad Pals Team. Get the MOST rewards including a discount on future products! Follow me on social media! I share regularly on Pinterest, YouTube, and Facebook! Please subscribe to my newsletter, too!Click here and enter your email. When you include your birthday you will even be added to my birthday card mailing list 🙂
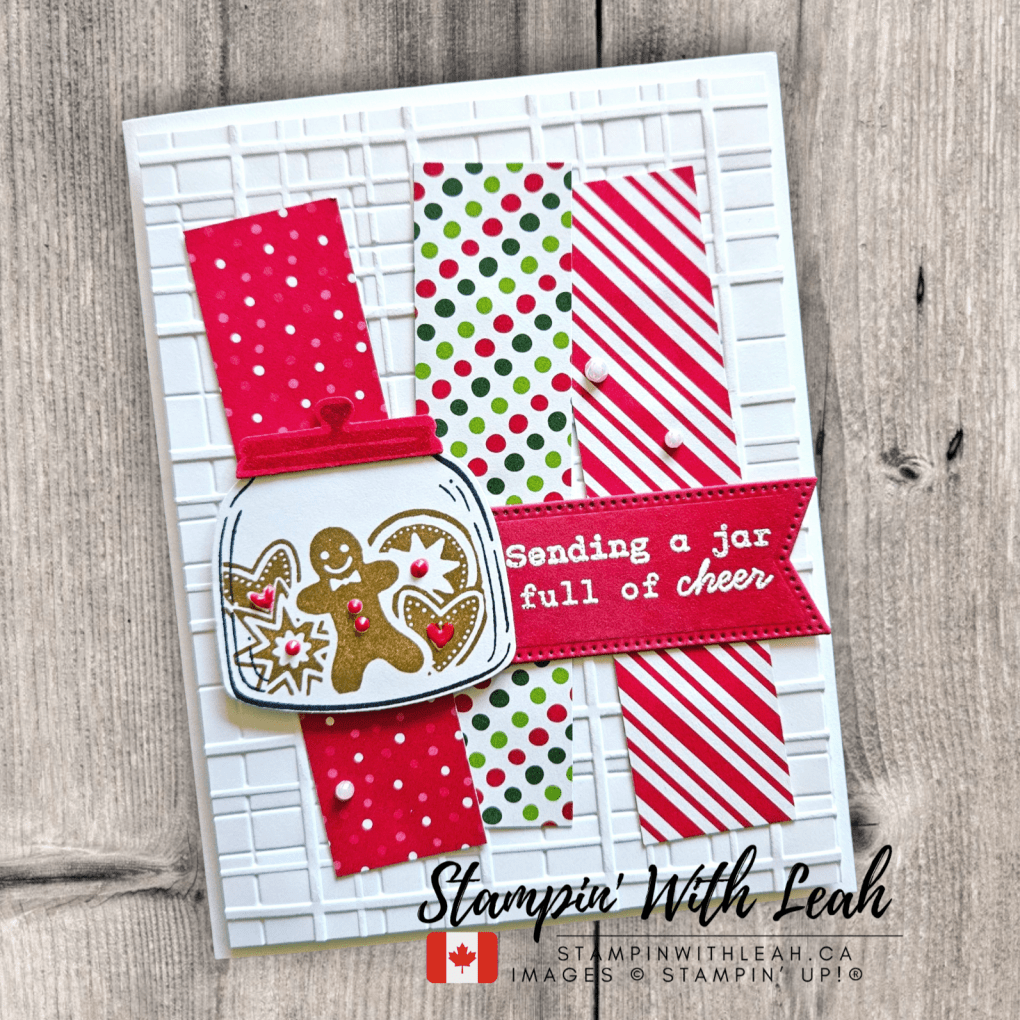
After a brief rest from Festive Friday (end-of-school exhaustion is real!), I’m back and excited to share this vibrant Christmas card featuring the brand-new Jar of Joy stamp set — an Online Exclusive you won’t find in any catalogue!
I lThis cheerful card came together using the following festive favourites:
🎄 Jar of Joy Stamp & Die Bundle – Online Exclusive 🎄 Take a Bow 6″ x 6″ Designer Series Paper – Last Chance item 🎄 Pearlized Enamel Effects Basics – Last Chance item 🎄 Iridescent Pearls – for a subtle holiday sparkle 🎄 Basics 3D Embossing Folder – for the textured background
The adorable jar is filled with gingerbread cookies and festive treats, and the sentiment “Sending a jar full of cheer” adds the perfect seasonal message. I layered strips of DSP to create a fun, playful background and popped the jar up with dimensionals for added interest.
🫙 CRAFTING TIP: Use scraps of coordinating DSP to build quick and dynamic backgrounds — it’s a great way to use every last bit of your paper!
See the details and register here – there is still time to register from any where in the world! The event has happened – but I still have a kit available and you can access the replay videos.
Click here to shop my online store. Click here to access & view the current catalogs. Click here to subscribe to those fun Paper Pumpkin kits of creativity! Click here for more information about joining my Online Monthly Technique Club. Earn even more goodies by joining a club! Click here to learn more about joining my Ink Pad Pals Team. Get the MOST rewards including a discount on future products! Follow me on social media! I share regularly on Pinterest, YouTube, and Facebook! Please subscribe to my newsletter, too!Click here and enter your email. When you include your birthday you will even be added to my birthday card mailing list 🙂


![Basic White 8 1/2" X 11" Thick Cardstock [ 159229 ]](https://assets1.tamsnetwork.com/images/EC042017NF/159229s.jpg "Basic White 8 1/2\" X 11\" Thick Cardstock [ 159229 ]")
![Basic Black 8-1/2" X 11" Cardstock [ 121045 ]](https://assets1.tamsnetwork.com/images/EC042017NF/121045s.jpg "Basic Black 8-1/2\" X 11\" Cardstock [ 121045 ]")
![Most Wonderful Cling Stamp Set (English) [ 162072 ]](https://assets1.tamsnetwork.com/images/EC042017NF/162072s.jpg "Most Wonderful Cling Stamp Set (English) [ 162072 ]")
![Clear Block F [ 118483 ]](https://assets1.tamsnetwork.com/images/EC042017NF/118483s.jpg "Clear Block F [ 118483 ]")
![Tuxedo Black Memento Ink Pad [ 132708 ]](https://assets1.tamsnetwork.com/images/EC042017NF/132708s.jpg "Tuxedo Black Memento Ink Pad [ 132708 ]")
![Versamark Pad [ 102283 ]](https://assets1.tamsnetwork.com/images/EC042017NF/102283s.jpg "Versamark Pad [ 102283 ]")
![Metallics Wow! Embossing Powder [ 165678 ]](https://assets1.tamsnetwork.com/images/EC042017NF/165678s.jpg "Metallics Wow! Embossing Powder [ 165678 ]")
![Embossing Additions Tool Kit [ 159971 ]](https://assets1.tamsnetwork.com/images/EC042017NF/159971s.jpg "Embossing Additions Tool Kit [ 159971 ]")
![Heat Tool (Us And Canada) [ 129053 ]](https://assets1.tamsnetwork.com/images/EC042017NF/129053s.jpg "Heat Tool (Us And Canada) [ 129053 ]")
![Stylish Shapes Dies [ 159183 ]](https://assets1.tamsnetwork.com/images/EC042017NF/159183s.jpg "Stylish Shapes Dies [ 159183 ]")
![Gold Striped 3/8" (1 Cm) Mesh Ribbon [ 165599 ]](https://assets1.tamsnetwork.com/images/EC042017NF/165599s.jpg "Gold Striped 3/8\" (1 Cm) Mesh Ribbon [ 165599 ]")
![Loose Gold Sequins [ 165267 ]](https://assets1.tamsnetwork.com/images/EC042017NF/165267s.jpg "Loose Gold Sequins [ 165267 ]")
![Multipurpose Liquid Glue [ 110755 ]](https://assets1.tamsnetwork.com/images/EC042017NF/110755s.jpg "Multipurpose Liquid Glue [ 110755 ]")
![Stampin' Dimensionals [ 104430 ]](https://assets1.tamsnetwork.com/images/EC042017NF/104430s.jpg "Stampin' Dimensionals [ 104430 ]")
![Basic White Medium Envelopes [ 159236 ]](https://assets1.tamsnetwork.com/images/EC042017NF/159236s.jpg "Basic White Medium Envelopes [ 159236 ]")


![Basic White 8 1/2" X 11" Cardstock [ 166780 ]](https://assets1.tamsnetwork.com/images/EC042017NF/166780s.jpg "Basic White 8 1/2\" X 11\" Cardstock [ 166780 ]")
![Pool Party 8-1/2" X 11" Cardstock [ 122924 ]](https://assets1.tamsnetwork.com/images/EC042017NF/122924s.jpg "Pool Party 8-1/2\" X 11\" Cardstock [ 122924 ]")
![Wildflower Birthday 12" X 12" (30.5 X 30.5 Cm) Specialty Designer Series Paper [ 164591 ]](https://assets1.tamsnetwork.com/images/EC042017NF/164591s.jpg "Wildflower Birthday 12\" X 12\" (30.5 X 30.5 Cm) Specialty Designer Series Paper [ 164591 ]")
![Adorable Owls Cling Stamp Set (English) [ 160269 ]](https://assets1.tamsnetwork.com/images/EC042017NF/160269s.jpg "Adorable Owls Cling Stamp Set (English) [ 160269 ]")
![Blueberry Bushel Classic Stampin' Pad [ 147138 ]](https://assets1.tamsnetwork.com/images/EC042017NF/147138s.jpg "Blueberry Bushel Classic Stampin' Pad [ 147138 ]")
![Crumb Cake Stampin' Blends Combo Pack [ 154882 ]](https://assets1.tamsnetwork.com/images/EC042017NF/154882s.jpg "Crumb Cake Stampin' Blends Combo Pack [ 154882 ]")
![Blueberry Bushel Stampin’ Blends Combo Pack [ 161679 ]](https://assets1.tamsnetwork.com/images/EC042017NF/161679s.jpg "Blueberry Bushel Stampin’ Blends Combo Pack [ 161679 ]")
![Bubble Bath Stampin’ Blends Combo Pack [ 161675 ]](https://assets1.tamsnetwork.com/images/EC042017NF/161675s.jpg "Bubble Bath Stampin’ Blends Combo Pack [ 161675 ]")
![Peach Pie Stampin’ Blends Combo Pack [ 163827 ]](https://assets1.tamsnetwork.com/images/EC042017NF/163827s.jpg "Peach Pie Stampin’ Blends Combo Pack [ 163827 ]")
![Pool Party Stampin' Blends Combo Pack [ 154894 ]](https://assets1.tamsnetwork.com/images/EC042017NF/154894s.jpg "Pool Party Stampin' Blends Combo Pack [ 154894 ]")
![Peach Pie 3/8" (1 Cm) Bordered Ribbon [ 163783 ]](https://assets1.tamsnetwork.com/images/EC042017NF/163783s.jpg "Peach Pie 3/8\" (1 Cm) Bordered Ribbon [ 163783 ]")
![Starburst Sequins [ 165539 ]](https://assets1.tamsnetwork.com/images/EC042017NF/165539s.jpg "Starburst Sequins [ 165539 ]")
![Exposed Brick 3 D Embossing Folder [ 161600 ]](https://assets1.tamsnetwork.com/images/EC042017NF/161600s.jpg "Exposed Brick 3 D Embossing Folder [ 161600 ]")


![Garden Green 8-1/2" X 11" Cardstock [ 102584 ]](https://assets1.tamsnetwork.com/images/EC042017NF/102584s.jpg "Garden Green 8-1/2\" X 11\" Cardstock [ 102584 ]")
![Cherry Cobbler 8-1/2" X 11" Cardstock [ 119685 ]](https://assets1.tamsnetwork.com/images/EC042017NF/119685s.jpg "Cherry Cobbler 8-1/2\" X 11\" Cardstock [ 119685 ]")
![Jolly Holly Bundle (English) [ 166120 ]](https://assets1.tamsnetwork.com/images/EC042017NF/166120s.jpg "Jolly Holly Bundle (English) [ 166120 ]")
![Textured Notes Dies [ 165555 ]](https://assets1.tamsnetwork.com/images/EC042017NF/165555s.jpg "Textured Notes Dies [ 165555 ]")
![Cherry Cobbler Classic Stampin' Pad [ 147083 ]](https://assets1.tamsnetwork.com/images/EC042017NF/147083s.jpg "Cherry Cobbler Classic Stampin' Pad [ 147083 ]")
![Garden Green Classic Stampin' Pad [ 147089 ]](https://assets1.tamsnetwork.com/images/EC042017NF/147089s.jpg "Garden Green Classic Stampin' Pad [ 147089 ]")
![Mossy Meadow Stampin' Blends Combo Pack [ 154890 ]](https://assets1.tamsnetwork.com/images/EC042017NF/154890s.jpg "Mossy Meadow Stampin' Blends Combo Pack [ 154890 ]")
![Cherry Cobbler Stampin' Blends Combo Pack [ 154880 ]](https://assets1.tamsnetwork.com/images/EC042017NF/154880s.jpg "Cherry Cobbler Stampin' Blends Combo Pack [ 154880 ]")
![Cherry Cobbler & Pearl Adhesive Backed Berries [ 164119 ]](https://assets1.tamsnetwork.com/images/EC042017NF/164119s.jpg "Cherry Cobbler & Pearl Adhesive Backed Berries [ 164119 ]")
![Basics Wow! Embossing Powder [ 165679 ]](https://assets1.tamsnetwork.com/images/EC042017NF/165679s.jpg "Basics Wow! Embossing Powder [ 165679 ]")
![Stampin' Cut & Emboss Machine [ 149653 ]](https://assets1.tamsnetwork.com/images/EC042017NF/149653s.jpg "Stampin' Cut & Emboss Machine [ 149653 ]")
![Mini Stampin' Dimensionals [ 144108 ]](https://assets1.tamsnetwork.com/images/EC042017NF/144108s.jpg "Mini Stampin' Dimensionals [ 144108 ]")
![Take Your Pick [ 144107 ]](https://assets1.tamsnetwork.com/images/EC042017NF/144107s.jpg "Take Your Pick [ 144107 ]")

![Regal Distressed Patterns 12" X 12" (30.5 X 30.5 Cm) Specialty Designer Series Paper [ 164037 ]](https://assets1.tamsnetwork.com/images/EC042017NF/164037s.jpg "Regal Distressed Patterns 12\" X 12\" (30.5 X 30.5 Cm) Specialty Designer Series Paper [ 164037 ]")
![Pretty Peacock 8-1/2" X 11" Cardstock [ 150880 ]](https://assets1.tamsnetwork.com/images/EC042017NF/150880s.jpg "Pretty Peacock 8-1/2\" X 11\" Cardstock [ 150880 ]")
![Long Time No See Photopolymer Stamp Set (English) [ 166189 ]](https://assets1.tamsnetwork.com/images/EC042017NF/166189s.jpg "Long Time No See Photopolymer Stamp Set (English) [ 166189 ]")
![Pretty Peacock Stampin’ Blends Combo Pack [ 161676 ]](https://assets1.tamsnetwork.com/images/EC042017NF/161676s.jpg "Pretty Peacock Stampin’ Blends Combo Pack [ 161676 ]")
![Old Olive Stampin' Blends Combo Pack [ 154892 ]](https://assets1.tamsnetwork.com/images/EC042017NF/154892s.jpg "Old Olive Stampin' Blends Combo Pack [ 154892 ]")
![Basic Black Stampin' Write Marker [ 162481 ]](https://assets1.tamsnetwork.com/images/EC042017NF/162481s.jpg "Basic Black Stampin' Write Marker [ 162481 ]")


![Not 29 Anymore Photopolymer Stamp Set (English) [ 166182 ]](https://assets1.tamsnetwork.com/images/EC042017NF/166182s.jpg "Not 29 Anymore Photopolymer Stamp Set (English) [ 166182 ]")
![Secret Sea Classic Stampin' Pad [ 165285 ]](https://assets1.tamsnetwork.com/images/EC042017NF/165285s.jpg "Secret Sea Classic Stampin' Pad [ 165285 ]")
![Petunia Pop Stampin’ Blends Combo Pack [ 163828 ]](https://assets1.tamsnetwork.com/images/EC042017NF/163828s.jpg "Petunia Pop Stampin’ Blends Combo Pack [ 163828 ]")
![Petal Pink Stampin' Blends Combo Pack [ 154893 ]](https://assets1.tamsnetwork.com/images/EC042017NF/154893s.jpg "Petal Pink Stampin' Blends Combo Pack [ 154893 ]")
![Basic Gray 8-1/2" X 11" Cardstock [ 121044 ]](https://assets1.tamsnetwork.com/images/EC042017NF/121044s.jpg "Basic Gray 8-1/2\" X 11\" Cardstock [ 121044 ]")
![Bubble Bath 8 1/2" X 11" Cardstock [ 161718 ]](https://assets1.tamsnetwork.com/images/EC042017NF/161718s.jpg "Bubble Bath 8 1/2\" X 11\" Cardstock [ 161718 ]")
![Secret Sea 8 1/2" X 11" Cardstock [ 165624 ]](https://assets1.tamsnetwork.com/images/EC042017NF/165624s.jpg "Secret Sea 8 1/2\" X 11\" Cardstock [ 165624 ]")
![Petunia Pop 8 1/2" X 11" Cardstock [ 163801 ]](https://assets1.tamsnetwork.com/images/EC042017NF/163801s.jpg "Petunia Pop 8 1/2\" X 11\" Cardstock [ 163801 ]")
![Dotted Circles 3 D Embossing Folder [ 163789 ]](https://assets1.tamsnetwork.com/images/EC042017NF/163789s.jpg "Dotted Circles 3 D Embossing Folder [ 163789 ]")
![Glass & Gardens Embossing Folders [ 165597 ]](https://assets1.tamsnetwork.com/images/EC042017NF/165597s.jpg "Glass & Gardens Embossing Folders [ 165597 ]")
![Mini Corrugated 3 D Embossing Folder [ 165559 ]](https://assets1.tamsnetwork.com/images/EC042017NF/165559s.jpg "Mini Corrugated 3 D Embossing Folder [ 165559 ]")
![Everyday Arches Dies [ 164629 ]](https://assets1.tamsnetwork.com/images/EC042017NF/164629s.jpg "Everyday Arches Dies [ 164629 ]")
![Petunia Pop 1/4" (6.4 Mm) Iridescent Ribbon [ 166203 ]](https://assets1.tamsnetwork.com/images/EC042017NF/166203s.jpg "Petunia Pop 1/4\" (6.4 Mm) Iridescent Ribbon [ 166203 ]")
![Charming Shimmer Faceted Dots [ 166139 ]](https://assets1.tamsnetwork.com/images/EC042017NF/166139s.jpg "Charming Shimmer Faceted Dots [ 166139 ]")
![Mini Stampin' Cut & Emboss Machine [ 150673 ]](https://assets1.tamsnetwork.com/images/EC042017NF/150673s.jpg "Mini Stampin' Cut & Emboss Machine [ 150673 ]")

![Granny Apple Green 8-1/2" X 11" Cardstock [ 146990 ]](https://assets1.tamsnetwork.com/images/EC042017NF/146990s.jpg "Granny Apple Green 8-1/2\" X 11\" Cardstock [ 146990 ]")
![Take A Bow 6" X 6" (15.2 X 15.2 Cm) Designer Series Paper [ 164309 ]](https://assets1.tamsnetwork.com/images/EC042017NF/164309s.jpg "Take A Bow 6\" X 6\" (15.2 X 15.2 Cm) Designer Series Paper [ 164309 ]")
![Real Red Stampin' Blends Combo Pack [ 154899 ]](https://assets1.tamsnetwork.com/images/EC042017NF/154899s.jpg "Real Red Stampin' Blends Combo Pack [ 154899 ]")
![Granny Apple Green Stampin' Blends Combo Pack [ 154885 ]](https://assets1.tamsnetwork.com/images/EC042017NF/154885s.jpg "Granny Apple Green Stampin' Blends Combo Pack [ 154885 ]")
![Shaded Spruce Stampin' Blends Combo Pack [ 154903 ]](https://assets1.tamsnetwork.com/images/EC042017NF/154903s.jpg "Shaded Spruce Stampin' Blends Combo Pack [ 154903 ]")
![Darling Duckling Stampin’ Blends Combo Pack [ 165288 ]](https://assets1.tamsnetwork.com/images/EC042017NF/165288s.jpg "Darling Duckling Stampin’ Blends Combo Pack [ 165288 ]")
![Real Red Classic Stampin' Pad [ 147084 ]](https://assets1.tamsnetwork.com/images/EC042017NF/147084s.jpg "Real Red Classic Stampin' Pad [ 147084 ]")
![Shaded Spruce Classic Stampin' Pad [ 147088 ]](https://assets1.tamsnetwork.com/images/EC042017NF/147088s.jpg "Shaded Spruce Classic Stampin' Pad [ 147088 ]")
![Granny Apple Green Stampin' Pad [ 147095 ]](https://assets1.tamsnetwork.com/images/EC042017NF/147095s.jpg "Granny Apple Green Stampin' Pad [ 147095 ]")
![Real Red & White Adhesive Backed Peppermints [ 164050 ]](https://assets1.tamsnetwork.com/images/EC042017NF/164050s.jpg "Real Red & White Adhesive Backed Peppermints [ 164050 ]")


![Early Espresso Classic Stampin' Pad [ 147114 ]](https://assets1.tamsnetwork.com/images/EC042017NF/147114s.jpg "Early Espresso Classic Stampin' Pad [ 147114 ]")
![Misty Moonlight Classic Stampin' Pad [ 153118 ]](https://assets1.tamsnetwork.com/images/EC042017NF/153118s.jpg "Misty Moonlight Classic Stampin' Pad [ 153118 ]")
![Flirty Flamingo Classic Stampin' Pad [ 147052 ]](https://assets1.tamsnetwork.com/images/EC042017NF/147052s.jpg "Flirty Flamingo Classic Stampin' Pad [ 147052 ]")
![Strawberry Slush Stampin’ Blends Combo Pack [ 165290 ]](https://assets1.tamsnetwork.com/images/EC042017NF/165290s.jpg "Strawberry Slush Stampin’ Blends Combo Pack [ 165290 ]")
![Pretty In Pink Stampin’ Blends Combo Pack [ 163824 ]](https://assets1.tamsnetwork.com/images/EC042017NF/163824s.jpg "Pretty In Pink Stampin’ Blends Combo Pack [ 163824 ]")
![Coastal Cabana 8-1/2" X 11" Cardstock [ 131297 ]](https://assets1.tamsnetwork.com/images/EC042017NF/131297s.jpg "Coastal Cabana 8-1/2\" X 11\" Cardstock [ 131297 ]")
![Real Red 8-1/2" X 11" Cardstock [ 102482 ]](https://assets1.tamsnetwork.com/images/EC042017NF/102482s.jpg "Real Red 8-1/2\" X 11\" Cardstock [ 102482 ]")
![Country Woods 12" X 12" (30.5 X 30.5 Cm) Designer Series Paper [ 163393 ]](https://assets1.tamsnetwork.com/images/EC042017NF/163393s.jpg "Country Woods 12\" X 12\" (30.5 X 30.5 Cm) Designer Series Paper [ 163393 ]")
![White 1/4" (6.4 Mm) Ribbon [ 165562 ]](https://assets1.tamsnetwork.com/images/EC042017NF/165562s.jpg "White 1/4\" (6.4 Mm) Ribbon [ 165562 ]")
![Adhesive Backed Textured Dots [ 163338 ]](https://assets1.tamsnetwork.com/images/EC042017NF/163338s.jpg "Adhesive Backed Textured Dots [ 163338 ]")


![Summer Splash 8 1/2" X 11 Cardstock [ 163797 ]](https://assets1.tamsnetwork.com/images/EC042017NF/163797s.jpg "Summer Splash 8 1/2\" X 11 Cardstock [ 163797 ]")
![Fluid 100 Watercolor Paper [ 149612 ]](https://assets1.tamsnetwork.com/images/EC042017NF/149612s.jpg "Fluid 100 Watercolor Paper [ 149612 ]")
![Cheers & Sips Bundle (English) [ 165594 ]](https://assets1.tamsnetwork.com/images/EC042017NF/165594s.jpg "Cheers & Sips Bundle (English) [ 165594 ]")
![Calypso Coral Classic Stampin' Pad [ 147101 ]](https://assets1.tamsnetwork.com/images/EC042017NF/147101s.jpg "Calypso Coral Classic Stampin' Pad [ 147101 ]")
![Old Olive Classic Stampin' Pad [ 147090 ]](https://assets1.tamsnetwork.com/images/EC042017NF/147090s.jpg "Old Olive Classic Stampin' Pad [ 147090 ]")
![Timid Tiger Classic Stampin' Ink Refill [ 165283 ]](https://assets1.tamsnetwork.com/images/EC042017NF/165283s.jpg "Timid Tiger Classic Stampin' Ink Refill [ 165283 ]")
![Strawberry Slush Classic Stampin' Ink Refill [ 165282 ]](https://assets1.tamsnetwork.com/images/EC042017NF/165282s.jpg "Strawberry Slush Classic Stampin' Ink Refill [ 165282 ]")
![Lemon Lime Twist Classic Stampin' Ink Refill [ 144092 ]](https://assets1.tamsnetwork.com/images/EC042017NF/144092s.jpg "Lemon Lime Twist Classic Stampin' Ink Refill [ 144092 ]")
![Timid Tiger Stampin’ Blends Combo Pack [ 165291 ]](https://assets1.tamsnetwork.com/images/EC042017NF/165291s.jpg "Timid Tiger Stampin’ Blends Combo Pack [ 165291 ]")
![Holographic Resin Dots [ 165598 ]](https://assets1.tamsnetwork.com/images/EC042017NF/165598s.jpg "Holographic Resin Dots [ 165598 ]")