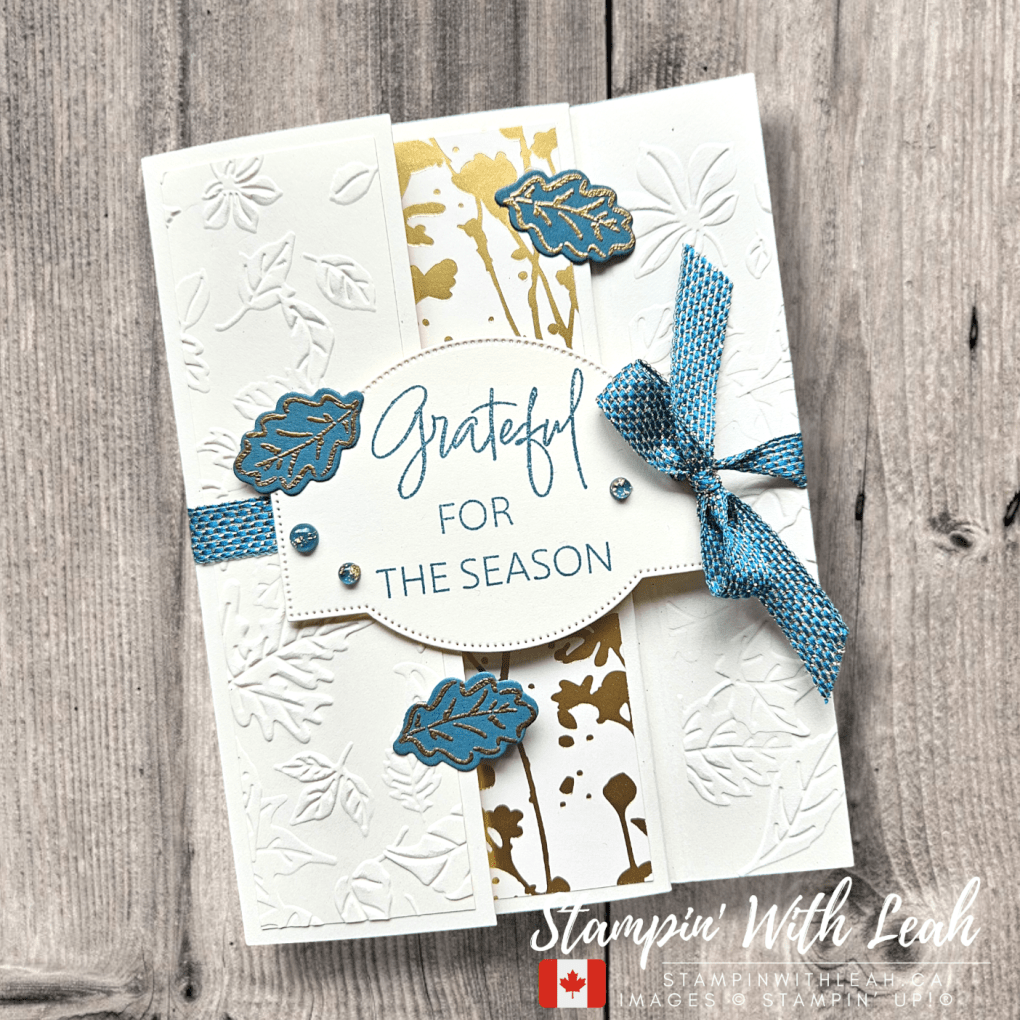
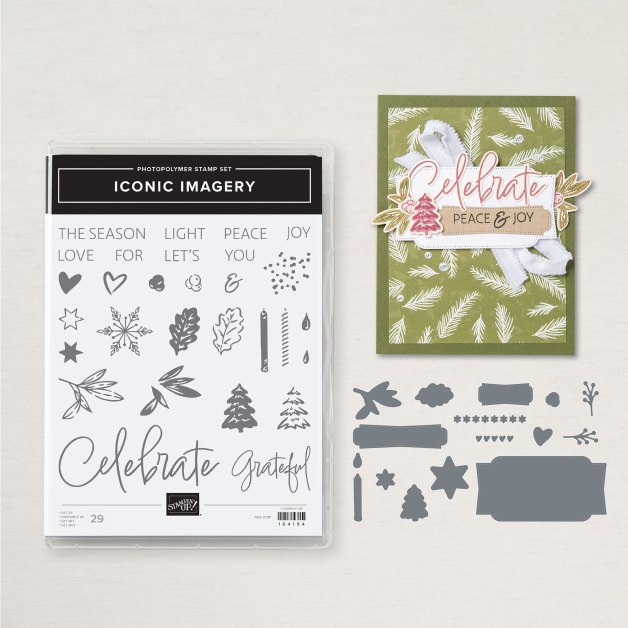
Welcome to another Festive Friday! This week’s card is a cheerful and bold Christmas design featuring some incredible Last Chance products. If you’ve had your eye on the More Wishes Stamp Set or the Take a Bow 6″x6″ Designer Series Paper, now is the time to grab them before they’re gone for good!
Card Details:
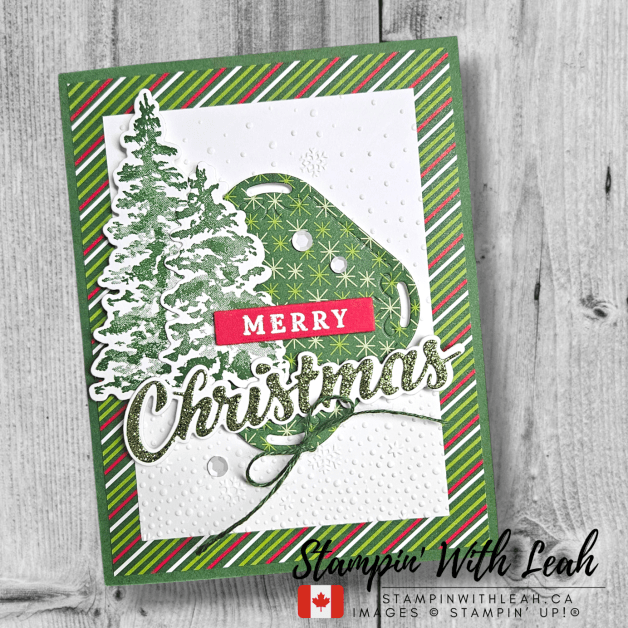
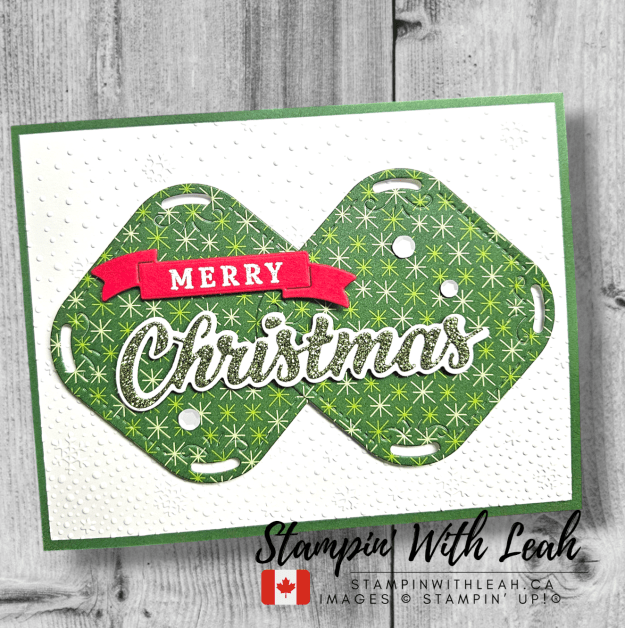
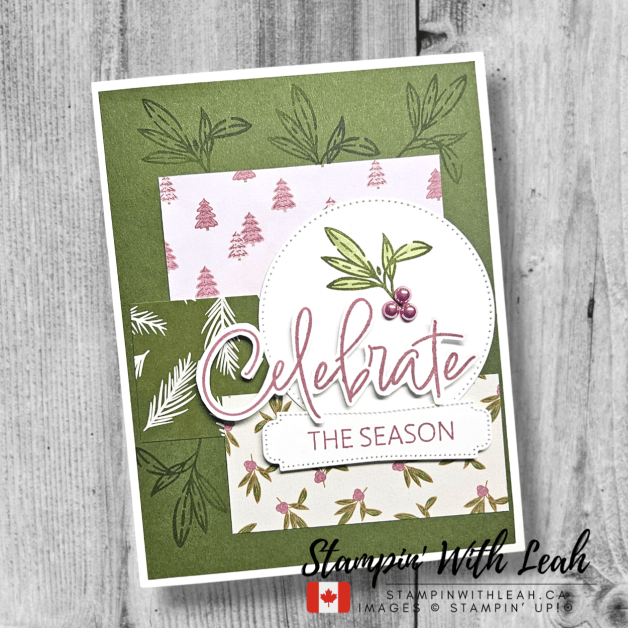
For this festive design, I combined bright, classic Christmas colors with fun typography and fussy-cut details:
The holly leaves were fussy cut from the DSP, and I added dimension with Cherry Cobbler Pearl Berries to give the card a little extra holiday sparkle!
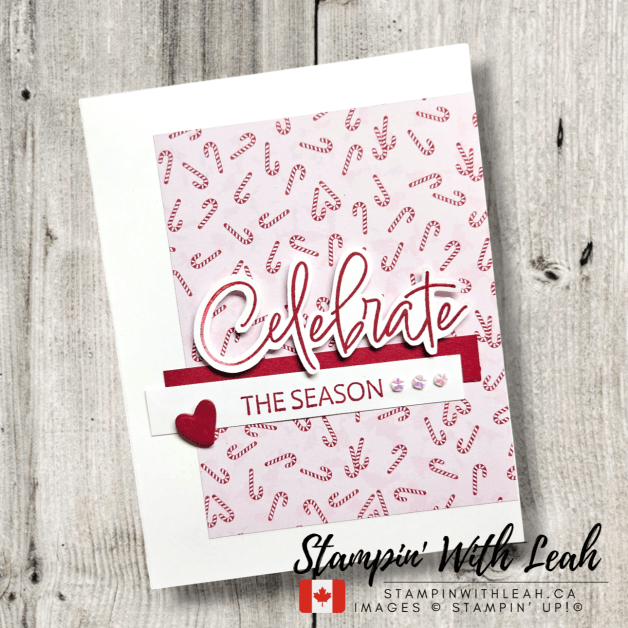
The sentiment features “merry” from the More Wishes Stamp Set, stamped in Real Red Ink on white die-cut panels.
The bold “CHRISTMAS” is heat embossed in White Embossing Powder on Real Red cardstock, creating a striking contrast.
The beautiful Take a Bow 6″x6″ DSP serves as the background, adding a festive flair with its starry green pattern.
Why You’ll Love This Card:
✔ Simple yet striking layout that makes a big impact
✔ A perfect way to use Last Chance products before they retire
✔ Great for mass-producing Christmas cards with a handmade touch
Don’t Miss Out!
Both the More Wishes Stamp Set and Take a Bow DSP are retiring soon—grab them before they sell out! Shop now and add these must-have items to your holiday crafting stash.
I hope this card inspires you to get a head start on your Christmas cardmaking. Let me know what you think in the comments! Would you recreate this design?
Click here to shop my online store. Click here to access & view the current catalogs. Click here to subscribe to Thanks for hopping by! Make sure to pin this post for future reference and share it with your crafty friends.those fun Paper Pumpkin kits of creativity! Click here for more information about joining my Online Monthly Technique Club. Earn even more goodies by joining a club! Click here to learn more about joining my Ink Pad Pals Team. Get the MOST rewards including a discount on future products! Follow me on social media! I share regularly on Pinterest, YouTube, and Facebook! Please subscribe to my newsletter, too!Click here and enter your email. When you include your birthday you will even be added to my birthday card mailing list 🙂
Happy Festive Friday, crafters! This week, I’m highlighting some incredible Last Chance Items—the Iconic Imagery Stamp Set and Dies, paired beautifully with the brand-new Textured Notes Dies. Plus, these Last Chance Items are on sale for a steal of a deal, so don’t miss out! 🎄✨
How It Came Together:
This card came to life with layers of Textured Notes dies in Pretty Peacock, Lost Lagoon, and Pool Party, creating an ombré look that’s both modern and festive. The Iconic Imagery Stamp Set adds extra charm with its snowflake images, stamped in Pretty Peacock Ink on Pool Party cardstock before being die cut for dimensional details.
The sentiment, “Celebrate the Season,” is heat-embossed in white on Lost Lagoon for a bold, frosty focal point. To tie everything together, I added Pretty Peacock sequins for a touch of holiday sparkle!
Why You’ll Love This Card:
✔ Easy to recreate with bold, geometric details ✔ Perfect for creating modern and elegant holiday cards ✔ Features a sophisticated ombré color palette
🔗 Shop Last Chance Deals and Online Exclusives in MY SHOP or click on the items below:
💬 Would you try this color palette for your holiday cards? Let me know in the comments!
Click here to shop my online store. Click here to access & view the current catalogs. Click here to subscribe to Thanks for hopping by! Make sure to pin this post for future reference and share it with your crafty friends.those fun Paper Pumpkin kits of creativity! Click here for more information about joining my Online Monthly Technique Club. Earn even more goodies by joining a club! Click here to learn more about joining my Ink Pad Pals Team. Get the MOST rewards including a discount on future products! Follow me on social media! I share regularly on Pinterest, YouTube, and Facebook! Please subscribe to my newsletter, too!Click here and enter your email. When you include your birthday you will even be added to my birthday card mailing list 🙂
Happy Friday, stamping friends! Welcome back to Festive Friday, where I share holiday card inspiration to keep your Christmas crafting on track all year long. This week, I’ve paired the versatile Take a Bow Designer Series Paper (DSP) with the Peaceful Season Stamp Set and Dies. These products create a stunning mix of festive textures and classic holiday charm.
The bold patterns of the DSP shine as a focal point, while subtle embossed backgrounds add texture and depth to the designs. I kept the color palette traditional with shades of green, red, and white, adding pops of sparkle and dimension with glimmer paper accents, linen thread, and sequins.
Whether you’re drawn to elegant sentiments like “Peace & Joy” or bold greetings like “Merry Christmas,” these cards are simple yet impactful, perfect for spreading holiday cheer.
Why You’ll Love These Products:
Take a Bow DSP: The festive patterns and rich colors make it a versatile choice for holiday projects.
Peaceful Season Stamp Set and Dies: With timeless holiday greetings and elegant coordinating dies, this set is a must-have for Christmas crafting.
Sale-A-Bration & Last Chance Reminder:
The Peaceful Season Stamp Set and Dies are on the Last Chance List—grab them before they’re gone!
Don’t forget, every $75 CAD purchase during Sale-A-Bration earns you a free reward, making it the perfect time to stock up on your crafting essentials.
A perk to ordering with me in the month of January is that with any order over $75cdn, you will receive a FREE SAB item and I am emailing out an amazing 38 project Tutorial Bundle. Just use the host code below. As a member of my team you get free access to this Tutorial Bundle.
Let’s Craft Together!
I’d love for you to join one of my in-person card classes:
These classes are perfect for all skill levels and are a great way to learn new techniques, try out Stampin’ Up! products, and connect with other cardmakers. Spots fill up quickly, so be sure to register early!
Also, don’t forget to sign up for my Stampin’ With Leah Newsletterto get all the details on upcoming events, promotions, and creative tips. You won’t want to miss out!
Live in Canada, don’t have a demonstrator? Contact me to get a catalogue or find out why right now is a great time to join my team.
You can see all the benefits of joining my team (the Ink Pad Pals) by clicking the image below. Right now there are even more perks to joining during Sale-a-bration!
These cards were such a joy to create, and I hope they inspire you to make your own holiday projects. I’d love to hear which products you’re excited to craft with—let me know in the comments below!
Click here to shop my online store. Click here to access & view the current catalogs. Click here to subscribe to Thanks for hopping by! Make sure to pin this post for future reference and share it with your crafty friends.those fun Paper Pumpkin kits of creativity! Click here for more information about joining my Online Monthly Technique Club. Earn even more goodies by joining a club! Click here to learn more about joining my Ink Pad Pals Team. Get the MOST rewards including a discount on future products! Follow me on social media! I share regularly on Pinterest, YouTube, and Facebook! Please subscribe to my newsletter, too!Click here and enter your email. When you include your birthday you will even be added to my birthday card mailing list 🙂
Happy Friday, friends! I’m so excited to share my second Festive Friday creation with you. This series is part of my crafting goals for 2025: to create one Christmas card every week and keep the holiday spirit alive year-round. It’s been such a joy to embrace this challenge and spark inspiration for Christmas crafting early in the year.
This week’s card spotlights the Iconic Imagery Stamp Set and Dies Bundle, and the Iconic Celebrations Designer Series Paper (DSP). These products are a dream for creating timeless designs with a touch of elegance. Let’s dive into the details of this project!
The Card Design
For this card, I wanted to showcase the versatility of the Iconic Imagery Bundle. The layered DSP creates depth and adds a beautiful contrast between the soft pinks and vibrant greens. The stamped images are simple yet striking, perfectly complementing the patterns in the DSP.
Here are some of the key features of this card:
Background Stamping: I used the foliage stamps from the Iconic Imagery set to add subtle details to the green card base, creating a cohesive look.
Layered DSP: The Designer Series Paper adds so much interest with its mix of classic Christmas motifs. The pink tree pattern is one of my favorites, offering a fresh take on holiday colors.
Focal Point: The “Celebrate the Season” sentiment is fussy-cut and layered on a stitched circle, accented with stamped greenery and Adhesive-backed Pearl Trio “berries” for a polished finish.
This design is perfect for mass-producing Christmas cards or as a one-of-a-kind creation for someone special!
Prepare Your Base: Start with a Thick Basic White card base. Cut it to 8-1/2” x 5-1/2” and score at 4-1/4”. Stamp the foliage images randomly across the background in Mossy Meadows ink.
Layer the DSP: Cut pieces of the Iconic Imagery DSP to 3” x 4” and 2” x 4”. Layer them on the card base, slightly offset for added dimension.
Create the Sentiment: Stamp “Celebrate the Season” in Rich Razzleberry ink on Basic White cardstock. Die-cut the sentiment and a stitched circle using the Iconic Imagery Dies. Stamp greenery and berries on the circle for a decorative touch.
Assemble the Card: Adhere the stitched circle and sentiment to the card using Stampin’ Dimensionals. Add a few adhesive-backed pearls to the berries for added detail.
Finishing Touches: Double-check your card for balance and alignment, and it’s ready to go!
Why I Love the Iconic Imagery Bundle
This bundle is perfect for crafters who love timeless designs and versatile products. Whether you’re creating cards, tags, or scrapbook layouts, the stamps and dies in this set are endlessly inspiring. Plus, the DSP’s mix of traditional and modern patterns makes it a must-have for holiday crafting.
Shop and Earn Free Products!
Ready to start your Christmas crafting goals? The Iconic Imagery Stamp Set, Bundle, and DSP are available now, but don’t wait too long – these products are flying off the shelves! Visit my online store to shop your favorites and join me in making 2025 a year full of festive creativity. Now is a great time to shop as well since for every $75 you spend, you earn a FREE Sale-a-bration item.
Don’t forget to subscribe to my blog and follow me on social media for weekly Festive Friday inspiration! Let me know in the comments: What colors or designs are inspiring your Christmas crafting this year?
Happy stamping, and I’ll see you next Friday for another Festive Friday creation!
A perk to ordering with me in the month of January is that with any order over $75cdn, you will receive a FREE SAB item and I am emailing out an amazing 38 project Tutorial Bundle. Just use the host code below. As a member of my team you get free access to this Tutorial Bundle.
To make sure you learn about all my upcoming events and don’t miss any sales join my newsletter or check out everything at linktr.ee/stampinwithleah.
Live in Canada, don’t have a demonstrator? Contact me to get a catalogue or find out why right now is a great time to join my team.
You can see all the benefits of joining my team (the Ink Pad Pals) by clicking the image below. Right now there are even more perks to joining during Sale-a-bration!
Thanks for hopping by! Make sure to pin this post for future reference and share it with your crafty friends.
Click here to shop my online store. Click here to access & view the current catalogs. Click here to subscribe to Thanks for hopping by! Make sure to pin this post for future reference and share it with your crafty friends.those fun Paper Pumpkin kits of creativity! Click here for more information about joining my Online Monthly Technique Club. Earn even more goodies by joining a club! Click here to learn more about joining my Ink Pad Pals Team. Get the MOST rewards including a discount on future products! Follow me on social media! I share regularly on Pinterest, YouTube, and Facebook! Please subscribe to my newsletter, too!Click here and enter your email. When you include your birthday you will even be added to my birthday card mailing list 🙂
Hello, stamping friends! I’m thrilled to join you for another exciting Coast to Coast Creators Blog Hop. This hop consistently takes place on the 14th of every month, making it a regular date for creativity and inspiration. This month, the theme is all about a sketch challenge that inspires us to think outside the box and create something uniquely our own.
If you’re new here, welcome to Stampin With Leah! I’m Leah, an avid Stampin’ Up! demonstrator passionate about bringing creativity and inspiration to your crafting journey. Let’s jump into the details of this month’s project and explore how you can interpret a sketch to design stunning cards.
Working with the Sketch
Sketch challenges are a fantastic way to kickstart your creativity. They provide a layout framework while allowing endless customization to suit your style. For this hop, I used the provided sketch to guide my design process, blending clean lines, subtle colors, and a touch of sparkle to bring the layout to life.
Here’s how I brought the design to life:
Materials:
Cardstock: Basic White and Thick Basic White
Ink Pads: Balmy Blue, Blueberry Bushel, Boho Blue
Stamps and Dies: Snowflake image, sentiment, and dies from the Iconic Imagery Bundle
Stylish Shapes Dies: Smallest square for stitched diamonds
Adhesive: Stampin’ Dimensionals and Multipurpose Liquid Glue
Embellishments: Rhinestone Basic Jewels
Instructions:
Base Layer: Start with an A2 card base (5-1/2” x 8-1/2”, scored at 4-1/4”) in Thick Basic White and a 4″ x 5-1/4″ layer to create on.
Focal Elements: Die-cut three stitched diamond shapes from Basic White cardstock using the smallest square die from the Stylish Shapes Dies. Stamp snowflake designs one in Balmy Blue, one in Blueberry Bushel, and one in Boho Blue. Die cut the images and attach to the squares using Dimensionals for added depth. Arrange the diamonds in a cluster at the center of the 4″ X 5-1/4″ Basic White layer, adhering with Liquid Glue.
Sentiment: Stamp the “Celebrate the Season” sentiment in Blueberry Bushel directly onto the card front, slightly offset below the snowflake cluster to follow the sketch’s layout. Once all the stamping is done, use Dimensionals to adhere the layer tot he card base.
Finishing Touches: Add Rhinestone Basic Jewels around the snowflakes and sentiment for a touch of sparkle and elegance.
Tips for Success
Keep It Clean: A clean design lets the sketch shine while emphasizing the stamped details.
Play with Placement: Arrange your elements to create balance and harmony within the sketch framework.
Add Subtle Sparkle: Rhinestones are perfect for adding a festive touch without overpowering the design.
Explore More Creations
Don’t stop here! Be sure to check out the other talented creators participating in the Coast to Coast Blog Hop. Each crafter has put their own spin on this month’s sketch, and you’re bound to find endless inspiration.
Join the Fun!
I hope this project inspires you to take on a sketch challenge and create something beautiful. Leave a comment below to share how you’re using sketches to inspire your crafting—I’d love to see your creations!
And don’t forget to subscribe to my newsletter for the latest updates on classes, promotions, and exclusive tutorials.
Here is a full list of supplies needed to create this card.
A perk to ordering with me in the month of December is that with any order over $65cdn, I am emailing out an amazing 29 project Tutorial Bundle. Just use the host code below. As a member of my team you get free access to this Tutorial Bundle.
To make sure you learn about all my upcoming events and don’t miss any sales join my newsletter or check out everything at linktr.ee/stampinwithleah.
Live in Canada, don’t have a demonstrator? Contact me to get a catalogue or find out why right now is a great time to join my team.
You can see all the benefits of joining my team (the Ink Pad Pals) by clicking the image below.
Thanks for hopping by! Make sure to pin this post for future reference and share it with your crafty friends.
Click here to shop my online store. Click here to access & view the current catalogs. Click here to subscribe to Thanks for hopping by! Make sure to pin this post for future reference and share it with your crafty friends.those fun Paper Pumpkin kits of creativity! Click here for more information about joining my Online Monthly Technique Club. Earn even more goodies by joining a club! Click here to learn more about joining my Ink Pad Pals Team. Get the MOST rewards including a discount on future products! Follow me on social media! I share regularly on Pinterest, YouTube, and Facebook! Please subscribe to my newsletter, too!Click here and enter your email. When you include your birthday you will even be added to my birthday card mailing list 🙂
This morning I used one of the layouts from page 22 of the Stampin’ Up! 2024 Annual Catalogue! Here are the 3 cards that I created live – you can see the full video below.
Watch this video replay or look below to grab the printable PDF Tutorials and a full printable image of the card templates from page 22 .
Looking for some other fun stamping experiences in person or online? If you are local to Port Coquitlam, join me in person for Coffee and Cards or contact me to book your own card class. You can always check out my calendar of events at my website.
Please leave a comment below and make sure to follow this blog for more great inspiration!
Click here to shop my online store. Click here to access & view the current catalogs. Click here to subscribe to those fun Paper Pumpkin kits of creativity! Click here for more information about joining my Online Monthly Technique Club. Earn even more goodies by joining a club! Click here to learn more about joining my Ink Pad Pals Team. Get the MOST rewards including a discount on future products! Follow me on social media! I share regularly on Pinterest, YouTube, and Facebook! Please subscribe to my newsletter, too!Click here and enter your email. When you include your birthday you will even be added to my birthday card mailing list 🙂
It’s the 14th of the month – time for another Coast to Coast Creators Blog Hop! This month we are featuring cards to show gratitude. I hope all of my Canadian friends enjoyed a sunny, fantastic Thanksgiving weekend. We are actually celebrating in my house hold next weekend – so we thoroughly enjoyed the sun and time in the garden.
See all the details of my cards below and then hop around to see all the amazing cards created by our team members! Leave a comment and then come back to see us again on the 14th next month!
I chose the Iconic Imagery Bundle. See below instructions and a full list of supplies used to create this card.
Please leave a comment below and make sure to follow my blog for lots more great inspiration!
Here is a full list of supplies needed to create this card.
Take a 5-½” X 12” piece of Very Vanilla CS, score it at 4-¼”, 7-¼” & 10-¼”.
On the 4-1/4” section of the card base – add two score lines, 1-1/4” and 1-3/8” then use those as a guide to add leaf embossing to the edge.
Glue a 2-¾” X 5-¼” piece of Naturally Gilded DSP to the inside fold that faces front and glue a 1-½” X 5-¼” embossed piece of Very Vanilla CS to the front flap.
Stamp sentiment on the Very Vanilla tag using Pretty Peacock Ink – ensure the tag hole is to the right.
Run ribbon through the tag hole and across the back of the tag. Use two Dimensionals on the back of the left side of the tag to attach it to the front flap of the card. Tie the ribbon in a bow on the right side of the card. Trim ends if needed, but not too short!
Use Versamark to stamp 3 leaves on the Pretty Peacock sheet, then heat emboss using Gold embossing powder. Die cut and glue to the card front (have the leaves hang slightly off the edges of the tag and the front folds.
A perk to ordering with me in the month of September is that with any order over $65cdn, I am emailing out an amazing 40 project Tutorial Bundle. Just use the host code below. As a member of my team you get free access to this Tutorial Bundle.
Looking for some more fun stamping experiences in person or online? I have an upcoming online stamp camp (PDF for US participants still available, or if Canada you can sign up, but know your product likely will not arrive on time). If you are local to Port Coquitlam, join me in person for Coffee and Cards or contact me to book your own card class. You can always check out my calendar of events at my website.
I will also be at 2 different Christmas Fairs in November – join me if you can!
$2 entrance fee – includes a door prize ticket
2329 Fremont Connector, Port Coquitlam
To make sure you learn about all my upcoming events and don’t miss any sales join my newsletter or check out everything at linktr.ee/stampinwithleah.
Live in Canada, don’t have a demonstrator? Contact me to get a catalogue or find out why right now is a great time to join my team.
You can see all the benefits of joining my team (the Ink Pad Pals) by clicking the image below.
Click here to shop my online store. Click here to access & view the current catalogs. Click here to subscribe to those fun Paper Pumpkin kits of creativity! Click here for more information about joining my Online Monthly Technique Club. Earn even more goodies by joining a club! Click here to learn more about joining my Ink Pad Pals Team. Get the MOST rewards including a discount on future products! Follow me on social media! I share regularly on Pinterest, YouTube, and Facebook! Please subscribe to my newsletter, too!Click here and enter your email. When you include your birthday you will even be added to my birthday card mailing list 🙂
This week’s Hand Stamped Sentiments challenge is a fantastic Colour Challenge. I used the adorable Birds Eye View stamp set paired with the Online Exclusive Iconic Imagery stamp set and DSP, both from Stampin’ Up! The rest of the design team have also created beautiful cards using the colours below. Hop over to the Hand Stamped Sentiments page to view them all and then join the challenge.
Here is my card created using this colour pallette, – all the delicious pie colours in recognition of the upcoming Thanksgiving holiday in Canada and pie season 🙂
You can find a full list of materials used below, as well as a printable recipe card for making this autumn Birds Eye View card. You can order any of these supplies from me here: https://www.stampinup.ca?hostcode=A9SH9NWC
In addition, when you use my host code this month I will also send you the link to a fantastic 40+ project Tutorial Bundle as a thank you!
Looking for some more fun stamping experiences in person or online?
Check out my Weekly LIVE videos on Wednesdays at 9am Pacific Time. ( Facebook and You Tube)
If you are local to Port Coquitlam, join me in person for Coffee and Cards on October 12th or contact me to book your own card class. Check out my calendar of events at my website.
Yet another FABULOUS way to stamp with me is to join my team. It is a great deal on your supplies, plus you get 20% off your future orders. The best part though is that you get free access to my monthly card class to go tutorials, my craty collaborations MEGA tutorial each month and we have monthly team meetings where we stamp together. So much fun!
Finally, there are 2 great sales – one is on any NEW paper pumpkin subscription before Oct 10 ( if you join my team you can subscribe for Paper Pumpkin under yourself and get your discount too!) The other is a kit sale – and boy do we have some good ones! Check it out on line!
To make sure you learn about all my upcoming events and don’t miss any sales join my newsletter or check out everything at linktr.ee/stampinwithleah. You can also sign up for my newsletter (link below) so you don’t miss out on any of my events.
Live in Canada, don’t have a demonstrator? Contact me to get a catalogue or find out why right now is a great time to join my team.
Please leave a comment below and make sure to follow this blog for more great inspiration!
Click here to shop my online store. Click here to access & view the current catalogs. Click here to subscribe to those fun Paper Pumpkin kits of creativity! Click here for more information about joining my Online Monthly Technique Club. Earn even more goodies by joining a club! Click here to learn more about joining my Ink Pad Pals Team. Get the MOST rewards including a discount on future products! Follow me on social media! I share regularly on Pinterest, YouTube, and Facebook! Please subscribe to my newsletter, too!Click here and enter your email. When you include your birthday you will even be added to my birthday card mailing list 🙂