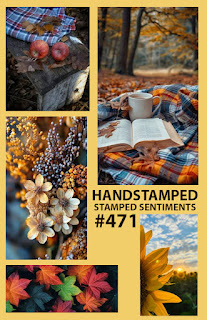
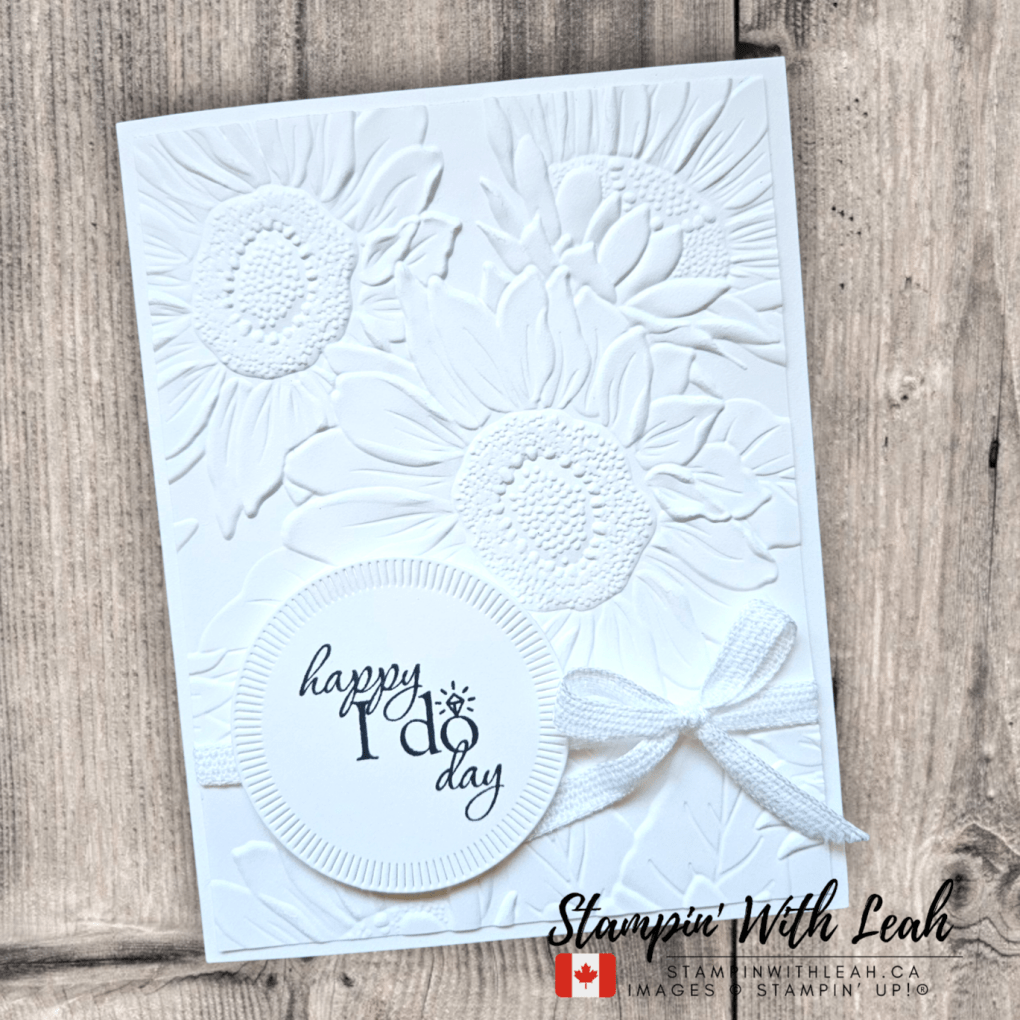
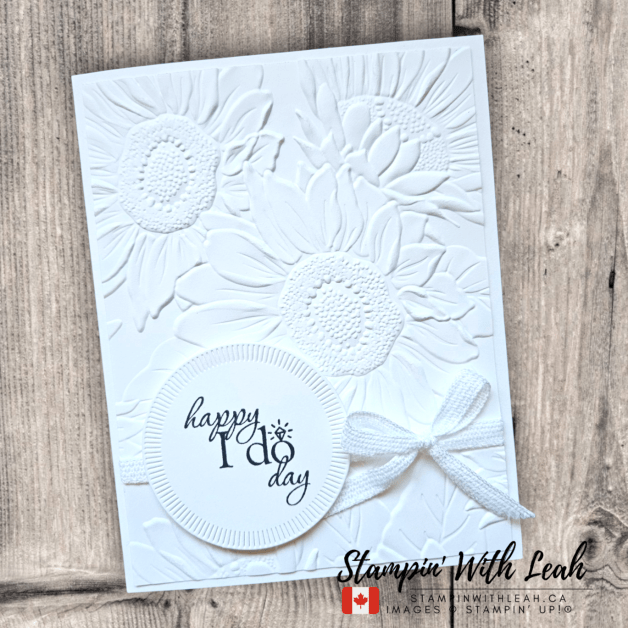
Coneflower Celebrations Card Class to Go – Replay + Kit & PDF available

This week’s Coneflower Celebrations Card Class to Go is now available for you to watch at your own pace! These bright, nature-inspired designs are perfect for late summer and early fall celebrations—from birthdays to thank you cards.

Watch the Replay Here:

💌 Why You’ll Love These Cards:

✔️ Fresh floral designs perfect for multiple occasions
✔️ Gorgeous Pressed Flower Motifs for extra texture and elegance
✔️ Quick to assemble yet visually stunning
✔️ Easy to adapt with other papers and embellishments you own

Here are the 4 beautiful cards:

🛍 Get the Card Kit FREE:
Place a $60+ order (before tax/shipping) in my Stampin’ Up! store between Aug 13–19, 2025, and I’ll send you the full kit to create all four cards.
👉 Shop Here

📄 PDF Tutorial Only:
Prefer to use your own supplies? Grab the detailed step-by-step PDF tutorial here:
👉 Get the PDF

Here are the supplies you’ll want to have at home:


Want to stamp with me some more?

Join my September Card Class to learn new techniques and create beautiful projects. Spots are limited, so reserve yours today!

See the details and register here – you can still get the kit and watch the replay!
  • Save 20%+ on your orders (including the virtual album and the suite sale items!!)
  • Get free access to my monthly card class tutorials.
  • Enjoy our monthly team meetings with stamping fun and collaboration.

Click here to shop my online store.
Click here to access & view the current catalogs.
Click here to subscribe to those fun Paper Pumpkin kits of creativity!
Click here for more information about joining my Online Monthly Technique Club. Earn even more goodies by joining a club!
Click here to learn more about joining my Ink Pad Pals Team. Get the MOST rewards including a discount on future products!
Follow me on social media! I share regularly on PinterestYouTube, and Facebook!
Please subscribe to my newsletter, too! Click here and enter your email. When you include your birthday you will even be added to my birthday card mailing list 🙂


Festive Friday with Jolly Holly

This week’s Festive Friday card was inspired by my August Card Class to Go featuring the Jolly Holly Bundle. I decided to create an extra card using this gorgeous set and its coordinating hybrid embossing folder.

✂️ How I Made This Card:

  • I started with a Pretty Peacock card base and ran a layer through the Jolly Holly Hybrid Embossing Folder (witht he die inserted).
  • To make the holly leaves pop, I gently dragged my Craft White Ink Pad across the raised areas—this creates such beautiful contrast and texture.
  • I then adhered the embossed panel to the card base, but here’s the trick—Dimensionals went only behind the cut-out leaves. This gives them a little lift, making the whole design more dimensional and eye-catching. Make sure to grab any small edge leaves that may fall away and add them in place with Dimensionals as well. If needed, use a Mini Glue Dot or other flat adhesive to hold the corners down to the card base.
  • The sentiment is stamped in Pretty Peacock ink on a stitched rectangle (from the Jolly Holly bundle), accented with an embossed-and-die-cut holly cluster.
  • To create the holly bundle, I fully cut out a piece of holly from another hybrid embossed sheet of Basic White cardstock. Then I coloured the berries and coated them in clear embossing powder. Next I used a blending brush to add Pretty Peacock Ink to the leaves.
  • I finished off the card with a few Iridescent Foil Gems for a touch of holiday sparkle.

This design is simple yet elegant, perfect for making multiples as part of your Christmas card stash.

Tip: The drag-ink technique works best with pigment ink pads like Craft White, as they give you bold coverage and time to blend if desired.

🛒 Want to recreate this card?
Head to my online store to grab your supplies or click on the supplies listed below:


📦 Want to create more with the Jolly Holly Bundle? Join my Card Class to Go this month and receive all the pre-cut supplies and tutorials to make even more festive cards!

Looking for more ways to stamp with me? You can find me online and in person ( In Port Coquitlam, BC)

See the details and register here – there is still time to register from any where in the world! The event has happened – but I still have a kit available and you can access the replay videos.

GET YOUR KIT HERE!

Looking for even more ways to enjoy stamping? Join my Stampin’ Up! Ink Pad Pals team!

  • Save 20%+ on your orders.
  • Get free access to my monthly card class tutorials.
  • Enjoy our monthly team meetings with stamping fun and collaboration.

Contact me to find out more or see the details on my website.

❤️ Thanks for crafting with me!
Be sure to subscribe so you never miss a Festive Friday!

Click here to shop my online store.
Click here to access & view the current catalogs.
Click here to subscribe to those fun Paper Pumpkin kits of creativity!
Click here for more information about joining my Online Monthly Technique Club. Earn even more goodies by joining a club!
Click here to learn more about joining my Ink Pad Pals Team. Get the MOST rewards including a discount on future products!
Follow me on social media! I share regularly on PinterestYouTube, and Facebook!
Please subscribe to my newsletter, too! Click here and enter your email. When you include your birthday you will even be added to my birthday card mailing list 🙂


Throwback Thursday: Revisiting the Nests of Christmas Paper Pumpkin Kit

I love revisiting my Paper Pumpkin kits, especially when they coordinate so perfectly with current products! This week, I pulled out the Nests of Christmas Paper Pumpkin kit from October 2024 and created three brand-new alternative cards using the coordinating Nests of Winter 12×12 DSP and the stunning Gold Striped Mesh Ribbon.

  • Die cut a Basic White and a Shaded Spruce Everyday Arch that can layer together. Glue them together and then glue to a Pool Party layer ( either a piece from the Paper Pumpkin kit or a 4″ X 5-1/4″ layer of Nests of Winter DSP).
  • Tie a piece of Gold Striped Mesh Ribbon around this layer and attach to a Thick Basic White card base.
  • Stamp the sentiment using Shaded Spruce Ink on one of the extra labels from the kit ( or cut your own with Stylish Shapes dies). Attach to the card front using Dimensionals.
  • Fussy cut a bird on a branch and an extra branch from the Nests of Winter DSP and glue to the card front ( tuck the ends under the sentiment label).
  • Embellish with Iridescent Foil Gems.

🛍️ Shop the Supplies:


🧵 BONUS: I have TWO full Nests of Christmas Paper Pumpkin kits available — directly from me (not Stampin’ Up!). These are $35 CAD each (+ shipping if needed). If you’re in Canada, contact me directly to arrange local pickup or mailing.

✨ You can also catch my original unboxing + 2 alternatives on YouTube here:
https://www.youtube.com/watch?v=5EOk43pdpPY&list=PLfZU8O6t1_SEy0Vv9A1Xf0ykL-5hp7djD&index=8

In addition to this sweet winter card, I created 3 other alternatives. Each of these uses bits from the Paper Pumpkin kit added on to a card stock base rather than creating the cards as intended. Let’s take a look at each of the new cards!

Don’t forget – you’ll earn Stampin’ Rewards on your purchase too!

📹 Want more inspiration? Be sure to follow me on YouTube or Facebook for tutorials, lives, and more!

👉 Looking for other ways to stamp with me?

If you are local – join my in person card class!

Looking for even more ways to enjoy stamping? Join my Stampin’ Up! Ink Pad Pals team!

  • Save 20%+ on your orders.
  • Get free access to my monthly card class tutorials.
  • Enjoy our monthly team meetings with stamping fun and collaboration.

Contact me to find out more or see the details on my website.

See you next week for another Throwback Thursday creation!

➡️ Subscribe to my newsletter at https://mailchi.mp/f18https://www.stampinup.ca?09c680508/subscribe-to-stampin-with-leahs-newsletter


Jolly Holly Card Class to Go – August 2025

My latest Card Class to Go is now available—and it’s a merry one! I’m featuring the Jolly Holly Bundle, an adorable Online Exclusive stamp and die set from Stampin’ Up! Paired with the luxe Regal Distressed Patterns 12×12 Specialty Paper, this class is all about holiday sparkle and cheer.

❄️ Whether you missed the Live or just want to craft along at your own pace, the Replay is now available on YouTube:

💖 Why You’ll Love These Cards:

✔️ Classic Christmas icons with a playful twist
✔️ Textured backgrounds using the Regal Distressed paper for wow-factor
✔️ Easy-to-follow layouts that look polished but come together quickly
✔️ Great for mass-producing holiday cards
✔️ Designs that pair beautifully with your existing holiday supplies

Whether you’re a beginner or experienced stamper, you’ll find this class both inspiring and achievable!

Here are the 4 unique cards:

This last card was inspired by the Global Design Project (GDP508) Case the Designer Challenge – so fun!

📦 How to Get the Card Kit
Receive the full card kit (supplies for 4 cards) FREE with your $60+ order (before tax/shipping) in my online store between August 6–12, 2025.
👉 Shop here

📥 Prefer just the tutorial?
Grab the PDF right here in my online shop:
👉 https://payhip.com/b/wDz9l

Here are the supplies you’ll want to have at home:


Want to stamp with me some more?

Join my August Card Class to learn new techniques and create beautiful projects. Spots are limited, so reserve yours today!

See the details and register here – you can still get the kit and watch the replay!
  • Save 20%+ on your orders (including the virtual album and the suite sale items!!)
  • Get free access to my monthly card class tutorials.
  • Enjoy our monthly team meetings with stamping fun and collaboration.

Click here to shop my online store.
Click here to access & view the current catalogs.
Click here to subscribe to those fun Paper Pumpkin kits of creativity!
Click here for more information about joining my Online Monthly Technique Club. Earn even more goodies by joining a club!
Click here to learn more about joining my Ink Pad Pals Team. Get the MOST rewards including a discount on future products!
Follow me on social media! I share regularly on PinterestYouTube, and Facebook!
Please subscribe to my newsletter, too! Click here and enter your email. When you include your birthday you will even be added to my birthday card mailing list 🙂


HSS469 Colour Challenge- Cheers to Blackberry Season!

This week’s Hand Stamped Sentiments Challenge #469 features a beautiful combo of:
🟣 Blackberry Bliss
🟪 Fresh Freesia
🩵 Pool Party

This palette immediately reminded me of the juicy blackberries I picked earlier this week — so of course, I had to add a few to the glasses on this card! The Cheers & Sips stamp set and Celebratory Sips DSP were the perfect pairing for this berry-inspired design.

🛠️ Step-by-Step Instructions:

Card Base: Pool Party cardstock, A2 size (5½” x 4¼”).

Embossed Layer: Fresh Freesia panel (4″ x 5¼”). Emboss using the Glass & Gardens Embossing Folder (tile pattern) for a patio-inspired backdrop.

Arch Focal Point: Die cut stitched arches from Everyday Details Dies (4th and 5th largest) in Blackberry Bliss and Basic White.

Adhere with liquid glue.

Drinks & Details: Die cut two drink glasses from the Celebratory Sips DSP. Use the texturing die on the taller glass. Add stamped blackberry clusters (because why not bring the garden to the glass?) Arrange and adhere with Dimensionals over the arch panel.

Sentiment Label: Stamp “Cheers” in Blackberry Bliss on Pool Party cardstock. Die cut using Beautiful Butterflies Dies label.

Final Touches: Stamp “Let’s Celebrate!” on the arch. Scatter a few Starburst Sequins for some bubbly sparkle. Tuck in more blackberries for flavour and fun! To create the blackberries I stamped them in B;ackberry Bliss Ink and used a blending pen to add Blackberry Bliss Ink to the insides, then die cut.

💡 TIP: Heat emboss the drinks for a glassy look or add Wink of Stella to the berries for extra juice-inspired shine!

🛒 Want to recreate this card? Click here to shop all supplies in my Canadian online store! Here is a full list of the supplies I used:


🎯 Join the Challenge:
Create your own summer-inspired card using this week’s trio at https://handstampedsentiments.blogspot.com/. You’ll love where the colours take you!


Want to Stamp With Me?

Join my August Card Class to learn new techniques and create beautiful projects. Spots are limited, so reserve yours today!

We are in month 4 of the In Colour Club – but it’s not too late to join and get these fabulous colours!

Looking for even more inspiration and more ways to enjoy stamping? Join my Stampin’ Up! Ink Pad Pals team!

  • Save 20%+ on your orders.
  • Get free access to my monthly card class tutorials.
  • Enjoy our monthly team meetings with stamping fun and collaboration.

Contact me to find out more or see the details on my website.


Christmas in July… on August 1st? Why not!

This week’s Global Design Project Challenge #GDP507 is all about celebrating the holidays early. I decided to go modern and bold with my Festive Friday creation—featuring a black background, shining gold embossing, and the stunning Most Wonderful stamp set.

✂️ How I Made This Card:

  • Card Base: Thick Basic White
  • Background Panel: Basic Black cardstock stamped with Most Wonderful stamp set – all stamps mounted together
  • Heat Embossing: Versamark ink + Gold Embossing Powder
  • Sentiment: Memento Black on Thick Basic White using the Stylish Shapes dies
  • Ribbon: Gold Mesh Ribbon
  • Embellishments: Loose sequins adhered with liquid glue
  • Adhesive: Stampin’ Dimensionals and Multipurpose Liquid Glue

✨ Try this technique with your own stamp sets—mounting them all at once makes a bold, custom background that’s perfect for embossing!

🛒 Want to recreate this card?
Head to my online store to grab your supplies or click on the supplies listed below:


Looking for more ways to stamp with me? You can find me online and in person ( In Port Coquitlam, BC)

See the details and register here – there is still time to register from any where in the world! The event has happened – but I still have a kit available and you can access the replay videos.

GET YOUR KIT HERE!

Looking for even more ways to enjoy stamping? Join my Stampin’ Up! Ink Pad Pals team!

  • Save 20%+ on your orders.
  • Get free access to my monthly card class tutorials.
  • Enjoy our monthly team meetings with stamping fun and collaboration.

Contact me to find out more or see the details on my website.

❤️ Thanks for crafting with me!
Be sure to subscribe so you never miss a Festive Friday!

Click here to shop my online store.
Click here to access & view the current catalogs.
Click here to subscribe to those fun Paper Pumpkin kits of creativity!
Click here for more information about joining my Online Monthly Technique Club. Earn even more goodies by joining a club!
Click here to learn more about joining my Ink Pad Pals Team. Get the MOST rewards including a discount on future products!
Follow me on social media! I share regularly on PinterestYouTube, and Facebook!
Please subscribe to my newsletter, too! Click here and enter your email. When you include your birthday you will even be added to my birthday card mailing list 🙂


Throwback Thursday – Adorable Owls Meet Wildflower Birthday DSP

Today’s card is a sweet birthday throwback featuring one of my all-time favourite retired stamp sets—Adorable Owls—brought to life with some fun new products!

This owl is celebrating in style with:

  • The vibrant Wildflower Birthday 12×12 DSP
  • Peach Pie Bordered Ribbon (currently on the Last Chance list—grab it while you can!)
  • A textured base using the Exposed Brick 3D Embossing Folder
  • A sprinkle of sparkle with Starburst Sequins

🎨 How to Make This Card:

  1. Start with a Thick Basic White card base.
  2. Emboss a 4″ x 5-¼” Basic White panel with the Exposed Brick 3D Embossing Folder and adhere it to your base.
  3. Cut 2 angled rectangles from the Wildflower Birthday DSP and layer them slightly askew for interest.
  4. Wrap the Peach Pie Bordered Ribbon across the layers and tie a bow on the left side.
  5. Die cut a stitched circle (Pool Party cardstock or similar) and pop it up with Dimensionals.
  6. Stamp the owl from Adorable Owls, colour with Stampin’ Blends, fussy cut, and adhere.
  7. Stamp a birthday sentiment and die-cut or banner cut it, then adhere with Dimensionals.
  8. Add a few Starburst Sequins for a pop of sparkle.

🧡 This card is bright, happy, and full of texture—perfect for any birthday celebration. While the Adorable Owls are retired, the layout and product mix can work with so many images you already have in your stash.

🛍️ Shop the Supplies:


Don’t forget – you’ll earn Stampin’ Rewards on your purchase too!

📹 Want more inspiration? Be sure to follow me on YouTube or Facebook for tutorials, lives, and more!

👉 Looking for other ways to stamp with me?

If you are local – join my in person card class!

Looking for even more ways to enjoy stamping? Join my Stampin’ Up! Ink Pad Pals team!

  • Save 20%+ on your orders.
  • Get free access to my monthly card class tutorials.
  • Enjoy our monthly team meetings with stamping fun and collaboration.

Contact me to find out more or see the details on my website.

See you next week for another Throwback Thursday creation!

➡️ Subscribe to my newsletter at https://mailchi.mp/f18https://www.stampinup.ca?09c680508/subscribe-to-stampin-with-leahs-newsletter


July 2025 Coffee & Cards – Card Class To Go!

Looking for variety, colour, and crafty inspiration? My July 2025 Coffee & Cards Class To Go is here — and it’s a fun one! Instead of spotlighting one stamp set, this class features four fresh and fabulous card designs that were first shared in my July in-person event.

🎥 Watch the Class Replay:
I already shared the class live — but don’t worry! You can still watch the full replay here and stamp along whenever it fits your schedule:

💖 Why You’ll Love This Class:

  • 4 cards covering a variety of styles and occasions
  • No need to own one specific stamp set
  • Great for building your skills and card stash
  • Bright, fun, and creative layouts using texture, die cuts & colouring

Don’t miss this cheerful and creative class — order your kit today or download the tutorial and get crafting!

Here are the 4 unique cards:

🛍 How to Get It FREE:
Place a $60+ order (before tax/shipping) in my Stampin’ Up!® online store between July 30 and August 5, and you’ll receive the PDF tutorial + prepped card kit FREE in the mail.
🛒 Shop here: https://www.stampinup.ca/?demoid=2189587

📥 Prefer just the tutorial?
Grab the PDF right here in my online shop:
👉 https://payhip.com/b/NWTaZ

Want to stamp with me some more?

Join my August Card Class to learn new techniques and create beautiful projects. Spots are limited, so reserve yours today!

See the details and register here – you can still get the kit and watch the replay!
  • Save 20%+ on your orders (including the virtual album and the suite sale items!!)
  • Get free access to my monthly card class tutorials.
  • Enjoy our monthly team meetings with stamping fun and collaboration.

Click here to shop my online store.
Click here to access & view the current catalogs.
Click here to subscribe to those fun Paper Pumpkin kits of creativity!
Click here for more information about joining my Online Monthly Technique Club. Earn even more goodies by joining a club!
Click here to learn more about joining my Ink Pad Pals Team. Get the MOST rewards including a discount on future products!
Follow me on social media! I share regularly on PinterestYouTube, and Facebook!
Please subscribe to my newsletter, too! Click here and enter your email. When you include your birthday you will even be added to my birthday card mailing list 🙂


Festive Friday: Bright & Happy with Jolly Holly

Happy Festive Friday! Today’s holiday card was created using the brand new Jolly Holly Bundle (an Online Exclusive!) and the GDP506 sketch for layout inspiration. With custom-stamped floral accents, bold texture, and a rich traditional palette, this is a fun, cheerful addition to your Christmas card stash.

And don’t forget — Stampin’ Up!’s FREE Shipping ends TONIGHT (July 25 at 11:59pm MT). Stock up on Online Exclusives like Jolly Holly while you can!

💡 Leah’s Crafting Tips:

🖼 Create your own patterned paper!
The centre strip isn’t from DSP — I hand-stamped and coloured the florals and greenery from the Jolly Holly stamp set using Stampin’ Blends. It’s a beautiful way to customize your colour palette or match any project theme!

✂️ Modify your dies:
The sentiment label was created using the Textured Notes Dies, but I trimmed it with a double cut technique to make it narrower — perfect for this long sentiment while keeping those stitched details.

Here is a full Product List for today’s card:


🛍️ LAST DAY: Free Shipping on Orders $100+ CAD!

Today is your final chance to enjoy FREE SHIPPING on qualifying orders at Stampin’ Up!
✔️ No code needed
✔️ Automatically applied at checkout
✔️ Ends July 25 at 11:59 PM (MT)

👉 Shop Online Exclusives like Jolly Holly now

    Looking for more ways to stamp with me? You can find me online and in person ( In Port Coquitlam, BC)

    See the details and register here – there is still time to register from any where in the world! The event has happened – but I still have a kit available and you can access the replay videos.

    GET YOUR KIT HERE!

    Looking for even more ways to enjoy stamping? Join my Stampin’ Up! Ink Pad Pals team!

    • Save 20%+ on your orders.
    • Get free access to my monthly card class tutorials.
    • Enjoy our monthly team meetings with stamping fun and collaboration.

    Contact me to find out more or see the details on my website.

    ❤️ Thanks for crafting with me!
    Be sure to subscribe so you never miss a Festive Friday!

    Click here to shop my online store.
    Click here to access & view the current catalogs.
    Click here to subscribe to those fun Paper Pumpkin kits of creativity!
    Click here for more information about joining my Online Monthly Technique Club. Earn even more goodies by joining a club!
    Click here to learn more about joining my Ink Pad Pals Team. Get the MOST rewards including a discount on future products!
    Follow me on social media! I share regularly on PinterestYouTube, and Facebook!
    Please subscribe to my newsletter, too! Click here and enter your email. When you include your birthday you will even be added to my birthday card mailing list 🙂


    Throwback Thursday: Cheerful Basket + July 2025 Paper Pumpkin = Summer Sweetness

    Happy Throwback Thursday!
    This week I paired one of my favourite oldies—the retired Cheerful Basket stamp set—with the adorable elements from the July 2025 Paper Pumpkin kit. I’m truly obsessed with this month’s Paper Pumpkin… the sweet strawberries and uplifting sentiments just feel like summer. 🍓☀️

    I used the basket image from Cheerful Basket and filled/ surrounded it with hand-cut strawberries and florals from the Paper Pumpkin kit. The colour palette is fresh and rustic, and I mounted everything on a Country Woods 12X12 DSP background for a cozy farmhouse feel.✂️ Project Details:

    • Stamp Sets: Cheerful Basket (retired), July 2025 Paper Pumpkin stamp set
    • Cardstock: Crumb Cake, Basic White
    • Paper: Country Woods 12 x 12 DSP
    • Ink Colours: Garden Green, Real Red, Early Espresso
    • Stampin’ Blends: Crumb Cake
    • Embellishments: Fussy-cut strawberries and blooms (from Paper Pumpkin stamp set), Strawberry Slush & Pretty In Pink Gems
    • Sentiment: “You fill my day with happiness” (from Cheerful Basket stamp set)

    This design is great for any occasion that calls for a smile—from birthdays to just-because notes. And best of all, it’s a reminder to mix your older stamps with your latest kits for endless inspiration!

    🛒 Ready to shop?
    Click here to browse my Stampin’ Up! online store! or use the items links below:

    Product List

    Don’t forget – you’ll earn Stampin’ Rewards on your purchase too!

    🎉 Don’t Miss: FREE SHIPPING July 23–25!

    ✔ No code needed
    ✔ Applies to all qualifying orders
    ✔ Runs July 23–25, 2025
    Now’s the perfect time to grab your wish list items or stock up on basics!

    👉 Looking for other ways to stamp with me?

    If you are local – join my in person card class!

    Looking for even more ways to enjoy stamping? Join my Stampin’ Up! Ink Pad Pals team!

    • Save 20%+ on your orders.
    • Get free access to my monthly card class tutorials.
    • Enjoy our monthly team meetings with stamping fun and collaboration.

    Contact me to find out more or see the details on my website.

    See you next week for another Throwback Thursday creation!

    ➡️ Subscribe to my newsletter at https://mailchi.mp/f18https://www.stampinup.ca?09c680508/subscribe-to-stampin-with-leahs-newsletter