

Hello, stamping friends! I’m excited to welcome you to another Coast to Coast Creators Blog Hop! This monthly hop is a creative celebration, consistently held on the 14th of each month, where talented crafter friends showcase their unique takes on a shared theme. This month’s theme? An optional sketch challenge and Sale-a-bration 2025!
If you’re new here, welcome! I’m Leah from Stampin’ With Leah, and today I’m thrilled to share not one, but four cards I created using the FREE Bloom Impressions 12×12 Designer Series Paper from Stampin’ Up!’s Sale-a-Bration promotion. Let’s dive into the details of this colorful collection and see how a simple sketch can spark endless creativity!
Sale-a-Bration Highlights
Did you know that during Stampin’ Up!’s Sale-a-Bration, you can earn FREE exclusive products with qualifying purchases? Here in Canada, you’ll get to choose items like the Bloom Impressions DSP with every $75 CAD spent, or even higher-tier rewards with $150 CAD purchases. It’s the perfect time to stock up on your crafting essentials while adding these gorgeous goodies to your collection!
The Sketch
This month’s sketch challenge is all about bold panels and balanced layers. It provided the perfect framework to let the vibrant patterns of the Bloom Impressions DSP shine. Whether you love soft pastels or bold, bright tones, this paper pack has something for everyone. Let’s take a closer look at my interpretations of the sketch.

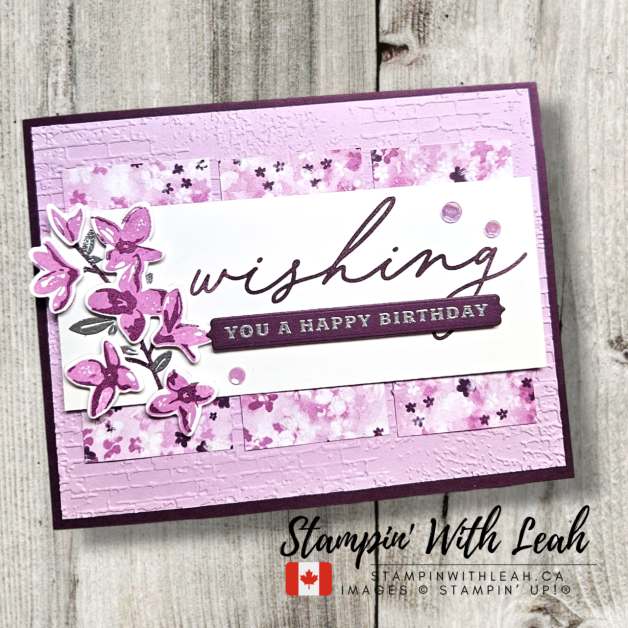
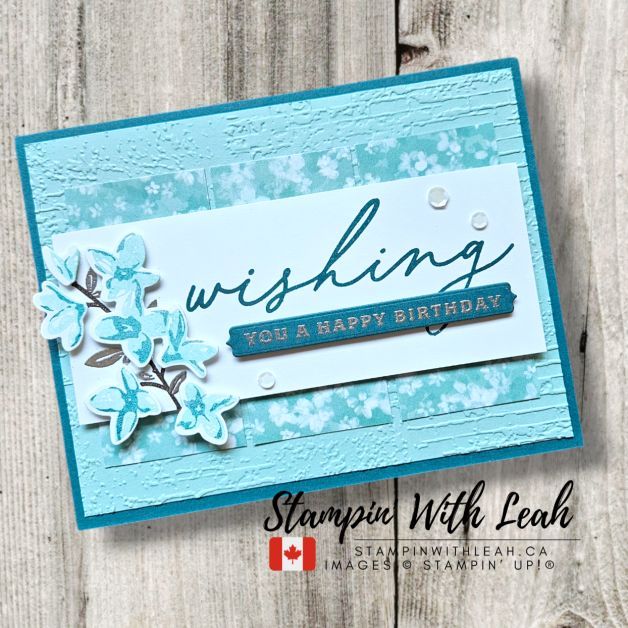
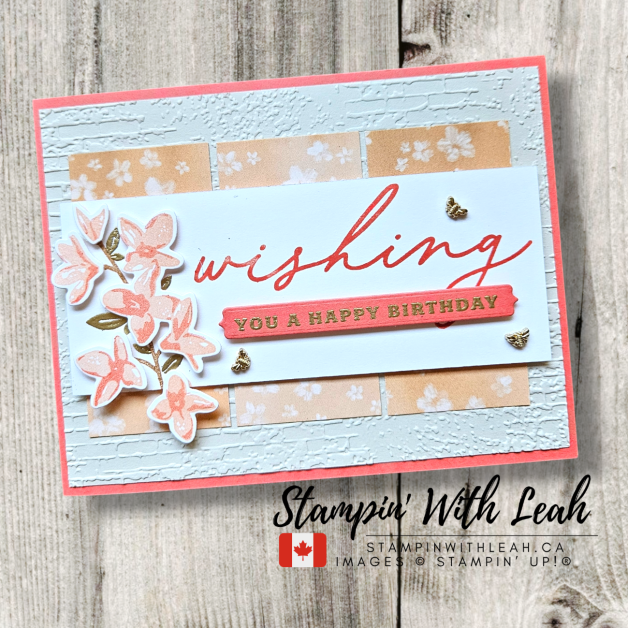
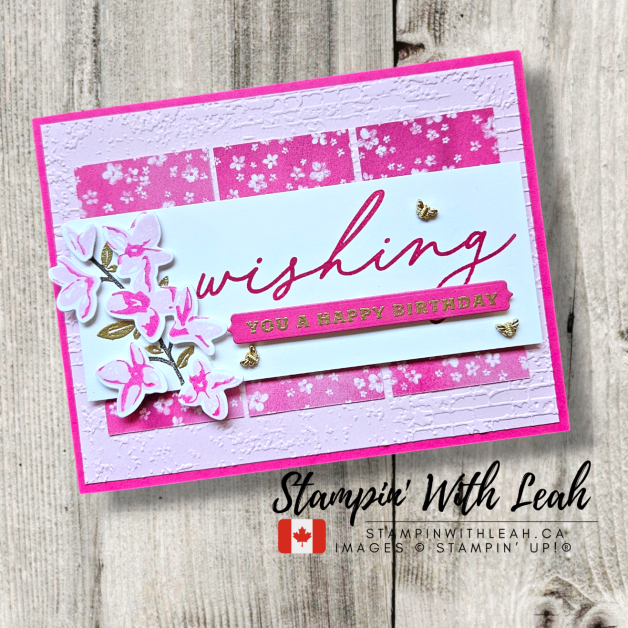
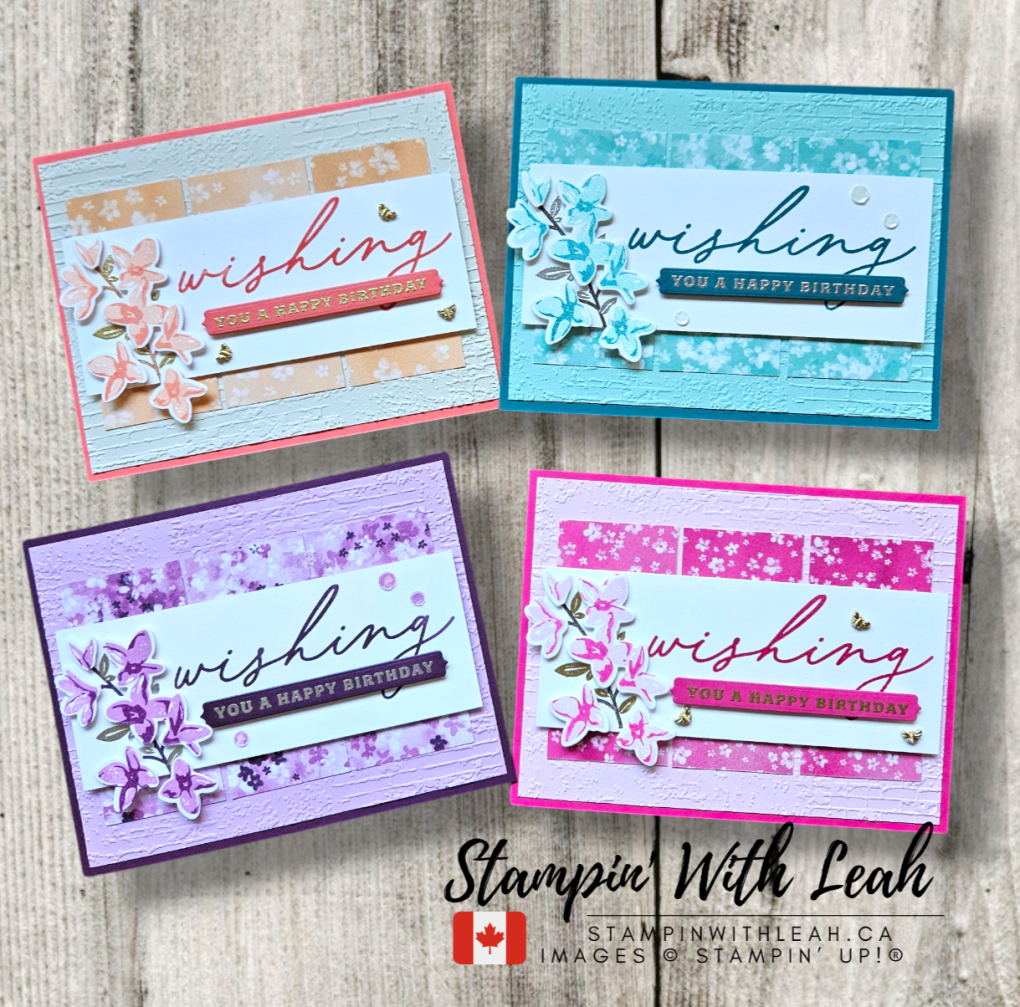
The Cards: Delightful Wishes Birthday Cards
For this set, I focused on creating four distinct yet cohesive cards by pairing different patterns from the Bloom Impressions DSP with complementary cardstock and embellishments. Here’s how I brought the sketch to life:
Materials:
- Cardstock: Basic White, coordinating colors (e.g.,Calypso Coral, Basic Beige, Pretty Peacock, Pool Party, Blackberry Bliss, Fresh Freesia, Melon Mambo and Bubble Bath)
- DSP: Bloom Impressions 12×12 DSP (FREE with Sale-a-Bration!)
- Stamps and Dies: Sentiment and floral images from the Delightful Wishes Bundle
- Embellishments: Purple Adhesive-Backed Sequins (SAB item) , Tiny Bee Trinkets
- Adhesive: Mini Stampin’ Dimensionals and Multipurpose Liquid Glue
Instructions:
- Background Layers: Emboss coordinating cardstock (4″ X 5-1/4″) using the Exposed Brick 3D Embossing Folder for texture. Trim the Bloom Impressions DSP into 1-1/2″ X 3″ panels and adhere them to the embossed layer.
- Sentiment: Stamp the “Wishing” sentiment in coordinating ink on a 2″ X 5″ piece of Basic White CS and the “You a Happy Birthday” can be heat embossed and die-cut on a coordinating CS. Layer the sentiment across the DSP panels, add the smaller sentiment using Dimensionals for added depth.
- Floral Details: Stamp and die-cut floral images from the Delightful Wishes Bundle in complementary colors to coordinate with the patterned paper. Stamp the stem in a dark colour and emboss the leaves with metallics. Arrange the flowers around the stem and sentiment, attached with Dimensionals.
- Finishing Touches: Mount the card fronts onto 4-1/4″ X 11″, scored at 5-1/2″ card bases and add embellishments as desired for balance and interest.
Tips for Success
- Use Coordinating Colors: Let the DSP inspire your color palette for a cohesive look.
- Layer with Dimension: Using Dimensionals adds depth and makes your elements pop.
- Add Texture: Embossed backgrounds add subtle interest without overwhelming the design.
Explore More Creations
The creativity doesn’t stop here! Be sure to check out the other talented creators in this month’s Coast to Coast Blog Hop. Each project is a unique interpretation of the sketch, and you’re sure to walk away brimming with inspiration. Click the links below to hop along:
Shop and Earn Free Products!
Ready to dive into Sale-a-Bration and earn the beautiful Bloom Impressions DSP for free? Head over to my online store to shop your favorite Stampin’ Up! products. With every $75 CAD purchase, you’ll unlock exclusive rewards to enhance your crafting collection.
Let’s Get Inspired!
I hope these cards inspire you to try this month’s sketch challenge and explore the possibilities with the Bloom Impressions DSP. Don’t forget to share your creations—I’d love to see how you interpret the sketch!
Thanks for hopping by! Be sure to subscribe to my newsletter for more crafting tips, project ideas, and updates on upcoming events.
Here is a list of supplies needed to create these card.
") |  |  |  | |
") |  |  |  |  |
 |  | |||
 |  |  | ||
 |  |
 Designer Series Paper")


A perk to ordering with me in the month of January is that with any order over $75cdn, you will receive a FREE SAB item and I am emailing out an amazing 38 project Tutorial Bundle. Just use the host code below. As a member of my team you get free access to this Tutorial Bundle.


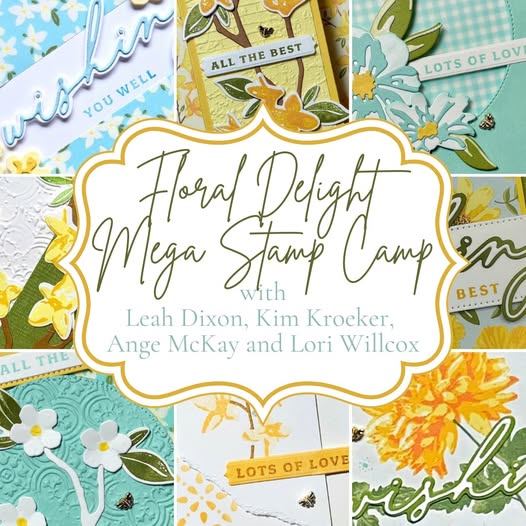
Featuring the Delightful Wishes Bundle
Excited about the Delightful Wishes Bundle? You’ll love its versatility in creating stunning cards for any occasion. Plus, this bundle will be a highlight in my upcoming Floral Delight Stamp Camp happening on January 25-26, 2025! During this event, you’ll have the opportunity to explore the Delightful Wishes Bundle in depth, creating even more beautiful projects.
Want more details? Click the image below to learn more and sign up for this exciting event. The original deadline has passed, but the whole event will be recorded – so you can still register – you just might not have your supplies by the event date. Spots are limited, so don’t wait! If you live outside of Canada – you can register right up to the 24th of January!
To make sure you learn about all my upcoming events and don’t miss any sales join my newsletter or check out everything at linktr.ee/stampinwithleah.
Live in Canada, don’t have a demonstrator? Contact me to get a catalogue or find out why right now is a great time to join my team.
You can see all the benefits of joining my team (the Ink Pad Pals) by clicking the image below. Right now there are even more perks to joining during Sale-a-bration!


Thanks for hopping by! Make sure to pin this post for future reference and share it with your crafty friends.

Click here to shop my online store.
Click here to access & view the current catalogs.
Click here to subscribe to Thanks for hopping by! Make sure to pin this post for future reference and share it with your crafty friends.those fun Paper Pumpkin kits of creativity!
Click here for more information about joining my Online Monthly Technique Club. Earn even more goodies by joining a club!
Click here to learn more about joining my Ink Pad Pals Team. Get the MOST rewards including a discount on future products!
Follow me on social media! I share regularly on Pinterest, YouTube, and Facebook!
Please subscribe to my newsletter, too! Click here and enter your email. When you include your birthday you will even be added to my birthday card mailing list 🙂


")
")


