

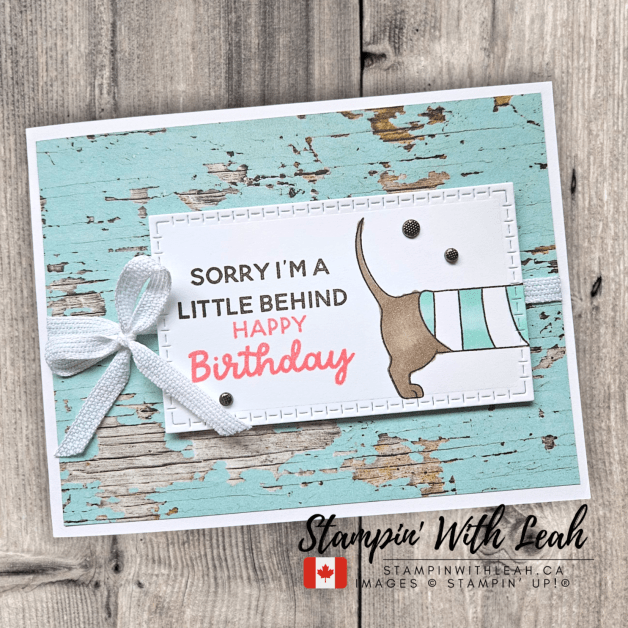
GIf you love a cheeky birthday card, this class is for you! I just wrapped up my latest Card Class To Go, featuring the brand-new Not 29 Anymore stamp set — packed with playful, age-defying sentiments perfect for birthdays with a wink. 🥳
I paired it with the fabulous Birthday Treats Mix & Match Ephemera for easy, coordinated accents, and finished each card with Online Exclusive Petunia Pop 1/4″ Iridescent Ribbon and Charming Shimmer Faceted Dots.
🎥 Missed the live? No worries!
👉 Watch the replay here:
💌 What You’ll Create
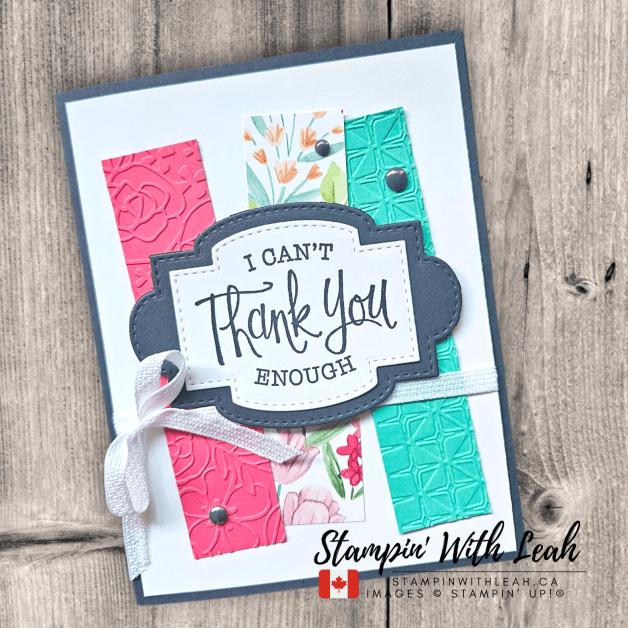
This class includes 4 unique cards, each with a pop of personality and texture:

“So. Many.Candles.” – an intricate background piece and beautiful watercolour cake ephemera paired with many candles and a bold embossed sentiment.

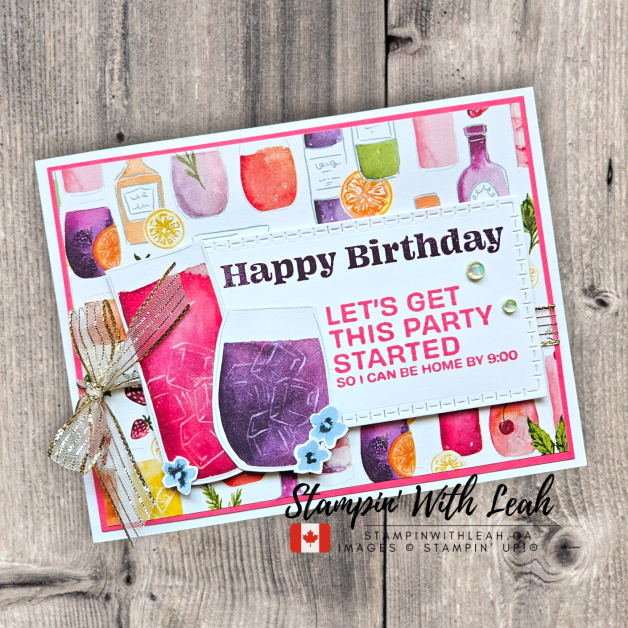
“Let’s Get This Party Started” – A playful card with Dotted Circles embossing, banners, balloons & layered messages.

“Not 29 Anymore” – With a lattice background, watercolour cupcake ephemera and a stitched circle sentiment.

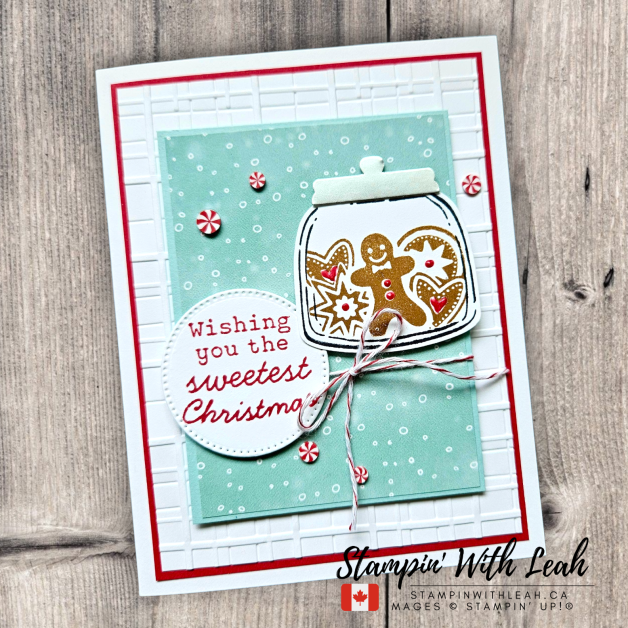
“Free Cake! I mean… Happy Birthday” – Featuring a watercoloured cake ephemera piece from the Birthday Treats Mix & Match Pack , bold embossing for the sentiment and a sneaky trick to extend the banner die.
Three of the cards feature a coordinating bow using our NEW Petunia Pop ribbon and they all have the Charming Shimmer Faceted Dots!
🛍️ How to Get the Kit
Place a $60 order (before tax/shipping) in my online store (between July 16 – 22) and you’ll get the full card kit plus the PDF tutorial.
👉 Shop here: https://www.stampinup.ca/?demoid=2189587
📍Live outside Canada? Purchase the PDF tutorial here: https://payhip.com/b/br05G
📦 The card kit includes pre-cut pieces, die cuts, ribbon, dots, and envelopes.
Here’s a list of the products you’ll need at home to create the cards using the kit I send you:
![Not 29 Anymore Photopolymer Stamp Set (English) [ 166182 ]](https://assets1.tamsnetwork.com/images/EC042017NF/166182s.jpg "Not 29 Anymore Photopolymer Stamp Set (English) [ 166182 ]")
![Versamark Pad [ 102283 ]](https://assets1.tamsnetwork.com/images/EC042017NF/102283s.jpg "Versamark Pad [ 102283 ]")
![Secret Sea Classic Stampin' Pad [ 165285 ]](https://assets1.tamsnetwork.com/images/EC042017NF/165285s.jpg "Secret Sea Classic Stampin' Pad [ 165285 ]")
![Petunia Pop Stampin’ Blends Combo Pack [ 163828 ]](https://assets1.tamsnetwork.com/images/EC042017NF/163828s.jpg "Petunia Pop Stampin’ Blends Combo Pack [ 163828 ]")
![Petal Pink Stampin' Blends Combo Pack [ 154893 ]](https://assets1.tamsnetwork.com/images/EC042017NF/154893s.jpg "Petal Pink Stampin' Blends Combo Pack [ 154893 ]")
![Bubble Bath Stampin’ Blends Combo Pack [ 161675 ]](https://assets1.tamsnetwork.com/images/EC042017NF/161675s.jpg "Bubble Bath Stampin’ Blends Combo Pack [ 161675 ]")
![Old Olive Stampin' Blends Combo Pack [ 154892 ]](https://assets1.tamsnetwork.com/images/EC042017NF/154892s.jpg "Old Olive Stampin' Blends Combo Pack [ 154892 ]")
![Multipurpose Liquid Glue [ 110755 ]](https://assets1.tamsnetwork.com/images/EC042017NF/110755s.jpg "Multipurpose Liquid Glue [ 110755 ]")
![Stampin' Dimensionals [ 104430 ]](https://assets1.tamsnetwork.com/images/EC042017NF/104430s.jpg "Stampin' Dimensionals [ 104430 ]")
![Basics Wow! Embossing Powder [ 165679 ]](https://assets1.tamsnetwork.com/images/EC042017NF/165679s.jpg "Basics Wow! Embossing Powder [ 165679 ]")
![Embossing Additions Tool Kit [ 159971 ]](https://assets1.tamsnetwork.com/images/EC042017NF/159971s.jpg "Embossing Additions Tool Kit [ 159971 ]")
![Heat Tool (Us And Canada) [ 129053 ]](https://assets1.tamsnetwork.com/images/EC042017NF/129053s.jpg "Heat Tool (Us And Canada) [ 129053 ]")
Want to make even more of these cards? Here is a list of the cardstock, DSP and embellishment pieces you will receive in your kit:
![Basic White 8 1/2" X 11" Thick Cardstock [ 159229 ]](https://assets1.tamsnetwork.com/images/EC042017NF/159229s.jpg "Basic White 8 1/2\" X 11\" Thick Cardstock [ 159229 ]")
![Basic White 8 1/2" X 11" Cardstock [ 166780 ]](https://assets1.tamsnetwork.com/images/EC042017NF/166780s.jpg "Basic White 8 1/2\" X 11\" Cardstock [ 166780 ]")
![Basic Gray 8-1/2" X 11" Cardstock [ 121044 ]](https://assets1.tamsnetwork.com/images/EC042017NF/121044s.jpg "Basic Gray 8-1/2\" X 11\" Cardstock [ 121044 ]")
![Bubble Bath 8 1/2" X 11" Cardstock [ 161718 ]](https://assets1.tamsnetwork.com/images/EC042017NF/161718s.jpg "Bubble Bath 8 1/2\" X 11\" Cardstock [ 161718 ]")
![Secret Sea 8 1/2" X 11" Cardstock [ 165624 ]](https://assets1.tamsnetwork.com/images/EC042017NF/165624s.jpg "Secret Sea 8 1/2\" X 11\" Cardstock [ 165624 ]")
![Petunia Pop 8 1/2" X 11" Cardstock [ 163801 ]](https://assets1.tamsnetwork.com/images/EC042017NF/163801s.jpg "Petunia Pop 8 1/2\" X 11\" Cardstock [ 163801 ]")
![Stylish Shapes Dies [ 159183 ]](https://assets1.tamsnetwork.com/images/EC042017NF/159183s.jpg "Stylish Shapes Dies [ 159183 ]")
![Dotted Circles 3 D Embossing Folder [ 163789 ]](https://assets1.tamsnetwork.com/images/EC042017NF/163789s.jpg "Dotted Circles 3 D Embossing Folder [ 163789 ]")
![Glass & Gardens Embossing Folders [ 165597 ]](https://assets1.tamsnetwork.com/images/EC042017NF/165597s.jpg "Glass & Gardens Embossing Folders [ 165597 ]")
![Mini Corrugated 3 D Embossing Folder [ 165559 ]](https://assets1.tamsnetwork.com/images/EC042017NF/165559s.jpg "Mini Corrugated 3 D Embossing Folder [ 165559 ]")
![Everyday Arches Dies [ 164629 ]](https://assets1.tamsnetwork.com/images/EC042017NF/164629s.jpg "Everyday Arches Dies [ 164629 ]")
![Petunia Pop 1/4" (6.4 Mm) Iridescent Ribbon [ 166203 ]](https://assets1.tamsnetwork.com/images/EC042017NF/166203s.jpg "Petunia Pop 1/4\" (6.4 Mm) Iridescent Ribbon [ 166203 ]")
![Charming Shimmer Faceted Dots [ 166139 ]](https://assets1.tamsnetwork.com/images/EC042017NF/166139s.jpg "Charming Shimmer Faceted Dots [ 166139 ]")
![Mini Stampin' Cut & Emboss Machine [ 150673 ]](https://assets1.tamsnetwork.com/images/EC042017NF/150673s.jpg "Mini Stampin' Cut & Emboss Machine [ 150673 ]")
![Basic White Medium Envelopes [ 159236 ]](https://assets1.tamsnetwork.com/images/EC042017NF/159236s.jpg "Basic White Medium Envelopes [ 159236 ]")
Check Out July’s Online Exclusives!
The Not 29 Anymore stamp set is just one of many fabulous new July Online Exclusives! You’ll also find:
- Fresh holiday kits
- Gorgeous DSP and embellishments
- And limited-time bundles – only available while supplies last!
✨ See it all here:
👉 https://www.stampinup.ca/categories/whats-new/new-arrivals?demoid=2189587
💖 Why You’ll Love This Class
- Laugh-out-loud humour: Perfect for friends and family who love a bit of sass with their birthday wishes.
- Great for “older” recipients: These sentiments are especially hilarious for anyone who’s gracefully aged past 29 (or at least pretends they haven’t!).
- No stamping experience required: The mix-and-match ephemera does the heavy lifting — just assemble and enjoy.
- Fun embellishments: From iridescent ribbon to shimmer dots, these details add sparkle and joy to every design.
- Easy-to-follow format: Whether you’re watching the replay or using the PDF, you’ll have everything you need to create four fantastic cards at your own pace.
Want to stamp with me some more?
Join my August Card Class to learn new techniques and create beautiful projects. Spots are limited, so reserve yours today!


- Save 20%+ on your orders (including the virtual album and the suite sale items!!)
- Get free access to my monthly card class tutorials.
- Enjoy our monthly team meetings with stamping fun and collaboration.

Click here to shop my online store.
Click here to access & view the current catalogs.
Click here to subscribe to those fun Paper Pumpkin kits of creativity!
Click here for more information about joining my Online Monthly Technique Club. Earn even more goodies by joining a club!
Click here to learn more about joining my Ink Pad Pals Team. Get the MOST rewards including a discount on future products!
Follow me on social media! I share regularly on Pinterest, YouTube, and Facebook!
Please subscribe to my newsletter, too! Click here and enter your email. When you include your birthday you will even be added to my birthday card mailing list 🙂


![Strawberry Slush 8 1/2" X 11" Cardstock [ 165625 ]](https://assets1.tamsnetwork.com/images/EC042017NF/165625s.jpg "Strawberry Slush 8 1/2\" X 11\" Cardstock [ 165625 ]")
![Celebratory Sips 12" X 12" (30.5 X 30.5 Cm) Designer Series Paper [ 165586 ]](https://assets1.tamsnetwork.com/images/EC042017NF/165586s.jpg "Celebratory Sips 12\" X 12\" (30.5 X 30.5 Cm) Designer Series Paper [ 165586 ]")
![Blackberry Bliss Classic Stampin' Pad [ 147092 ]](https://assets1.tamsnetwork.com/images/EC042017NF/147092s.jpg "Blackberry Bliss Classic Stampin' Pad [ 147092 ]")
![Strawberry Slush Classic Stampin' Pad [ 165286 ]](https://assets1.tamsnetwork.com/images/EC042017NF/165286s.jpg "Strawberry Slush Classic Stampin' Pad [ 165286 ]")
![Textured Notes Dies [ 165555 ]](https://assets1.tamsnetwork.com/images/EC042017NF/165555s.jpg "Textured Notes Dies [ 165555 ]")
![Gold Striped 3/8" (1 Cm) Mesh Ribbon [ 165599 ]](https://assets1.tamsnetwork.com/images/EC042017NF/165599s.jpg "Gold Striped 3/8\" (1 Cm) Mesh Ribbon [ 165599 ]")
![Holographic Resin Dots [ 165598 ]](https://assets1.tamsnetwork.com/images/EC042017NF/165598s.jpg "Holographic Resin Dots [ 165598 ]")


![Long Time No See Photopolymer Stamp Set (English) [ 166189 ]](https://assets1.tamsnetwork.com/images/EC042017NF/166189s.jpg "Long Time No See Photopolymer Stamp Set (English) [ 166189 ]")
![Tuxedo Black Memento Ink Pad [ 132708 ]](https://assets1.tamsnetwork.com/images/EC042017NF/132708s.jpg "Tuxedo Black Memento Ink Pad [ 132708 ]")
![Early Espresso Classic Stampin' Pad [ 147114 ]](https://assets1.tamsnetwork.com/images/EC042017NF/147114s.jpg "Early Espresso Classic Stampin' Pad [ 147114 ]")
![Misty Moonlight Classic Stampin' Pad [ 153118 ]](https://assets1.tamsnetwork.com/images/EC042017NF/153118s.jpg "Misty Moonlight Classic Stampin' Pad [ 153118 ]")
![Granny Apple Green Stampin' Pad [ 147095 ]](https://assets1.tamsnetwork.com/images/EC042017NF/147095s.jpg "Granny Apple Green Stampin' Pad [ 147095 ]")
![Flirty Flamingo Classic Stampin' Pad [ 147052 ]](https://assets1.tamsnetwork.com/images/EC042017NF/147052s.jpg "Flirty Flamingo Classic Stampin' Pad [ 147052 ]")
![Shaded Spruce Classic Stampin' Pad [ 147088 ]](https://assets1.tamsnetwork.com/images/EC042017NF/147088s.jpg "Shaded Spruce Classic Stampin' Pad [ 147088 ]")
![Strawberry Slush Stampin’ Blends Combo Pack [ 165290 ]](https://assets1.tamsnetwork.com/images/EC042017NF/165290s.jpg "Strawberry Slush Stampin’ Blends Combo Pack [ 165290 ]")
![Pretty In Pink Stampin’ Blends Combo Pack [ 163824 ]](https://assets1.tamsnetwork.com/images/EC042017NF/163824s.jpg "Pretty In Pink Stampin’ Blends Combo Pack [ 163824 ]")
![Pool Party Stampin' Blends Combo Pack [ 154894 ]](https://assets1.tamsnetwork.com/images/EC042017NF/154894s.jpg "Pool Party Stampin' Blends Combo Pack [ 154894 ]")
![Granny Apple Green Stampin' Blends Combo Pack [ 154885 ]](https://assets1.tamsnetwork.com/images/EC042017NF/154885s.jpg "Granny Apple Green Stampin' Blends Combo Pack [ 154885 ]")
![Shaded Spruce Stampin' Blends Combo Pack [ 154903 ]](https://assets1.tamsnetwork.com/images/EC042017NF/154903s.jpg "Shaded Spruce Stampin' Blends Combo Pack [ 154903 ]")
![Crumb Cake Stampin' Blends Combo Pack [ 154882 ]](https://assets1.tamsnetwork.com/images/EC042017NF/154882s.jpg "Crumb Cake Stampin' Blends Combo Pack [ 154882 ]")
![Granny Apple Green 8-1/2" X 11" Cardstock [ 146990 ]](https://assets1.tamsnetwork.com/images/EC042017NF/146990s.jpg "Granny Apple Green 8-1/2\" X 11\" Cardstock [ 146990 ]")
![Coastal Cabana 8-1/2" X 11" Cardstock [ 131297 ]](https://assets1.tamsnetwork.com/images/EC042017NF/131297s.jpg "Coastal Cabana 8-1/2\" X 11\" Cardstock [ 131297 ]")
![Real Red 8-1/2" X 11" Cardstock [ 102482 ]](https://assets1.tamsnetwork.com/images/EC042017NF/102482s.jpg "Real Red 8-1/2\" X 11\" Cardstock [ 102482 ]")
![Country Woods 12" X 12" (30.5 X 30.5 Cm) Designer Series Paper [ 163393 ]](https://assets1.tamsnetwork.com/images/EC042017NF/163393s.jpg "Country Woods 12\" X 12\" (30.5 X 30.5 Cm) Designer Series Paper [ 163393 ]")
![Take A Bow 6" X 6" (15.2 X 15.2 Cm) Designer Series Paper [ 164309 ]](https://assets1.tamsnetwork.com/images/EC042017NF/164309s.jpg "Take A Bow 6\" X 6\" (15.2 X 15.2 Cm) Designer Series Paper [ 164309 ]")
![White 1/4" (6.4 Mm) Ribbon [ 165562 ]](https://assets1.tamsnetwork.com/images/EC042017NF/165562s.jpg "White 1/4\" (6.4 Mm) Ribbon [ 165562 ]")
![Adhesive Backed Textured Dots [ 163338 ]](https://assets1.tamsnetwork.com/images/EC042017NF/163338s.jpg "Adhesive Backed Textured Dots [ 163338 ]")

![Summer Splash 8 1/2" X 11 Cardstock [ 163797 ]](https://assets1.tamsnetwork.com/images/EC042017NF/163797s.jpg "Summer Splash 8 1/2\" X 11 Cardstock [ 163797 ]")
![Florals In Bloom 12" X 12" (30.5 X 30.5 Cm) Designer Series Paper [ 165175 ]](https://assets1.tamsnetwork.com/images/EC042017NF/165175s.jpg "Florals In Bloom 12\" X 12\" (30.5 X 30.5 Cm) Designer Series Paper [ 165175 ]")
![2025–2027 In Color™ Flat Pearls [ 165192 ]](https://assets1.tamsnetwork.com/images/EC042017NF/165192s.jpg "2025–2027 In Color™ Flat Pearls [ 165192 ]")
![So Sentimental Bundle (English) [ 153828 ]](https://assets1.tamsnetwork.com/images/EC042017NF/153828s.jpg "So Sentimental Bundle (English) [ 153828 ]")


![Fluid 100 Watercolor Paper [ 149612 ]](https://assets1.tamsnetwork.com/images/EC042017NF/149612s.jpg "Fluid 100 Watercolor Paper [ 149612 ]")
![Cheers & Sips Bundle (English) [ 165594 ]](https://assets1.tamsnetwork.com/images/EC042017NF/165594s.jpg "Cheers & Sips Bundle (English) [ 165594 ]")
![Calypso Coral Classic Stampin' Pad [ 147101 ]](https://assets1.tamsnetwork.com/images/EC042017NF/147101s.jpg "Calypso Coral Classic Stampin' Pad [ 147101 ]")
![Old Olive Classic Stampin' Pad [ 147090 ]](https://assets1.tamsnetwork.com/images/EC042017NF/147090s.jpg "Old Olive Classic Stampin' Pad [ 147090 ]")
![Timid Tiger Classic Stampin' Ink Refill [ 165283 ]](https://assets1.tamsnetwork.com/images/EC042017NF/165283s.jpg "Timid Tiger Classic Stampin' Ink Refill [ 165283 ]")
![Strawberry Slush Classic Stampin' Ink Refill [ 165282 ]](https://assets1.tamsnetwork.com/images/EC042017NF/165282s.jpg "Strawberry Slush Classic Stampin' Ink Refill [ 165282 ]")
![Lemon Lime Twist Classic Stampin' Ink Refill [ 144092 ]](https://assets1.tamsnetwork.com/images/EC042017NF/144092s.jpg "Lemon Lime Twist Classic Stampin' Ink Refill [ 144092 ]")
![Peach Pie Stampin’ Blends Combo Pack [ 163827 ]](https://assets1.tamsnetwork.com/images/EC042017NF/163827s.jpg "Peach Pie Stampin’ Blends Combo Pack [ 163827 ]")
![Timid Tiger Stampin’ Blends Combo Pack [ 165291 ]](https://assets1.tamsnetwork.com/images/EC042017NF/165291s.jpg "Timid Tiger Stampin’ Blends Combo Pack [ 165291 ]")
![Stampin' Cut & Emboss Machine [ 149653 ]](https://assets1.tamsnetwork.com/images/EC042017NF/149653s.jpg "Stampin' Cut & Emboss Machine [ 149653 ]")


![Jar Of Joy Photopolymer Stamp Set (English) [ 166176 ]](https://assets1.tamsnetwork.com/images/EC042017NF/166176s.jpg "Jar Of Joy Photopolymer Stamp Set (English) [ 166176 ]")
![Sweet Jar Builder Punch [ 165506 ]](https://assets1.tamsnetwork.com/images/EC042017NF/165506s.jpg "Sweet Jar Builder Punch [ 165506 ]")
![Real Red Classic Stampin' Pad [ 147084 ]](https://assets1.tamsnetwork.com/images/EC042017NF/147084s.jpg "Real Red Classic Stampin' Pad [ 147084 ]")
![Pool Party Classic Stampin' Pad [ 147107 ]](https://assets1.tamsnetwork.com/images/EC042017NF/147107s.jpg "Pool Party Classic Stampin' Pad [ 147107 ]")
![Pecan Pie Classic Stampin' Pad [ 161665 ]](https://assets1.tamsnetwork.com/images/EC042017NF/161665s.jpg "Pecan Pie Classic Stampin' Pad [ 161665 ]")
![Simply Shammy [ 147042 ]](https://assets1.tamsnetwork.com/images/EC042017NF/147042s.jpg "Simply Shammy [ 147042 ]")
![Paper Snips [ 103579 ]](https://assets1.tamsnetwork.com/images/EC042017NF/103579s.jpg "Paper Snips [ 103579 ]")
![Pearlized Enamel Effects Basics [ 156310 ]](https://assets1.tamsnetwork.com/images/EC042017NF/156310s.jpg "Pearlized Enamel Effects Basics [ 156310 ]")
![Pool Party 8-1/2" X 11" Cardstock [ 122924 ]](https://assets1.tamsnetwork.com/images/EC042017NF/122924s.jpg "Pool Party 8-1/2\" X 11\" Cardstock [ 122924 ]")
![Gray Granite 8-1/2" X 11" Cardstock [ 146983 ]](https://assets1.tamsnetwork.com/images/EC042017NF/146983s.jpg "Gray Granite 8-1/2\" X 11\" Cardstock [ 146983 ]")
![Nests Of Winter 12" X 12" (30.5 X 30.5 Cm) Designer Series Paper [ 164183 ]](https://assets1.tamsnetwork.com/images/EC042017NF/164183s.jpg "Nests Of Winter 12\" X 12\" (30.5 X 30.5 Cm) Designer Series Paper [ 164183 ]")
![Silver 12" X 12" (30.5 X 30.5 Cm) Foil Sheets [ 163387 ]](https://assets1.tamsnetwork.com/images/EC042017NF/163387s.jpg "Silver 12\" X 12\" (30.5 X 30.5 Cm) Foil Sheets [ 163387 ]")
![Real Red & White Baker's Twine [ 164051 ]](https://assets1.tamsnetwork.com/images/EC042017NF/164051s.jpg "Real Red & White Baker's Twine [ 164051 ]")
![Real Red & White Adhesive Backed Peppermints [ 164050 ]](https://assets1.tamsnetwork.com/images/EC042017NF/164050s.jpg "Real Red & White Adhesive Backed Peppermints [ 164050 ]")
![Forever Plaid 3 D Embossing Folder [ 164049 ]](https://assets1.tamsnetwork.com/images/EC042017NF/164049s.jpg "Forever Plaid 3 D Embossing Folder [ 164049 ]")
![Lost Lagoon 8-1/2" X 11" Cardstock [ 133679 ]](https://assets1.tamsnetwork.com/images/EC042017NF/133679s.jpg "Lost Lagoon 8-1/2\" X 11\" Cardstock [ 133679 ]")
![2025–2027 In Color™ 6" X 6" (15.2 X 15.2 Cm) Designer Series Paper [ 165300 ]](https://assets1.tamsnetwork.com/images/EC042017NF/165300s.jpg "2025–2027 In Color™ 6\" X 6\" (15.2 X 15.2 Cm) Designer Series Paper [ 165300 ]")
![Wildly Happy Cling Stamp Set [ 149408 ]](https://assets1.tamsnetwork.com/images/EC042017NF/149408s.jpg "Wildly Happy Cling Stamp Set [ 149408 ]")
![Basic Gray Classic Stampin' Pad [ 149165 ]](https://assets1.tamsnetwork.com/images/EC042017NF/149165s.jpg "Basic Gray Classic Stampin' Pad [ 149165 ]")
![Lost Lagoon Classic Stampin' Pad [ 161678 ]](https://assets1.tamsnetwork.com/images/EC042017NF/161678s.jpg "Lost Lagoon Classic Stampin' Pad [ 161678 ]")
![Smoky Slate Stampin' Blends Combo Pack [ 154904 ]](https://assets1.tamsnetwork.com/images/EC042017NF/154904s.jpg "Smoky Slate Stampin' Blends Combo Pack [ 154904 ]")
![Strawberry Slush & Pretty In Pink Gems [ 165615 ]](https://assets1.tamsnetwork.com/images/EC042017NF/165615s.jpg "Strawberry Slush & Pretty In Pink Gems [ 165615 ]")


![Encircled With Love Photopolymer Stamp Set (English) [ 165338 ]](https://assets1.tamsnetwork.com/images/EC042017NF/165338s.jpg "Encircled With Love Photopolymer Stamp Set (English) [ 165338 ]")
![Timid Tiger Classic Stampin' Pad [ 165278 ]](https://assets1.tamsnetwork.com/images/EC042017NF/165278s.jpg "Timid Tiger Classic Stampin' Pad [ 165278 ]")
![Petal Pink 3/8” (1 Cm) Scalloped Ribbon [ 164680 ]](https://assets1.tamsnetwork.com/images/EC042017NF/164680s.jpg "Petal Pink 3/8” (1 Cm) Scalloped Ribbon [ 164680 ]")
![2 3/8" (6 Cm) Circle Punch [ 161354 ]](https://assets1.tamsnetwork.com/images/EC042017NF/161354s.jpg "2 3/8\" (6 Cm) Circle Punch [ 161354 ]")


![Berry Burst 8-1/2" X 11" Cardstock [ 144243 ]](https://assets1.tamsnetwork.com/images/EC042017NF/144243s.jpg "Berry Burst 8-1/2\" X 11\" Cardstock [ 144243 ]")
![Timid Tiger 8 1/2" X 11" Cardstock [ 165626 ]](https://assets1.tamsnetwork.com/images/EC042017NF/165626s.jpg "Timid Tiger 8 1/2\" X 11\" Cardstock [ 165626 ]")
![Darling Duckling 8 1/2" X 11" Cardstock [ 165622 ]](https://assets1.tamsnetwork.com/images/EC042017NF/165622s.jpg "Darling Duckling 8 1/2\" X 11\" Cardstock [ 165622 ]")
![Boho Vibes Suite Collection (English) [ 165156 ]](https://assets1.tamsnetwork.com/images/EC042017NF/165156s.jpg "Boho Vibes Suite Collection (English) [ 165156 ]")
![Adhesive Sheets [ 152334 ]](https://assets1.tamsnetwork.com/images/EC042017NF/152334s.jpg "Adhesive Sheets [ 152334 ]")


![Cloud Cover 8 1/2" X 11" Cardstock [ 165621 ]](https://assets1.tamsnetwork.com/images/EC042017NF/165621s.jpg "Cloud Cover 8 1/2\" X 11\" Cardstock [ 165621 ]")
![Level Complete Cling Stamp Set (English) [ 161563 ]](https://assets1.tamsnetwork.com/images/EC042017NF/161563s.jpg "Level Complete Cling Stamp Set (English) [ 161563 ]")
![Cloud Cover Classic Stampin' Ink Refill [ 165279 ]](https://assets1.tamsnetwork.com/images/EC042017NF/165279s.jpg "Cloud Cover Classic Stampin' Ink Refill [ 165279 ]")
![Uninked Stampin' Spots [ 141822 ]](https://assets1.tamsnetwork.com/images/EC042017NF/141822s.jpg "Uninked Stampin' Spots [ 141822 ]")
![Cloud Cover Stampin’ Blends Combo Pack [ 165287 ]](https://assets1.tamsnetwork.com/images/EC042017NF/165287s.jpg "Cloud Cover Stampin’ Blends Combo Pack [ 165287 ]")
![Poppy Parade Stampin' Blends Combo Pack [ 154958 ]](https://assets1.tamsnetwork.com/images/EC042017NF/154958s.jpg "Poppy Parade Stampin' Blends Combo Pack [ 154958 ]")
![Azure Afternoon Stampin’ Blends Combo Pack [ 161672 ]](https://assets1.tamsnetwork.com/images/EC042017NF/161672s.jpg "Azure Afternoon Stampin’ Blends Combo Pack [ 161672 ]")
![Daffodil Delight Stampin' Blends Combo Pack [ 154883 ]](https://assets1.tamsnetwork.com/images/EC042017NF/154883s.jpg "Daffodil Delight Stampin' Blends Combo Pack [ 154883 ]")
![Spotlight On Nature Dies [ 163580 ]](https://assets1.tamsnetwork.com/images/EC042017NF/163580s.jpg "Spotlight On Nature Dies [ 163580 ]")
