


Hello, stamping friends! I’m thrilled to join you for another exciting Coast to Coast Creators Blog Hop. This hop consistently takes place on the 14th of every month, making it a regular date for creativity and inspiration. This month, the theme is all about a sketch challenge that inspires us to think outside the box and create something uniquely our own.
If you’re new here, welcome to Stampin With Leah! I’m Leah, an avid Stampin’ Up! demonstrator passionate about bringing creativity and inspiration to your crafting journey. Let’s jump into the details of this month’s project and explore how you can interpret a sketch to design stunning cards.
Working with the Sketch
Sketch challenges are a fantastic way to kickstart your creativity. They provide a layout framework while allowing endless customization to suit your style. For this hop, I used the provided sketch to guide my design process, blending clean lines, subtle colors, and a touch of sparkle to bring the layout to life.

Here’s how I brought the design to life:
Materials:
- Cardstock: Basic White and Thick Basic White
- Ink Pads: Balmy Blue, Blueberry Bushel, Boho Blue
- Stamps and Dies: Snowflake image, sentiment, and dies from the Iconic Imagery Bundle
- Stylish Shapes Dies: Smallest square for stitched diamonds
- Adhesive: Stampin’ Dimensionals and Multipurpose Liquid Glue
- Embellishments: Rhinestone Basic Jewels
Instructions:
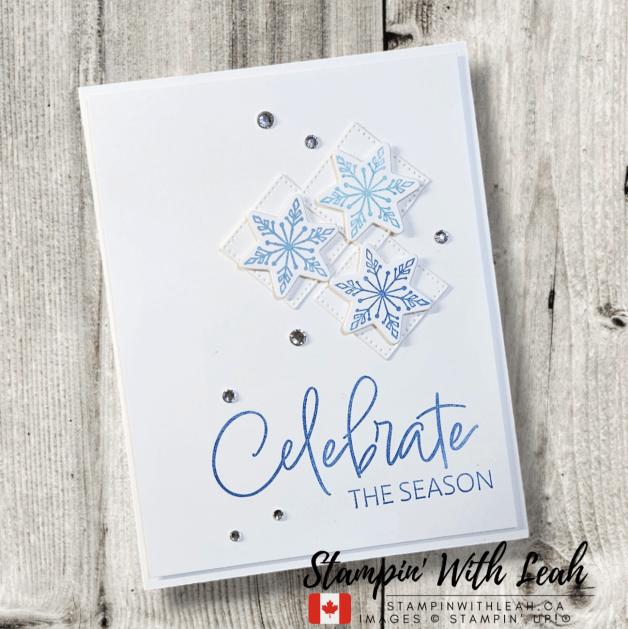
Base Layer: Start with an A2 card base (5-1/2” x 8-1/2”, scored at 4-1/4”) in Thick Basic White and a 4″ x 5-1/4″ layer to create on.
Focal Elements: Die-cut three stitched diamond shapes from Basic White cardstock using the smallest square die from the Stylish Shapes Dies. Stamp snowflake designs one in Balmy Blue, one in Blueberry Bushel, and one in Boho Blue. Die cut the images and attach to the squares using Dimensionals for added depth. Arrange the diamonds in a cluster at the center of the 4″ X 5-1/4″ Basic White layer, adhering with Liquid Glue.
Sentiment: Stamp the “Celebrate the Season” sentiment in Blueberry Bushel directly onto the card front, slightly offset below the snowflake cluster to follow the sketch’s layout. Once all the stamping is done, use Dimensionals to adhere the layer tot he card base.
Finishing Touches: Add Rhinestone Basic Jewels around the snowflakes and sentiment for a touch of sparkle and elegance.
Tips for Success
- Keep It Clean: A clean design lets the sketch shine while emphasizing the stamped details.
- Play with Placement: Arrange your elements to create balance and harmony within the sketch framework.
- Add Subtle Sparkle: Rhinestones are perfect for adding a festive touch without overpowering the design.
Explore More Creations
Don’t stop here! Be sure to check out the other talented creators participating in the Coast to Coast Blog Hop. Each crafter has put their own spin on this month’s sketch, and you’re bound to find endless inspiration.
Join the Fun!
I hope this project inspires you to take on a sketch challenge and create something beautiful. Leave a comment below to share how you’re using sketches to inspire your crafting—I’d love to see your creations!
And don’t forget to subscribe to my newsletter for the latest updates on classes, promotions, and exclusive tutorials.
Here is a full list of supplies needed to create this card.
") | ") |  |  | |
 |  |  |  | |
 |  |


A perk to ordering with me in the month of December is that with any order over $65cdn, I am emailing out an amazing 29 project Tutorial Bundle. Just use the host code below. As a member of my team you get free access to this Tutorial Bundle.


To make sure you learn about all my upcoming events and don’t miss any sales join my newsletter or check out everything at linktr.ee/stampinwithleah.
Live in Canada, don’t have a demonstrator? Contact me to get a catalogue or find out why right now is a great time to join my team.
You can see all the benefits of joining my team (the Ink Pad Pals) by clicking the image below.

Thanks for hopping by! Make sure to pin this post for future reference and share it with your crafty friends.

Click here to shop my online store.
Click here to access & view the current catalogs.
Click here to subscribe to Thanks for hopping by! Make sure to pin this post for future reference and share it with your crafty friends.those fun Paper Pumpkin kits of creativity!
Click here for more information about joining my Online Monthly Technique Club. Earn even more goodies by joining a club!
Click here to learn more about joining my Ink Pad Pals Team. Get the MOST rewards including a discount on future products!
Follow me on social media! I share regularly on Pinterest, YouTube, and Facebook!
Please subscribe to my newsletter, too! Click here and enter your email. When you include your birthday you will even be added to my birthday card mailing list 🙂


